Friktionsnav, axelkopplingar, spärrhjul, spärrhakar, frinav-backspärr
Friktionsnav, axelkopplingar, spärrhjul, spärrhakar, frinav-backspärr
Friktionsnav, axelkopplingar, spärrhjul, spärrhakar, frinav-backspärr

You also want an ePaper? Increase the reach of your titles
YUMPU automatically turns print PDFs into web optimized ePapers that Google loves.
C<br />
42<br />
BACKSPÄRR - FRINAV<br />
BACKSTOP CAM CLUTCHES<br />
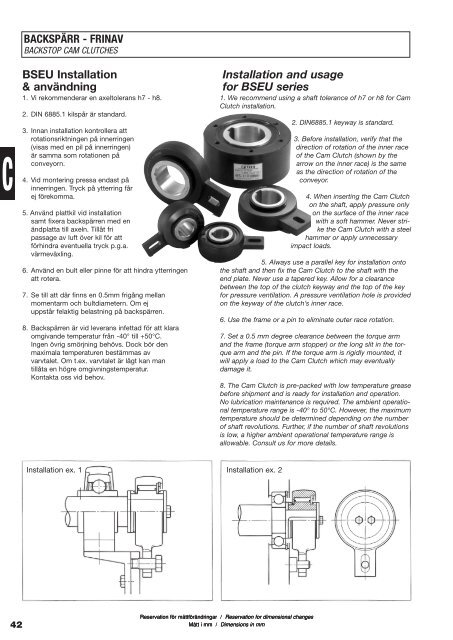
BSEU Installation Installation and usage<br />
& användning for BSEU series<br />
1. Vi rekommenderar en axeltolerans h7 - h8.<br />
2. DIN 6885.1 kilspår är standard.<br />
3. Innan installation kontrollera att<br />
rotationsriktningen på innerringen<br />
(visas med en pil på innerringen)<br />
är samma som rotationen på<br />
conveyorn.<br />
4. Vid montering pressa endast på<br />
innerringen. Tryck på ytterring får<br />
ej förekomma.<br />
5. Använd plattkil vid installation<br />
samt fixera <strong>backspärr</strong>en med en<br />
ändplatta till axeln. Tillåt fri<br />
passage av luft över kil för att<br />
förhindra eventuella tryck p.g.a.<br />
värmeväxling.<br />
6. Använd en bult eller pinne för att hindra ytterringen<br />
att rotera.<br />
7. Se till att där finns en 0.5mm frigång mellan<br />
momentarm och bultdiametern. Om ej<br />
uppstår felaktig belastning på <strong>backspärr</strong>en.<br />
8. Backspärren är vid leverans infettad för att klara<br />
omgivande temperatur från -40° till +50°C.<br />
Ingen övrig smörjning behövs. Dock bör den<br />
maximala temperaturen bestämmas av<br />
varvtalet. Om t.ex. varvtalet är lågt kan man<br />
tillåta en högre omgivningstemperatur.<br />
Kontakta oss vid behov.<br />
Installation ex. 1 Installation ex. 2<br />
1. We recommend using a shaft tolerance of h7 or h8 for Cam<br />
Clutch installation.<br />
Reservation Reservation för måttförändringar måttförändringar måttförändringar / / / Reservation Reservation for for dimensional dimensional changes changes changes<br />
Mått i mm / Dimensions in mm<br />
2. DIN6885.1 keyway is standard.<br />
3. Before installation, verify that the<br />
direction of rotation of the inner race<br />
of the Cam Clutch (shown by the<br />
arrow on the inner race) is the same<br />
as the direction of rotation of the<br />
conveyor.<br />
4. When inserting the Cam Clutch<br />
on the shaft, apply pressure only<br />
on the surface of the inner race<br />
with a soft hammer. Never strike<br />
the Cam Clutch with a steel<br />
hammer or apply unnecessary<br />
impact loads.<br />
5. Always use a parallel key for installation onto<br />
the shaft and then fix the Cam Clutch to the shaft with the<br />
end plate. Never use a tapered key. Allow for a clearance<br />
between the top of the clutch keyway and the top of the key<br />
for pressure ventilation. A pressure ventilation hole is provided<br />
on the keyway of the clutch’s inner race.<br />
6. Use the frame or a pin to eliminate outer race rotation.<br />
7. Set a 0.5 mm degree clearance between the torque arm<br />
and the frame (torque arm stopper) or the long slit in the torque<br />
arm and the pin. If the torque arm is rigidly mounted, it<br />
will apply a load to the Cam Clutch which may eventually<br />
damage it.<br />
8. The Cam Clutch is pre-packed with low temperature grease<br />
before shipment and is ready for installation and operation.<br />
No lubrication maintenance is required. The ambient operational<br />
temperature range is -40° to 50°C. However, the maximum<br />
temperature should be determined depending on the number<br />
of shaft revolutions. Further, if the number of shaft revolutions<br />
is low, a higher ambient operational temperature range is<br />
allowable. Consult us for more details.