Challenger Lifts, Inc. - Flamingo Shop Serv
Challenger Lifts, Inc. - Flamingo Shop Serv
Challenger Lifts, Inc. - Flamingo Shop Serv

You also want an ePaper? Increase the reach of your titles
YUMPU automatically turns print PDFs into web optimized ePapers that Google loves.
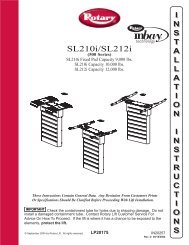
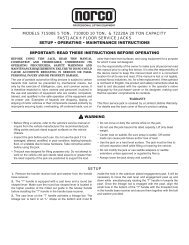
Maintenance<br />
Models 27000 & 31000<br />
Installation, Operation and Maintenance<br />
The following maintenance points are suggested as the basis of a preventive maintenance program.<br />
The actual maintenance program should be tailored to the installation.<br />
Daily<br />
Inspect the lift for loose anchor bolts (If loose tighten to 80 ft-lbs), fluid leaks, and loose connections.<br />
All anchor bolts should take full torque<br />
Weekly<br />
Check fluid level in power pack reservoir.<br />
Check for lock release activation.<br />
Monthly<br />
Check synchronizer cables or chains for wear and tension, adjust if necessary.<br />
Lubricate cable sheaves or chain sprockets with light oil to reduce drag.<br />
Lubricate synchronizing chain with light oil to reduce drag.<br />
Lubricate carriage slide tracks with heavy viscous grease.<br />
Appendix A<br />
Hydraulic Fitting Assembly<br />
Hydraulic line sets are prefabricated to allow easy assembly in the field. Follow the steps outlined<br />
below for reliable, leak-free joint:<br />
1. Remove any shipping plugs or caps, insuring that no remnants of the plugs or caps remain in<br />
the tube.<br />
2. Lubricate the threads and seat of the fitting with hydraulic oil or a compatible lubricant. Do<br />
not use pipe dope or Teflon tape on these fittings.<br />
3. Align the tubing joints so that the tubing and sleeve assemblies can be inserted easily into the<br />
fitting.<br />
4. Insert the tubing and sleeve assemblies into the fitting and start the fitting nut by hand.<br />
CAUTION: If the fitting nut cannot be started by hand, the joint is not aligned properly.<br />
Attempting to start a misaligned fitting with a wrench is likely to damage the fitting<br />
and result in a leaking joint.<br />
5. Tighten the fitting nut until the force required to turn it rises sharply.<br />
6. Tighten the fitting nut 1/4 turn past the point noted in the previous step. Only if the joint leaks<br />
in operation should the joint be tightened further.<br />
CAUTION: Do not over tighten the hydraulic fittings.<br />
P/N 31345 7 Rev. 4/15/98