
You also want an ePaper? Increase the reach of your titles
YUMPU automatically turns print PDFs into web optimized ePapers that Google loves.
How to install brake<br />
scoops in a 944<br />
By Steve Vetter<br />
for der Vorgänger<br />
Brake cooling<br />
duct kit<br />
The brake cooling duct<br />
kit N.E.R.P. LLC (www.<br />
nerp.biz) is available online<br />
through various retails<br />
such as Pelican Parts,<br />
Paragon Products and<br />
Tarett Engineering. Kits<br />
are available for 911s,<br />
944s Mini Coopers and<br />
some BMW models.<br />
DIY<br />
Working on your car<br />
should be approached<br />
with all due caution and<br />
with safety foremost in<br />
mind.<br />
Share your own do-ityourself<br />
stories with dV<br />
readers by sending an<br />
email to dveditor<br />
@pcapotomac.org. A<br />
high-resolution photo will<br />
be necessary also.<br />
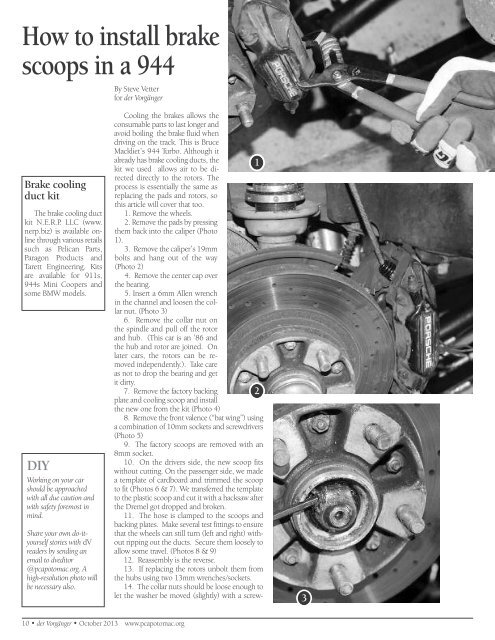
Cooling the brakes allows the<br />
consumable parts to last longer and<br />
avoid boiling the brake fluid when<br />
driving on the track. This is Bruce<br />
Mackliet’s 944 Turbo. Although it<br />
already has brake cooling ducts, the 1<br />
kit we used allows air to be directed<br />
directly to the rotors. The<br />
process is essentially the same as<br />
replacing the pads and rotors, so<br />
this article will cover that too.<br />
1. Remove the wheels.<br />
2. Remove the pads by pressing<br />
them back into the caliper (Photo<br />
1).<br />
3. Remove the caliper’s 19mm<br />
bolts and hang out <strong>of</strong> the way<br />
(Photo 2)<br />
4. Remove the center cap over<br />
the bearing.<br />
5. Insert a 6mm Allen wrench<br />
in the channel and loosen the collar<br />
nut. (Photo 3)<br />
6. Remove the collar nut on<br />
the spindle and pull <strong>of</strong>f the rotor<br />
and hub. (This car is an ’86 and<br />
the hub and rotor are joined. On<br />
later cars, the rotors can be removed<br />
independently.). Take care<br />
as not to drop the bearing and get<br />
it dirty.<br />
7. Remove the factory backing 2<br />
plate and cooling scoop and install<br />
the new one from the kit (Photo 4)<br />
8. Remove the front valence (“bat wing”) using<br />
a combination <strong>of</strong> 10mm sockets and screwdrivers<br />
(Photo 5)<br />
9. The factory scoops are removed with an<br />
8mm socket.<br />
10. On the drivers side, the new scoop fits<br />
without cutting. On the passenger side, we made<br />
a template <strong>of</strong> cardboard and trimmed the scoop<br />
to fit (Photos 6 & 7). We transferred the template<br />
to the plastic scoop and cut it with a hacksaw after<br />
the Dremel got dropped and broken.<br />
11. The hose is clamped to the scoops and<br />
backing plates. Make several test fittings to ensure<br />
that the wheels can still turn (left and right) without<br />
ripping out the ducts. Secure them loosely to<br />
allow some travel. (Photos 8 & 9)<br />
12. Reassembly is the reverse.<br />
13. If replacing the rotors unbolt them from<br />
the hubs using two 13mm wrenches/sockets.<br />
14. The collar nuts should be loose enough to<br />
let the washer be moved (slightly) with a screw-<br />
3<br />
10 • der Vorgänger • <strong>October</strong> 2013 www.pcapotomac.org