


Create successful ePaper yourself
Turn your PDF publications into a flip-book with our unique Google optimized e-Paper software.
<strong>PRX</strong>-<strong>3A</strong> Power for Receiver<br />
Using the <strong>PRX</strong> for the first time<br />
At this point we assume that you have read and absorbed the complete operating instructions,<br />
especially in respect of special notes, characteristics, voltage ranges and battery types.<br />
In the following section we assume that your system incorporates<br />
suitable batteries, and that they are fully charged.<br />
Error states are described in the later section.<br />
1. Select the appropriate battery type using the rotary switch on the <strong>PRX</strong>.<br />
2. Select the appropriate output voltage by setting the rotary switch on the <strong>PRX</strong><br />
(can also be changed when the unit is in use).<br />
3. Connect your battery (type as set) to the <strong>PRX</strong> (BAT), using the adapter lead<br />
supplied if necessary.<br />
4. Connect the output (RX) of the <strong>PRX</strong> to your receiver.<br />
5. Switch the <strong>PRX</strong> on (ON). Never connect or disconnect batteries unless the <strong>PRX</strong> is<br />
switched off (OFF).<br />
6. When the unit is switched on, the input LED flashes green in the sequence which indicates<br />
the code for the set battery type (BAT).<br />
2 x flashes: two-cell LiFe<br />
4 x flashes: two-cell LiPo<br />
5 x flashes: five-cell NiMH / NiCd<br />
6 x flashes: six-cell NiMH / NiCd or two-cell LiIon<br />
7. When the flashing sequence for the battery type is finished, the LED (BAT) glows a<br />
constant green - assuming that the battery in use is fully charged.<br />
8. If the LED (BAT) display a different flashing code from those described above,<br />
it is indicating a warning or an error.<br />
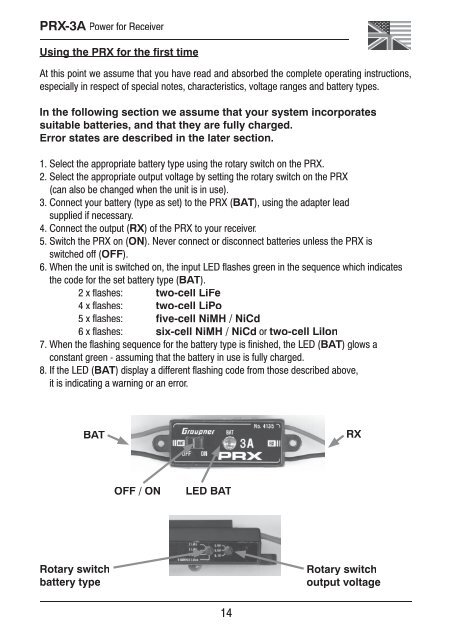
BAT<br />
RX<br />
OFF / ON<br />
LED BAT<br />
Rotary switch<br />
battery type<br />
Rotary switch<br />
output voltage<br />
14


