purefusion - Hair Magazine
purefusion - Hair Magazine
purefusion - Hair Magazine

You also want an ePaper? Increase the reach of your titles
YUMPU automatically turns print PDFs into web optimized ePapers that Google loves.
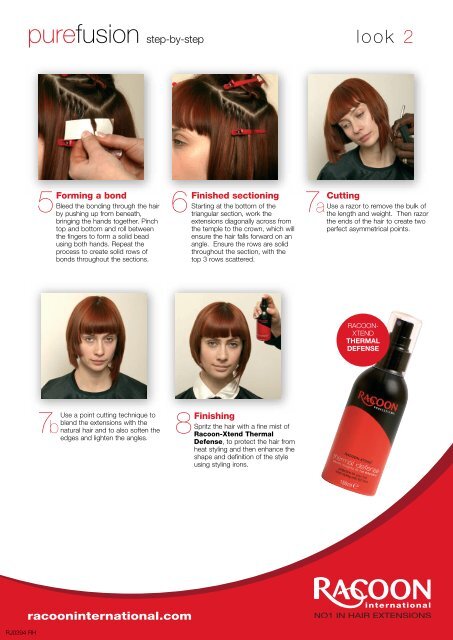
<strong>purefusion</strong> step-by-step look 2<br />
5<br />
Forming a bond<br />
6<br />
Finished sectioning<br />
Cutting<br />
Bleed the bonding through the hair Starting at the bottom of the<br />
7a<br />
by pushing up from beneath,<br />
bringing the hands together. Pinch<br />
top and bottom and roll between<br />
the fingers to form a solid bead<br />
using both hands. Repeat the<br />
process to create solid rows of<br />
bonds throughout the sections.<br />
triangular section, work the<br />
extensions diagonally across from<br />
the temple to the crown, which will<br />
ensure the hair falls forward on an<br />
angle. Ensure the rows are solid<br />
throughout the section, with the<br />
top 3 rows scattered.<br />
Use a razor to remove the bulk of<br />
the length and weight. Then razor<br />
the ends of the hair to create two<br />
perfect asymmetrical points.<br />
RACOON-<br />
XTEND<br />
THERMAL<br />
DEFENSE<br />
Use a point cutting technique to<br />
blend the extensions with the<br />
natural hair and to also soften the<br />
edges and lighten the angles.<br />
7b 8<br />
Finishing<br />
Spritz the hair with a fine mist of<br />
Racoon-Xtend Thermal<br />
Defense, to protect the hair from<br />
heat styling and then enhance the<br />
shape and definition of the style<br />
using styling irons.<br />
RJ0394 RH<br />
racooninternational.com


![[pdf] nominerede – dbca 2008 - Hair Magazine](https://img.yumpu.com/22144921/1/190x245/pdf-nominerede-dbca-2008-hair-magazine.jpg?quality=85)