Power Tour Guitar Instructions - Hasbro
Power Tour Guitar Instructions - Hasbro
Power Tour Guitar Instructions - Hasbro

You also want an ePaper? Increase the reach of your titles
YUMPU automatically turns print PDFs into web optimized ePapers that Google loves.
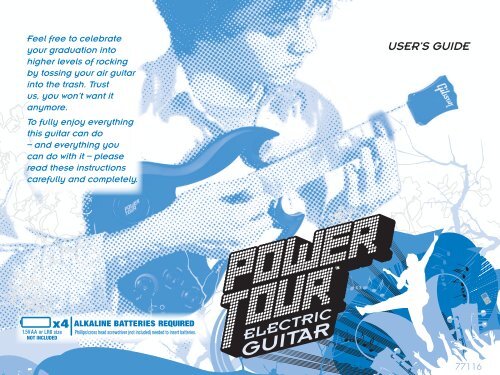
Thank you for purchasing the <strong>Power</strong> <strong>Tour</strong> Electric <strong>Guitar</strong>!<br />
Feel free to celebrate<br />
your graduation into<br />
higher levels of rocking<br />
by tossing your air guitar<br />
into the trash. Trust<br />
us, you won’t want it<br />
anymore.<br />
To fully enjoy everything<br />
this guitar can do<br />
– and everything you<br />
can do with it – please<br />
read these instructions<br />
carefully and completely.<br />
USER’S GUIDE<br />
TM<br />
<br />
<br />
<br />
x4<br />
1.5V AA or LR6 size<br />
NOT INCLUDED<br />
ALKALINE BATTERIES REQUIRED<br />
Phillips/cross head screwdriver (not included) needed to insert batteries.<br />
ELECTRIC<br />
GUITAR<br />
1<br />
<br />
77116
GET TO KNOW YOUR GUITAR<br />
Output Jack<br />
(for external amp<br />
or headphones)*<br />
Frets LED display<br />
Palm Sensor<br />
Speaker<br />
Strum Bar<br />
Strum Bar LEDs<br />
Tone Knob<br />
Tone Button<br />
Mode Knob<br />
Mode Button<br />
ON / Volume<br />
1<br />
Input Jack<br />
(for personal<br />
music player)**<br />
NOTE: When you connect your guitar<br />
to an external device through the<br />
output jack, the speaker on the guitar<br />
shuts off, and the guitar’s volume knob<br />
controls the volume of the guitar to the<br />
external device.<br />
* Amp sold separately<br />
** Headphones and personal music player not included
TO INSERT BATTERIES<br />
Before you begin playing with your<br />
guitar, you must first install the batteries.<br />
Using a Phillips/cross head screwdriver<br />
(not included), loosen screw in battery<br />
compartment cover (screw stays<br />
attached to cover), located on the back<br />
panel of the guitar. Insert 4 x 1.5V “AA”<br />
or LR6 alkaline batteries in the battery<br />
compartment. Replace cover and<br />
tighten screw.<br />
CAUTION: TO AVOID BATTERY LEAKAGE<br />
1. Be sure to insert the batteries correctly and<br />
always follow the toy and battery manufacturers’<br />
instructions;<br />
2. Do not mix old batteries and new batteries or<br />
alkaline, standard (carbon-zinc) or rechargeable<br />
(nickel-cadmium) batteries;<br />
3. Always remove weak or dead batteries from the<br />
product.<br />
IMPORTANT: BATTERY INFORMATION<br />
Please retain this information for future reference.<br />
Batteries should be replaced by an adult.<br />
CAUTION:<br />
1. Always follow the instructions carefully. Use only batteries specified<br />
and be sure to insert item correctly by matching the + and – polarity<br />
markings.<br />
2. Do not mix old and new batteries or standard (carbon-zinc) with<br />
alkaline batteries.<br />
3. Remove exhausted or dead batteries from the product.<br />
4. Remove batteries if product is not to be played with for a long time.<br />
5. Do not short-circuit the supply terminals.<br />
6. Should this product cause, or be affected by, local electrical<br />
interference, move it away from other electrical equipment. Reset<br />
(switching off and back on again or removing and re-inserting<br />
batteries) if necessary.<br />
7. RECHARGEABLE BATTERIES: Do not mix these with any other types<br />
of batteries. Always remove from the product before recharging.<br />
Recharge batteries under adult supervision. DO NOT RECHARGE<br />
OTHER TYPES OF BATTERIES.<br />
21
LET’S ROCK!<br />
KNOBS / BUTTONS<br />
The instrument you’re holding in your hands<br />
is loaded with lots of hi-tech features! We<br />
understand, though, if you’re itchin’ to rock<br />
right out of the box, so here’s what you do:<br />
1. Turn the guitar ON by turning<br />
the ON/Volume Button. For<br />
best sensor performance, don’t<br />
press any frets or sensors<br />
when you turn the guitar on.<br />
2. Turn the MODE Knob to “Jam”<br />
Mode.<br />
3. Brush the Strum Bar with the<br />
fleshy part of your right-hand<br />
thumb or finger, and press<br />
your left-hand fingers on the<br />
frets.<br />
4. Use the Tone Knob or Button,<br />
if you like, to change the<br />
sound of the guitar. Notice<br />
how strumming faster or slower<br />
affects the sound.<br />
5. Rock out, play, experiment,<br />
and HAVE FUN!<br />
Now let’s learn more about your new<br />
instrument and all the cool things it can do.<br />
13<br />
To turn the guitar ON, turn the Volume Button<br />
and adjust the volume as desired. For best<br />
sensor performance, don’t press any frets<br />
or sensors when you turn the guitar on. Turn<br />
the Mode knob to “Jam” Mode.<br />
The TONE Knob lets you choose<br />
from the sound of four musical<br />
styles. To add cool effects to<br />
whatever tone you choose, press<br />
the Tone Knob and then play.<br />
Style<br />
Sounds like<br />
Metal Heavy distortion Echo<br />
Punk<br />
Rock<br />
Moderate distortion<br />
<strong>Guitar</strong> plus<br />
synthesizer<br />
Press TONE<br />
Button to add<br />
Distortion without<br />
echo<br />
A sound like<br />
notes played<br />
backward<br />
Indie Clean sound Depth of sound<br />
The MODE Knob lets you play<br />
your guitar in different ways (see<br />
p.6): for example, to learn and<br />
play along with built-in songs.<br />
Because this is more advanced<br />
play, we’ll leave it for now and<br />
proceed with basic play.
HOW TO PLAY<br />
Playing the <strong>Guitar</strong><br />
You hold this guitar as you would any other guitar.<br />
Because there are no strings, you strum this guitar in<br />
a unique way.<br />
Take the fleshy part of your thumb or fingers and<br />
brush the Strum Bar in an up or down motion. The<br />
speed with which you brush the Strum Bar affects<br />
tone and volume.<br />
Tilting the guitar up and down as you play produces a cool audio effect of “bending” notes (see p. 5): to<br />
play without these effects, hold and play the guitar in an approximately horizontal fashion.<br />
Note that the sensors on your guitar do not work as well when your hands are very dry.<br />
NOTE: This guitar is built for right-handed players. If you are left-handed and try to play the guitar upside<br />
down, the built-in “tilt switches” will constantly “bend” the notes you play. To turn the tilt switches off, press<br />
and hold the TONE Button while turning the guitar ON: you can now turn the guitar upside down and play<br />
it left-handed. You need to do this every time you turn the guitar on or change the batteries.<br />
14
Frets<br />
To produce different notes, either<br />
touch and hold or press the frets on<br />
the neck of the guitar, then strum. You<br />
don’t have to press the frets hard. The<br />
frets are chromatically arranged:<br />
FRET #<br />
Open (strum with<br />
no frets pressed)<br />
MUSICAL NOTE<br />
A<br />
1 A sharp/B flat<br />
2 B<br />
3 C<br />
4 C sharp/D flat<br />
5 D<br />
6 D sharp/E flat<br />
7 E<br />
8 F<br />
9 F sharp/G flat<br />
10 G<br />
11 G sharp/A flat<br />
12 A<br />
Special Ways to Play<br />
Palming<br />
“Palming” means using the edge of your strumming<br />
hand to mute or stop guitar sound. This guitar has<br />
a Palm Sensor that produces an effect similar to<br />
“palming” on a stringed guitar.<br />
Here’s how you do it:<br />
1. Brush the Strum Bar to<br />
produce a sound.<br />
2. Depress the edge of<br />
your palm on the Palm<br />
Sensor to stop the<br />
sound; or<br />
3. Brush the Strum Bar with<br />
the fleshy part of your<br />
palm holding down the<br />
Palm Sensor to play<br />
palm-muted notes.<br />
Play around and have fun: you’ll get it.<br />
And the Palm Sensor won’t work through your sleeve, so<br />
keep your strumming arm’s sleeve out of the way!<br />
Bending Notes<br />
When you are playing a note, tilt your guitar’s<br />
neck upward or downward: this produces an effect<br />
similar to “bending” strings/notes on a real guitar.<br />
15
Hammer-Ons<br />
Your guitar also lets you play “hammer-ons”: that<br />
is, pressing a fret, without strumming, to produce<br />
a higher note than the one being played. To do<br />
what’s called a one-handed hammer-on:<br />
1. Brush the Strum Bar to play a note.<br />
2. While that note is sounding: if you are already<br />
pressing a fret, press any fret between your left<br />
hand and the Strum Bar; or just press a fret on<br />
an “open” strum.<br />
Hear how the note changes?<br />
You can also do two-handed hammer-ons:<br />
1. As you play with<br />
your finger on<br />
a fret, brush the<br />
Strum Bar to play<br />
that note.<br />
2. While the note is<br />
sounding, keep the first finger depressed<br />
and, with your strumming hand, touch a fret<br />
between your left hand and the Strum Bar.<br />
Pull-Offs<br />
Your guitar also lets you play what are called<br />
“pull-offs”; the opposite of a “hammer-on.” A<br />
pull-off means you remove your finger from an<br />
already-pressed fret while the note is sounding,<br />
producing a new, lower note.<br />
Experiment with different settings, styles, and tones: have fun!<br />
16<br />
MODES<br />
There’s more than one way to play with<br />
your new guitar!<br />
Speaker With Lights – Take the enclosed<br />
cable and connect your personal music<br />
player (mp3 player, stereo, CD player, etc.*)<br />
to the guitar through the Input Jack. Control<br />
the volume through your music player.<br />
As music plays through the guitar’s speaker, a light<br />
show appears on the neck. Touch the neck to get<br />
different light patterns.<br />
If you leave music playing through the guitar for<br />
about an hour – let’s say you step away to sign<br />
autographs – the guitar will “go to sleep.” To “wake it<br />
up,” press the Mode button.<br />
If no music is detected in about 3 minutes, the<br />
guitar will “go to sleep.”<br />
Jam – This mode allows you to play your<br />
guitar one of two ways:<br />
• By yourself, with no accompaniment<br />
• With a PMP (personal music player*)<br />
connected to the Input Jack and music<br />
playing through the guitar’s speaker. Your<br />
playing will be layered over the music<br />
coming through the speaker. Adjust the<br />
volume of your PMP* so it is compatible<br />
with your guitar’s volume.<br />
* Not included
Learn – This mode teaches you songs<br />
that are stored in the guitar’s memory.<br />
1. Turn the MODE Knob to the LEARN<br />
setting.<br />
2. Lights on the fret board will blink: 12<br />
frets, 12 songs, arranged in order of<br />
increasing difficulty. The first fret is the<br />
first lesson.<br />
<br />
12 11 10 9 8 7 6 5 4 3 2 1<br />
3. Press a blinking fret to select a lesson<br />
NOTE: When you are in LEARN MODE, you cannot<br />
use the TONE Button to change the tone. There is a<br />
default tone for each lesson in LEARN MODE.<br />
<strong>Guitar</strong> Plays Phrase<br />
Your guitar divides each song into phrases: you will<br />
learn each phrase, one at a time. A metronome will<br />
count four “clicks,” and you will hear the musical<br />
phrase.<br />
Watch the lights on the fret board: they will light up<br />
to show you where to put your fingers and when to<br />
strum (green), palm mute (red) or play a hammer-on/<br />
pull-off (amber).<br />
If a guitar note is playing and no lights on the fret<br />
board are lighting up, this means an “open strum”:<br />
that is, brush the Strum Bar to produce the note and<br />
do not press any frets.<br />
17<br />
Now You Play<br />
Once the phrase is done playing, it’s your turn to<br />
play the phrase. You must play the correct notes<br />
and approximately in time:<br />
If you make three mistakes playing a phrase, a<br />
“clink” sound marks each missed note. Then you’ll<br />
hear a “booing” sound. (Don’t take it personally:<br />
the world’s greatest musicians have been booed,<br />
at one time or another.) The phrase will then<br />
repeat at a slightly slower speed: give it another<br />
try until you get it right.*<br />
If you make two mistakes playing a phrase, a<br />
“clink” sound marks each missed note. The phrase<br />
will continue playing, and so should you. When it’s<br />
over, you will hear some light applause.<br />
If you make one mistake, a “clink” sound marks<br />
the missed note. The phrase will continue playing,<br />
and so should you. When it’s over, you will hear<br />
some moderate applause.<br />
If you make no mistakes, you hear a “cheering”<br />
sound. (Don’t let it go to your head.)<br />
<br />
* When you make a mistake, the guitar will demonstrate<br />
the phrase again; to cancel this demonstration and<br />
immediately try to play the phrase again, touch the<br />
TONE Button. You will hear the four-click count-in to the<br />
song, and you can try again.
Once you have played the phrase well enough to<br />
get applause (2 mistakes or less), the guitar will<br />
then play the phrase you have learned plus the<br />
next phrase of the song: you must play the longer<br />
phrase correctly, to advance. You must make fewer<br />
than 3 mistakes to advance.<br />
Once you’ve learned all the phrases, you will get<br />
a big cheer and the guitar will return to the 12-fret<br />
blinking menu. You now know all you need to know<br />
to play the complete version of the song (available<br />
in “BAND ACCOMPANIMENT” mode).<br />
Other Ways to Play<br />
If you want to hear one of the songs all the way<br />
through – that is, not hear it one phrase at a<br />
time – press the MODE Button to return to the<br />
main menu (all the lights on the neck blinking).<br />
Then, while you press and hold down the MODE<br />
Button, press a fret to select a song. That song<br />
will play all the way through, and you will have a<br />
chance to play it entirely.<br />
If you press the TONE button while selecting a<br />
blinking fret from the main menu, you will hear<br />
the selected song all the way through, and when<br />
it’s your turn, you are allowed to make infinite<br />
mistakes. You’ll still hear a “clink” to let you know<br />
when you hit wrong notes, but you won’t get<br />
booed or cheered, and the song plays all the<br />
way through.<br />
18<br />
If you want to add more notes than the ones<br />
LEARN Mode requires you to play, feel free!<br />
LEARN Mode is testing your ability to play certain<br />
notes, in a certain order, at the right time. (There<br />
is a small “window of opportunity” in time to play<br />
the correct note – you can be very slightly offtime,<br />
but not much!)<br />
To return to the main menu of lessons at any<br />
time, press the MODE Button.<br />
To exit LEARN Mode, turn the MODE Knob. If<br />
your guitar is in this mode and you don’t press<br />
any frets for about 3 minutes, the guitar “goes to<br />
sleep.” Press the MODE Button to reactivate.<br />
Dude, What’s That Light?<br />
The first few lessons on your guitar are at a beginner<br />
level. As you proceed, the lessons become more<br />
advanced and require you to play “hammer-ons,”<br />
“pull-offs” and “palming.” For a definition of these<br />
terms, see p. 5-6.<br />
During your lesson, watch the Strum Bar LED light:<br />
• A green light shows you when to brush the<br />
Strum Bar.<br />
• An amber light shows you if a note is a “hammeron”<br />
or “pull-off.” (See p. 6)<br />
• A red light shows you if a note is to be “palmed.”<br />
Listen to the demonstration to hear if the note is<br />
being stopped or muted with palming. (See p. 5)<br />
Be patient, as you learn! They don’t call<br />
them “advanced” lessons for nothing!
Band Accompaniment – In this<br />
mode, you can play along with<br />
one of 12 songs stored in your<br />
guitar’s memory. These songs are<br />
complete versions of the songs in<br />
LEARN mode.<br />
1. Turn the MODE Knob to the BAND<br />
ACCOMPANIMENT setting.<br />
2. You will see all the lights on the fret board<br />
blink: 12 frets, 12 songs, arranged in order of<br />
increasing difficulty.<br />
3. Press a blinking fret to select a song. (You<br />
might want to select a song you already<br />
learned in LEARN Mode, dude.)<br />
Following the count-in, you may proceed to rock<br />
out. Use the TONE Knob to play in any tone<br />
you want.<br />
To stop the song, press the MODE Button. Press<br />
the MODE Button again, and the song starts from<br />
the beginning.<br />
If your guitar is in this mode and you don’t press<br />
any frets for about 3 minutes, the guitar “goes<br />
to sleep.” Press the MODE Button again, to<br />
reactivate.<br />
These lessons are only the beginning: with time<br />
and practice, you’ll teach yourself new songs and<br />
new ways to play your new guitar.<br />
SONG<br />
NUMBER SONG TITLE<br />
1 “Basic Strumming Blues”<br />
2 “Wild Thing”<br />
(made famous by The Troggs)*<br />
3 “Punkitude”<br />
4 Intro to Hammer-Ons<br />
5 “Smoke on the Water”<br />
(made famous by Deep Purple)*<br />
6 Intro to Palm Mute/Stops<br />
7 “My Own Worst Enemy”<br />
(made famous by Lit)*<br />
8 Intro to Palm Strum<br />
9 “Breaking the Law”<br />
(made famous by Judas Priest)*<br />
10 “Ace of Spades”<br />
(made famous by Motörhead)*<br />
11 “Hard Rock Blues”<br />
12 “Frankenstein”<br />
(made famous by The Edgar Winter Group)*<br />
* ALL MUSIC IS DIGITALLY RECREATED AND NOT RECORDED BY<br />
THE ORIGINAL ARTISTS, WHO HAVE NO CONNECTION TO OR<br />
SPONSORSHIP OF THIS PRODUCT.<br />
Remember: with great rock comes great<br />
responsibility – the responsibility to enjoy<br />
music, love life, and have fun.<br />
19
FACE PLATES<br />
TIPS<br />
You can remove the Face Plate of your guitar: for<br />
example, if you want to replace it with a new <strong>Power</strong><br />
<strong>Tour</strong> Face Plate (sold separately).<br />
It’s easy:<br />
1. Press in on the<br />
tabs on either<br />
side of the<br />
Strum Bar.<br />
2. With your<br />
fingernail, lift<br />
up the Face<br />
Plate and gently<br />
remove it.<br />
1. If you are not playing<br />
with your guitar for an<br />
extended period of time,<br />
turn the Volume Button<br />
down to turn the guitar<br />
OFF. Doing so will help<br />
conserve battery life.<br />
2. If your guitar starts acting erratically, try<br />
turning it OFF, wait a few seconds, and turn<br />
it ON again, or change the batteries.<br />
3. Do not expose your guitar to areas of high<br />
or low temperature, dusty or humid areas,<br />
or direct sunlight.<br />
4. Your guitar is an electrical device. Do<br />
not play it in a bathtub full of water, on a<br />
flotation device in a swimming pool, or in<br />
concert in the rain.<br />
<br />
If you have a replacement Face Plate (sold<br />
separately), position it over the Face Plate area and<br />
click it into place.<br />
10 1
FCC STATEMENT<br />
This equipment has been tested and found to comply with the limits for a Class B digital<br />
device, pursuant to Part 15 of the FCC Rules. These limits are designed to provide reasonable<br />
protection against harmful interference in a residential installation. This equipment generates,<br />
uses and can radiate radio frequency energy, and, if not installed and used in accordance with<br />
the instructions, may cause harmful interference to radio communications. However, there is<br />
no guarantee that interference will not occur in a particular installation. If this equipment does<br />
cause harmful interference to radio or television reception, which can be determined by turning<br />
the equipment off and on, the user is encouraged to try to correct the interference by one or<br />
more of the following measures:<br />
• Reorient or relocate the receiving antenna.<br />
• Increase the separation between the equipment and the receiver.<br />
• Consult the dealer or an experienced radio/TV technician for help.<br />
Questions? Call 1-800-327-8264<br />
All Gibson marks, logos, trade dress, guitar models and related<br />
rights provided pursuant to license from Gibson <strong>Guitar</strong> Corp.<br />
Rights used with permission.<br />
Sold under license from Kid Group LLC<br />
Product and colors may vary. © 2007 <strong>Hasbro</strong>. All Rights<br />
Reserved. TM & ® denote U.S Trademarks. Patent Pending.<br />
77116 PN 6688120000<br />
1