2 - Elon
2 - Elon
2 - Elon

Create successful ePaper yourself
Turn your PDF publications into a flip-book with our unique Google optimized e-Paper software.
Installation & Maintenance<br />
EN<br />
Safety instructions for the installation<br />
This oven may be installed only by an approved electrician. The installer is responsible for<br />
connecting the appliance to the mains and in so doing for observing the relevant safety<br />
regulations.<br />
● Ensure protection from live parts when installing the oven.<br />
● The kitchen cabinet in which the oven is built in must satisfy stability requirements as<br />
specified in DIN 68930.<br />
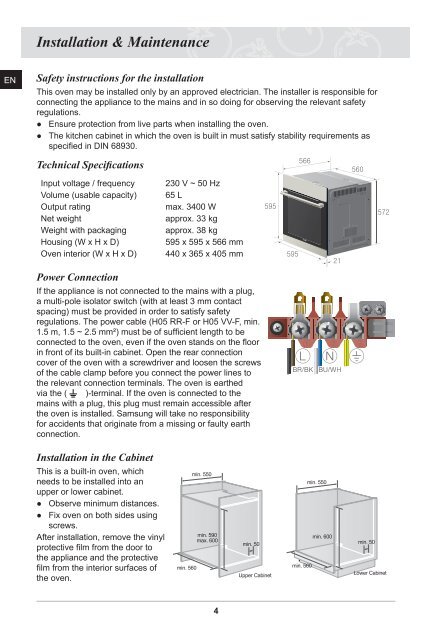
Technical Specifications<br />
Input voltage / frequency<br />
Volume (usable capacity)<br />
Output rating<br />
Net weight<br />
Weight with packaging<br />
Housing (W x H x D)<br />
Oven interior (W x H x D)<br />
Power Connection<br />
230 V ~ 50 Hz<br />
65 L<br />
max. 3400 W<br />
approx. 33 kg<br />
approx. 38 kg<br />
595 x 595 x 566 mm<br />
440 x 365 x 405 mm<br />
If the appliance is not connected to the mains with a plug,<br />
a multi-pole isolator switch (with at least 3 mm contact<br />
spacing) must be provided in order to satisfy safety<br />
regulations. The power cable (H05 RR-F or H05 VV-F, min.<br />
1.5 m, 1.5 ~ 2.5 mm²) must be of sufficient length to be<br />
connected to the oven, even if the oven stands on the floor<br />
in front of its built-in cabinet. Open the rear connection<br />
cover of the oven with a screwdriver and loosen the screws<br />
of the cable clamp before you connect the power lines to<br />
the relevant connection terminals. The oven is earthed<br />
via the ( )-terminal. If the oven is connected to the<br />
mains with a plug, this plug must remain accessible after<br />
the oven is installed. Samsung will take no responsibility<br />
for accidents that originate from a missing or faulty earth<br />
connection.<br />
<br />
<br />
<br />
<br />
<br />
<br />
Installation in the Cabinet<br />
This is a built-in oven, which<br />
needs to be installed into an<br />
upper or lower cabinet.<br />
● Observe minimum distances.<br />
● Fix oven on both sides using<br />
screws.<br />
After installation, remove the vinyl<br />
protective film from the door to<br />
the appliance and the protective<br />
film from the interior surfaces of<br />
the oven.<br />
min. 560<br />
min. 550<br />
min. 590<br />
max. 600<br />
min. 50<br />
Upper Cabinet<br />
min. 560<br />
min. 550<br />
min. 600<br />
min. 50<br />
Lower Cabinet<br />
4<br />
BF641-Series_XEE-00142V-01_EN.indd 4 2010-08-16 2:15:19