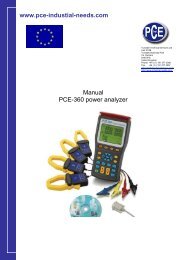
DIGITAL THICKNESS GAUGE
DIGITAL THICKNESS GAUGE
DIGITAL THICKNESS GAUGE

You also want an ePaper? Increase the reach of your titles
YUMPU automatically turns print PDFs into web optimized ePapers that Google loves.
TABLE OF CONTENTS<br />
1. FEATURES ........................................1<br />
2. SPECIFICATIONS ............................1<br />
3. FRONT PANEL DESCRIPTIONS ...2<br />
4. MATERIAL SELECTION.................5<br />
5. CALIBRATION .................................4<br />
6. MEASURING PROCEDURE...........5<br />
7.MEASURING BY VELOCITY<br />
SETTING......................5<br />
8. BATTERY REPLACEMENT............6<br />
`5.0` mm (or `0.197` inch) and `CAL` will be<br />
shown on the Display in turn. When steady,<br />
Press CAL key 3-8 to confirm and then the<br />
unit return to the state of measurement.<br />
5.4 The calibration result will be auto-saved to<br />
the unit once confirmation. It is unnecessary<br />
to calibrate often unless you suspect the<br />
accuracy of measurement<br />
6. MEASURING PROCEDURE<br />
6.1 Press the power key 3-4 to turn on the unit.<br />
6.2 Press the mm/inch key 3-3 to select the right<br />
measurement unit.<br />
6.3 Press the Sensor 3-7 onto the material<br />
surface to measure on the premise that the<br />
material code selected is right. Be sure that<br />
coupling is well and the symbol is on. The<br />
reading on display is the measurement value.<br />
6.4 The reading is held till a new measurement<br />
value is coming. The last value is held on the<br />
display till the power is off.<br />
6.5 2 modes to turn off the power.<br />
Manual off at any time by pressing the power<br />
key or Auto power off after about 1 minutes<br />
from last key operation.<br />
7. MEASURING BY VELOCITY SETTING<br />
7.1 Press the VEL key 3-13 and the display<br />
shows the velocity set last time.<br />
7.2 How to measure its thickness by the velocity<br />
known ?<br />
The velocity can be changed by pressing the<br />
plus key or minus key to the value of known<br />
velocity. The increment is 10m/s every time<br />
5<br />
Accessory<br />
Carrying case<br />
1 pc.<br />
Operation manual 1 pc.<br />
Ultrasonic sensor ....................1 pc.<br />
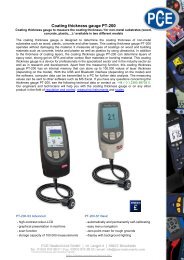
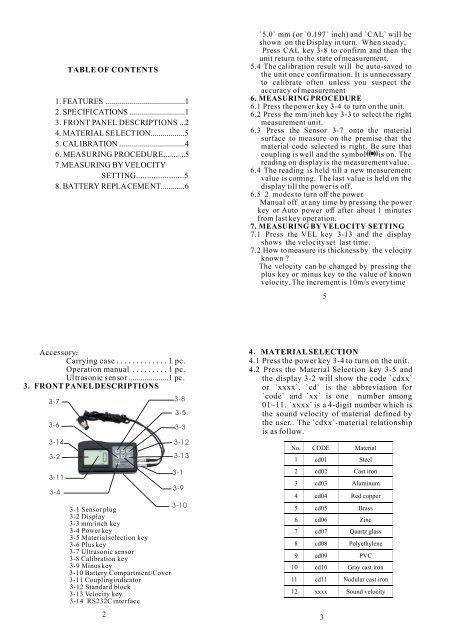
3. FRONT PANEL DESCRIPTIONS<br />
3-7<br />
3-6<br />
3-14<br />
3-2<br />
3-11<br />
3-4<br />
3-8<br />
3-5<br />
3-3<br />
3-12<br />
3-13<br />
3-1<br />
3-9<br />
3-10<br />
3-1 Sensor plug<br />
3-2 Display<br />
3-3 mm/inch key<br />
3-4 Power key<br />
3-5 Material selection key<br />
3-6 Plus key<br />
3-7 Ultrasonic sensor<br />
3-8 Calibration key<br />
3-9 Minus key<br />
3-10 Battery Compartment/Cover<br />
3-11 Coupling indicator<br />
3-12 Standard block<br />
3-13 Velocity key<br />
3-14 RS232C interface<br />
4 MATERIAL SELECTION<br />
4.1 Press the power key 3-4 to turn on the unit.<br />
4.2 Press the Material Selection key 3-5 and<br />
the display 3-2 will show the code `cdxx`<br />
or `xxxx`. `cd` is the abbreviation for<br />
`code` and `xx` is one number among<br />
01~11. `xxxx` is a 4-digit number which is<br />
the sound velocity of material defined by<br />
the user.. The `cdxx`-material relationship<br />
is as follow.<br />
No. CODE Material<br />
1 cd01 Steel<br />
2 cd02 Cast iron<br />
3 cd03 Aluminum<br />
4 cd04 Red copper<br />
5 cd05 Brass<br />
6 cd06 Zinc<br />
7 cd07 Quartz glass<br />
8 cd08 Polyethylene<br />
9 cd09 PVC<br />
10 cd10 Gray cast iron<br />
11 cd11 Nodular cast iron<br />
12 xxxx Sound velocity<br />
2 3