Trellising and Soft Fruit Solutions
Trellising and Soft Fruit Solutions
Trellising and Soft Fruit Solutions

You also want an ePaper? Increase the reach of your titles
YUMPU automatically turns print PDFs into web optimized ePapers that Google loves.
Vineyard Trellis<br />
Product application<br />
The ideal installation is to install the Gripple in a loop format around<br />
each end post. The most commonly used size for vineyard trellising (with<br />
average length rows) is a Gripple Medium. If rows are particularly long,<br />
exposed or crops are intense - we would recommend choosing a<br />
Gripple Jumbo.<br />
Vineyard <strong>Trellising</strong><br />
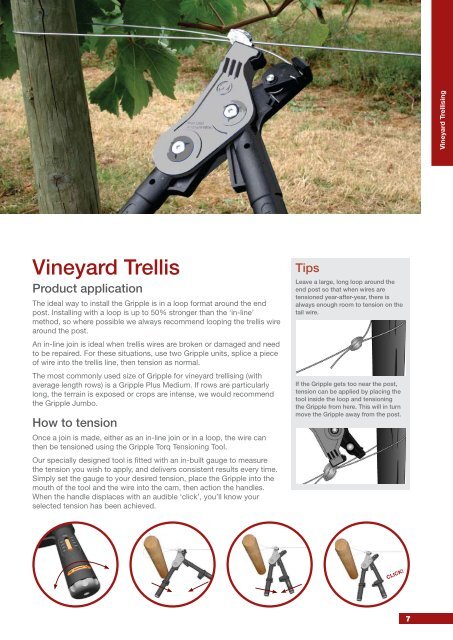
Vineyard Trellis<br />
Product application<br />
The ideal way to install the Gripple is in a loop format around the end<br />
post. Installing with a loop is up to 50% stronger than the ‘in-line’<br />
method, so where possible we always recommend looping the trellis wire<br />
around the post.<br />
An in-line join is ideal when trellis wires are broken or damaged <strong>and</strong> need<br />
to be repaired. For these situations, use two Gripple units, splice a piece<br />
of wire into the trellis line, then tension as normal.<br />
The most commonly used size of Gripple for vineyard trellising (with<br />
average length rows) is a Gripple Plus Medium. If rows are particularly<br />
long, the terrain is exposed or crops are intense, we would recommend<br />
the Gripple Jumbo.<br />
How to tension<br />
Once a join is made, either as an in-line join or in a loop, the wire can<br />
then be tensioned using the Gripple Torq Tensioning Tool.<br />
Our specially designed tool is fitted with an in-built gauge to measure<br />
the tension you wish to apply, <strong>and</strong> delivers consistent results every time.<br />
Simply set the gauge to your desired tension, place the Gripple into the<br />
mouth of the tool <strong>and</strong> the wire into the cam, then action the h<strong>and</strong>les.<br />
When the h<strong>and</strong>le displaces with an audible ‘click’, you’ll know your<br />
selected tension has been achieved.<br />
Tips<br />
Leave a large, long loop around the<br />
end post so that when wires are<br />
tensioned year-after-year, there is<br />
always enough room to tension on the<br />
tail wire.<br />
If the Gripple gets too near the post,<br />
tension can be applied by placing the<br />
tool inside the loop <strong>and</strong> tensioning<br />
the Gripple from here. This will in turn<br />
move the Gripple away from the post.<br />
CLICK!<br />
7