Installation Instructions - J&M Motorcycle Audio
Installation Instructions - J&M Motorcycle Audio
Installation Instructions - J&M Motorcycle Audio

You also want an ePaper? Increase the reach of your titles
YUMPU automatically turns print PDFs into web optimized ePapers that Google loves.
Product Description<br />
This exciting new J&M 2-channel 180w fairing speaker<br />
amplifier kit has been design specifically for the universal<br />
application 1998-2013 Harley® Batwing & RoadGlide<br />
fairings, with the stock Harley or aftermarket radio system.<br />
The less expensive universal application kit allows the<br />
installer to configure or fabricate the exact mounting<br />
location as desired, to meet their installation goals or space<br />
requirements.<br />
This is a full range class D amplifier and is spec’d at<br />
90watts RMS per channel X2 channels, (180w total) driven<br />
continuous into a 2 ohm load @ 14.4vdc.<br />
Custom made plug-n-play wiring harnesses are included<br />
with this amplifier kit, top quality heavy gauge power/ground<br />
wires are used for the fused battery connection, along with<br />
complete installation/operation instructions.<br />
Amplifier itself measures 6 ½” X 4 ¾“ X 1 ¾”.<br />
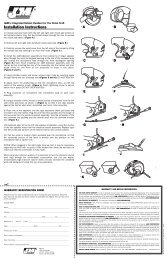
<strong>Installation</strong> <strong>Instructions</strong><br />
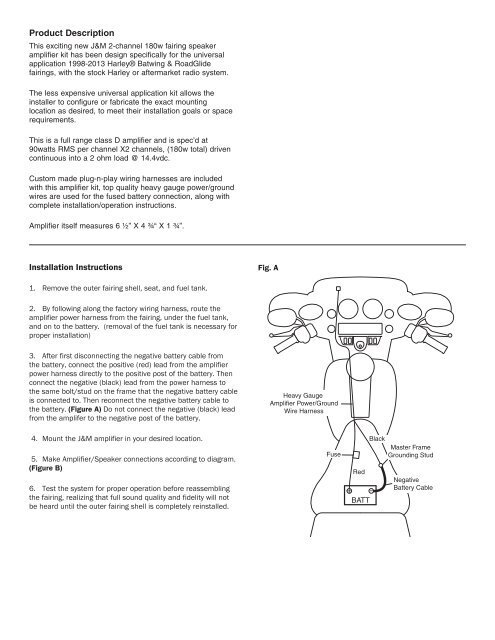
Fig. A<br />
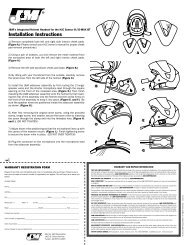
1. Remove the outer fairing shell, seat, and fuel tank.<br />
2. By following along the factory wiring harness, route the<br />
amplifier power harness from the fairing, under the fuel tank,<br />
and on to the battery. (removal of the fuel tank is necessary for<br />
proper installation)<br />
3. After first disconnecting the negative battery cable from<br />
the battery, connect the positive (red) lead from the amplifier<br />
power harness directly to the positive post of the battery. Then<br />
connect the negative (black) lead from the power harness to<br />
the same bolt/stud on the frame that the negative battery cable<br />
is connected to. Then reconnect the negative battery cable to<br />
the battery. (Figure A) Do not connect the negative (black) lead<br />
from the amplifer to the negative post of the battery.<br />
Heavy Gauge<br />
Amplifier Power/Ground<br />
Wire Harness<br />
4. Mount the J&M amplifier in your desired location.<br />
5. Make Amplifier/Speaker connections according to diagram.<br />
(Figure B)<br />
6. Test the system for proper operation before reassembling<br />
the fairing, realizing that full sound quality and fidelity will not<br />
be heard until the outer fairing shell is completely reinstalled.<br />
Fuse<br />
Red<br />
+<br />
BATT<br />
Black<br />
Master Frame<br />
Grounding Stud<br />
Negative<br />
Battery Cable