You also want an ePaper? Increase the reach of your titles
YUMPU automatically turns print PDFs into web optimized ePapers that Google loves.
INSTALLATION<br />
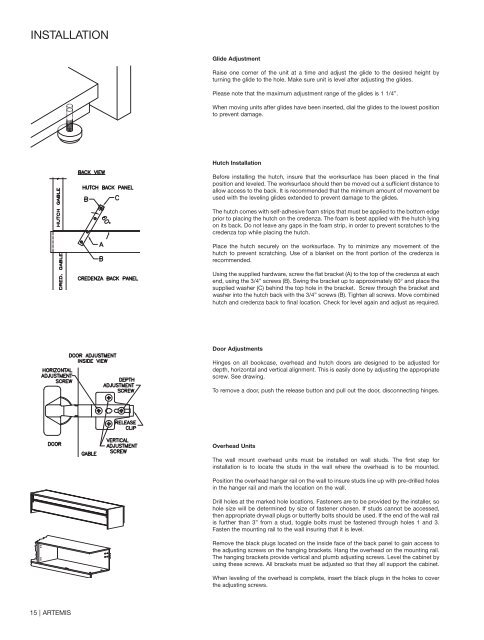
Glide Adjustment<br />
Raise one corner of the unit at a time and adjust the glide to the desired height by<br />
turning the glide to the hole. Make sure unit is level after adjusting the glides.<br />
Please note that the maximum adjustment range of the glides is 1 1/4”.<br />
When moving units after glides have been inserted, dial the glides to the lowest position<br />
to prevent damage.<br />
Hutch Installation<br />
Before installing the hutch, insure that the worksurface has been placed in the final<br />
position and leveled. The worksurface should then be moved out a sufficient distance to<br />
allow access to the back. It is recommended that the minimum amount of movement be<br />
used with the leveling glides extended to prevent damage to the glides.<br />
The hutch comes with self-adhesive foam strips that must be applied to the bottom edge<br />
prior to placing the hutch on the credenza. The foam is best applied with the hutch lying<br />
on its back. Do not leave any gaps in the foam strip, in order to prevent scratches to the<br />
credenza top while placing the hutch.<br />
Place the hutch securely on the worksurface. Try to minimize any movement of the<br />
hutch to prevent scratching. Use of a blanket on the front portion of the credenza is<br />
recommended.<br />
Using the supplied hardware, screw the flat bracket (A) to the top of the credenza at each<br />
end, using the 3/4” screws (B). Swing the bracket up to approximately 60° and place the<br />
supplied washer (C) behind the top hole in the bracket. Screw through the bracket and<br />
washer into the hutch back with the 3/4” screws (B). Tighten all screws. Move combined<br />
hutch and credenza back to final location. Check for level again and adjust as required.<br />
Door Adjustments<br />
Hinges on all bookcase, overhead and hutch doors are designed to be adjusted for<br />
depth, horizontal and vertical alignment. This is easily done by adjusting the appropriate<br />
screw. See drawing.<br />
To remove a door, push the release button and pull out the door, disconnecting hinges.<br />
Overhead Units<br />
The wall mount overhead units must be installed on wall studs. The first step for<br />
installation is to locate the studs in the wall where the overhead is to be mounted.<br />
Position the overhead hanger rail on the wall to insure studs line up with pre-drilled holes<br />
in the hanger rail and mark the location on the wall.<br />
Drill holes at the marked hole locations. Fasteners are to be provided by the installer, so<br />
hole size will be determined by size of fastener chosen. If studs cannot be accessed,<br />
then appropriate drywall plugs or butterfly bolts should be used. If the end of the wall rail<br />
is further than 3” from a stud, toggle bolts must be fastened through holes 1 and 3.<br />
Fasten the mounting rail to the wall insuring that it is level.<br />
Remove the black plugs located on the inside face of the back panel to gain access to<br />
the adjusting screws on the hanging brackets. Hang the overhead on the mounting rail.<br />
The hanging brackets provide vertical and plumb adjusting screws. Level the cabinet by<br />
using these screws. All brackets must be adjusted so that they all support the cabinet.<br />
When leveling of the overhead is complete, insert the black plugs in the holes to cover<br />
the adjusting screws.<br />
15 | ARTEMIS



![Zola Modular Brochure [PDF] - Krug](https://img.yumpu.com/23967543/1/190x68/zola-modular-brochure-pdf-krug.jpg?quality=85)

![Zola Tables Brochure [PDF] - Krug](https://img.yumpu.com/23967529/1/190x130/zola-tables-brochure-pdf-krug.jpg?quality=85)


