

Instruction Manual - Team Associated
Instruction Manual - Team Associated
Instruction Manual - Team Associated

Create successful ePaper yourself
Turn your PDF publications into a flip-book with our unique Google optimized e-Paper software.
15<br />
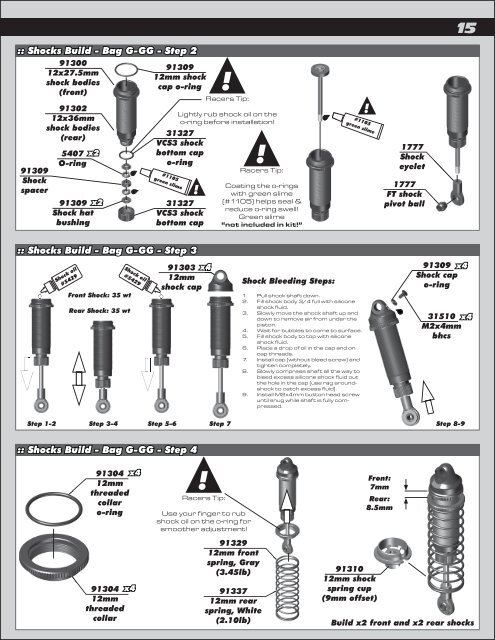
:: Shocks Build - Bag G-GG - Step 2<br />
91300<br />
12x27.5mm<br />
shock bodies<br />
(front)<br />
91302<br />
12x36mm<br />
shock bodies<br />
(rear)<br />
5407 x2<br />
O-ring<br />
91309<br />
Shock<br />
spacer<br />
91309 x2<br />
Shock hat<br />
bushing<br />
91309<br />
12mm shock<br />
cap o-ring !<br />
Racers Tip:<br />
Lightly rub shock oil on the<br />
o-ring before installation!<br />
31327<br />
VCS3 shock<br />
bottom cap<br />
o-ring<br />
#1105<br />
green slime<br />
!<br />
31327<br />
VCS3 shock<br />
bottom cap<br />
!<br />
Racers Tip:<br />
Coating the o-rings<br />
with green slime<br />
(#1105) helps seal &<br />
reduce o-ring swell!<br />
Green slime<br />
“not included in kit!”<br />
!<br />
#1105<br />
green slime<br />
1777<br />
Shock<br />
eyelet<br />
1777<br />
FT shock<br />
pivot ball<br />
:: Shocks Build - Bag G-GG - Step 3<br />
Shock oil<br />
#5429<br />
Front Shock: 35 wt<br />
Rear Shock: 35 wt<br />
Shock oil<br />
#5429<br />
91303<br />
x4<br />
12mm<br />
shock cap<br />
Shock Bleeding Steps:<br />
1. Pull shock shaft down.<br />
2. Fill shock body 3/4 full with silicone<br />
shock fluid.<br />
3. Slowly move the shock shaft up and<br />
down to remove air from under the<br />
piston.<br />
4. Wait for bubbles to come to surface.<br />
5. Fill shock body to top with silicone<br />
shock fluid.<br />
6. Place a drop of oil in the cap and on<br />
cap threads.<br />
7. Install cap (without bleed screw) and<br />
tighten completely.<br />
8. Slowly compress shaft all the way to<br />
bleed excess silicone shock fluid out<br />
the hole in the cap (use rag aroundshock<br />
to catch excess fluid).<br />
9. Install M2x4mm button head screw<br />
until snug while shaft is fully compressed.<br />
91309 x4<br />
Shock cap<br />
o-ring<br />
31510 x4<br />
M2x4mm<br />
bhcs<br />
Step 1-2<br />
Step 3-4<br />
Step 5-6<br />
Step 7<br />
Step 8-9<br />
:: Shocks Build - Bag G-GG - Step 4<br />
91304 x4<br />
12mm<br />
threaded<br />
collar<br />
o-ring<br />
91304 x4<br />
12mm<br />
threaded<br />
collar<br />
!<br />
Racers Tip:<br />
Use your finger to rub<br />
shock oil on the o-ring for<br />
smoother adjustment!<br />
91329<br />
12mm front<br />
spring, Gray<br />
(3.45lb)<br />
91337<br />
12mm rear<br />
spring, White<br />
(2.10lb)<br />
91310<br />
12mm shock<br />
spring cup<br />
(9mm offset)<br />
Front:<br />
7mm<br />
Rear:<br />
8.5mm<br />
Build x2 front and x2 rear shocks


