DCN, DCR & B7 Handing Instructions - Olympus Lock
DCN, DCR & B7 Handing Instructions - Olympus Lock
DCN, DCR & B7 Handing Instructions - Olympus Lock

You also want an ePaper? Increase the reach of your titles
YUMPU automatically turns print PDFs into web optimized ePapers that Google loves.
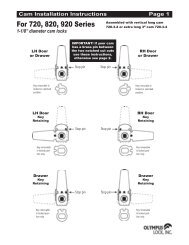
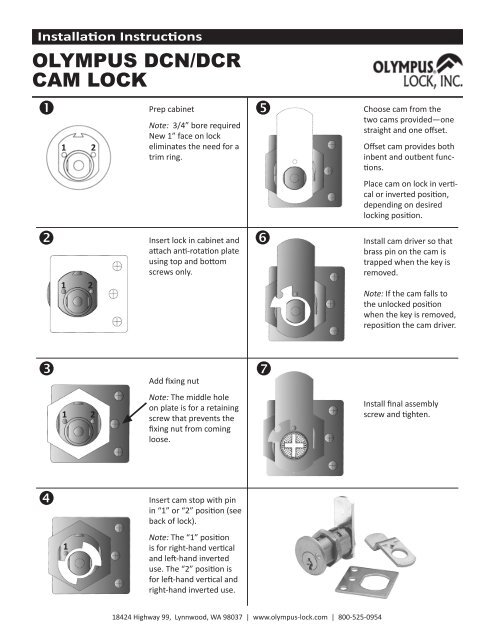
Installation <strong>Instructions</strong><br />
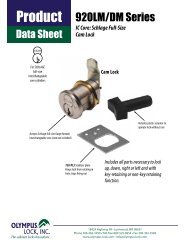
OLYMPUS <strong>DCN</strong>/<strong>DCR</strong><br />
CAM LOCK<br />
<br />
1 2<br />
Prep cabinet<br />
Note: 3/4” bore required<br />
New 1” face on lock<br />
eliminates the need for a<br />
trim ring.<br />
<br />
Choose cam from the<br />
two cams provided—one<br />
straight and one offset.<br />
Offset cam provides both<br />
inbent and outbent functions.<br />
Place cam on lock in vertical<br />
or inverted position,<br />
depending on desired<br />
locking position.<br />
<br />
1 2<br />
Insert lock in cabinet and<br />
attach anti-rotation plate<br />
using top and bottom<br />
screws only.<br />
<br />
Install cam driver so that<br />
brass pin on the cam is<br />
trapped when the key is<br />
removed.<br />
Note: If the cam falls to<br />
the unlocked position<br />
when the key is removed,<br />
reposition the cam driver.<br />
<br />
Add fixing nut<br />
<br />
1 2<br />
Note: The middle hole<br />
on plate is for a retaining<br />
screw that prevents the<br />
fixing nut from coming<br />
loose.<br />
Install final assembly<br />
screw and tighten.<br />
<br />
Insert cam stop with pin<br />
in “1” or “2” position (see<br />
back of lock).<br />
1<br />
Note: The “1” position<br />
is for right-hand vertical<br />
and left-hand inverted<br />
use. The “2” position is<br />
for left-hand vertical and<br />
right-hand inverted use.<br />
18424 Highway 99, Lynnwood, WA 98037 | www.olympus-lock.com | 800-525-0954