SURFACE ANCHORS BMXNET - Association of Professional Piercers
SURFACE ANCHORS BMXNET - Association of Professional Piercers
SURFACE ANCHORS BMXNET - Association of Professional Piercers

You also want an ePaper? Increase the reach of your titles
YUMPU automatically turns print PDFs into web optimized ePapers that Google loves.
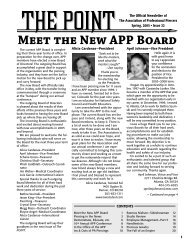
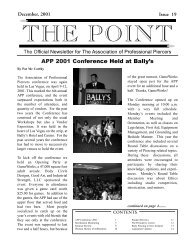
Anchors and photo courtesy Industrial Strength Jewelry<br />
clients to select a piece that is safe for healing and a style they are sure<br />
they will leave on throughout the entire length <strong>of</strong> the healing process.<br />
(For optimal results, the client should wait three to four months<br />
before threaded ends are changed.)<br />
Tools are manufactured specifically for threaded-end installation<br />
and removal purposes. Like most tools, they can make the task easier<br />
but may damage the wearing surface <strong>of</strong> the post if not used with care.<br />
These tools make all the difference in changing the end, but you still<br />
have to go grab and hold the post. This can promote migration in a<br />
healing anchor piercing. A threaded end can be removed on a healed<br />
anchor by hand to avoid lifting or disrupting an anchor that sits close<br />
to the surface. If you choose to remove the threaded end by hand,<br />
remember the turning <strong>of</strong> the base can be traumatic if not secured by<br />
your fingers or the appropriate tool. To determine the location <strong>of</strong> the<br />
heel and toe <strong>of</strong> the base, gently pull up on the anchor from the end.<br />
Feel around the base <strong>of</strong> the anchor. Place your index finger on the<br />
heel side and your thumb on the opposing toe side. With fingers in<br />
place use a pair <strong>of</strong> hemostats to unscrew the end.<br />
As intimidating as taking out an anchor my seem to any person<br />
on the street, removal should take only a second. The most common<br />
method is:<br />
• Hold the anchor from the threaded end.<br />
• Place your thumb on the heel side <strong>of</strong> the base.<br />
• Lean the tool toward the toe side and tilt the heel out while pulling<br />
the anchor out.<br />
If this method is not possible, the same tools you used to install an<br />
anchor can be used to remove it. Check the stability <strong>of</strong> the anchor<br />
by holding it from the top with a tool and placing your thumb at the<br />
base <strong>of</strong> the heel. Tilt the anchor away from your thumb and if the<br />
anchor still seems resistant to removal, use a piercing needle to pierce<br />
straight down at the base <strong>of</strong> the anchor’s post on the heel side <strong>of</strong> the<br />
anchor. See if exposing the heel is possible. If it is, remove the anchor<br />
and cover the wound with gauze.<br />
Your client may request to have the anchor reinserted directly after<br />
removal, but it is always best to suggest they consider letting the area<br />
heal before attempting repiercing. If you do reinsert without a waiting<br />
period, swap the position <strong>of</strong> the toe and heel to help find a healthier<br />
area <strong>of</strong> the tissue. If the area is highly irritated or heavily scarred, insist<br />
that the client wait and suggest a form <strong>of</strong> natural scar tissue reduction<br />
to attempt before repiercing the area.<br />
Aftercare can be very simple, and it seems that, when left alone,<br />
anchors frequently heal themselves — though it does make sense to<br />
stick with the guidelines for normal cleaning, especially when you<br />
consider what a piercing comes into contact with throughout the<br />
course <strong>of</strong> a day. Staying consistent with aftercare is also important.<br />
For the first few days, cold saline pads can help with any irritation<br />
or swelling. The client should clean around and irrigate the piercing<br />
with saline once or twice a day. Flushing underneath the threaded<br />
end will help to prevent build up <strong>of</strong> discharge and lifting <strong>of</strong> the<br />
anchor. I’ve been suggesting cleaning under the anchor as a daily<br />
regimen to reduce build up on the jewelry inside the channel, as daily<br />
saline flushing can reduce the chance <strong>of</strong> migration. The flush should<br />
be done in addition to any standard saline soaks to assure that your<br />
client ends up with a healthy, healed piercing. This cleaning schedule<br />
should be followed for six to eight weeks or until the piercing appears<br />
healed.<br />
Surface anchors have specific jewelry, piercing, and removal<br />
techniques that make them somewhat different from other piercings.<br />
These differences can be intimidating to a client if they are not<br />
explained in a simple, thorough manner by a qualified pr<strong>of</strong>essional. If<br />
you are unsure <strong>of</strong> anything, seek out the knowledge you need. There<br />
are enough competent piercers available that you should not have<br />
to settle for being underinformed. I always encourage my clients to<br />
do research on their own in addition to having a consultation with<br />
me. Even with the most experienced and knowledgeable pr<strong>of</strong>essional,<br />
without sound communication, there can be misunderstandings.<br />
This communication with your clients is a form <strong>of</strong> outreach that you<br />
are performing. It will not only educate that client, but hopefully<br />
everyone who asks the about their experience, and importantly, their<br />
amazing new piercing. P<br />
ISSUE 50 • THE POINT 11