Installation and Maintenance Manual - Res-Kem Corporation
Installation and Maintenance Manual - Res-Kem Corporation
Installation and Maintenance Manual - Res-Kem Corporation

You also want an ePaper? Increase the reach of your titles
YUMPU automatically turns print PDFs into web optimized ePapers that Google loves.
INSTALLATION INSTRUCTIONS<br />
STEP 1...CONTINUED<br />
1.4 Slide the feeder into the bracket from the top.<br />
1.5 Use a volt meter to verify supply voltage of the receptacle<br />
prior to connecting the power cord. Cycle the pump<br />
control (flow switch, pressure switch, etc.) to verify the<br />
metering pump power supply circuit works in conjunction<br />
with the control equipment.<br />
1.6 Plug the metering pump into the proper receptacle.<br />
1.7 Turn the Feed Rate Control dial to setting “10.”<br />
Cycle motor On-Off switch to ON. Observe the rollers<br />
turn continuously.<br />
1.8 Turn switch to OFF position. Proceed to Step 2.<br />
STEP 2<br />
Install Suction Line<br />
STEP 3<br />
Install Discharge Line<br />
3.1 Locate remaining suction/discharge tubing, two connecting<br />
nuts <strong>and</strong> ferrules.<br />
3.2 Repeat step 2.3. Install connecting nut <strong>and</strong> ferrule 1/2'' to<br />
3/4'' up the tubing.<br />
3.3 Insert the tubing approximately 3/4'' into pump tube<br />
discharge fitting labeled “OUT” on tube housing cover.<br />
FINGER TIGHT ONLY while holding the “OUT” fitting to<br />
prevent rotation.<br />
HAZARDOUS PRESSURE:<br />
Use caution <strong>and</strong> bleed off all resident system pressure<br />
prior to attempting service or installation.<br />
3.4 Shut off water or circulation system <strong>and</strong> bleed off any<br />
resident system pressure.<br />
2.1 Locate the 20' roll of suction/discharge tubing <strong>and</strong> uncoil.<br />
Determine the required amount of suction tubing required<br />
to reach two to three inches from the bottom of chemical<br />
tank. Use the outside of the tank as a guide. Mark this<br />
length on tubing.<br />
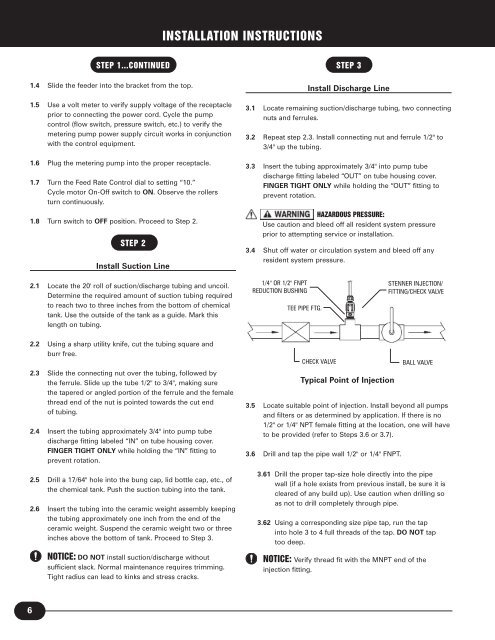
1/4'' OR 1/2'' FNPT<br />
REDUCTION BUSHING<br />
TEE PIPE FTG.<br />
STENNER INJECTION/<br />
FITTING/CHECK VALVE<br />
2.2 Using a sharp utility knife, cut the tubing square <strong>and</strong><br />
burr free.<br />
2.3 Slide the connecting nut over the tubing, followed by<br />
the ferrule. Slide up the tube 1/2'' to 3/4'', making sure<br />
the tapered or angled portion of the ferrule <strong>and</strong> the female<br />
thread end of the nut is pointed towards the cut end<br />
of tubing.<br />
2.4 Insert the tubing approximately 3/4'' into pump tube<br />
discharge fitting labeled “IN” on tube housing cover.<br />
FINGER TIGHT ONLY while holding the “IN” fitting to<br />
prevent rotation.<br />
2.5 Drill a 17/64'' hole into the bung cap, lid bottle cap, etc., of<br />
the chemical tank. Push the suction tubing into the tank.<br />
2.6 Insert the tubing into the ceramic weight assembly keeping<br />
the tubing approximately one inch from the end of the<br />
ceramic weight. Suspend the ceramic weight two or three<br />
inches above the bottom of tank. Proceed to Step 3.<br />
NOTICE: DO NOT install suction/discharge without<br />
sufficient slack. Normal maintenance requires trimming.<br />
Tight radius can lead to kinks <strong>and</strong> stress cracks.<br />
CHECK VALVE<br />
Typical Point of Injection<br />
3.5 Locate suitable point of injection. Install beyond all pumps<br />
<strong>and</strong> filters or as determined by application. If there is no<br />
1/2'' or 1/4'' NPT female fitting at the location, one will have<br />
to be provided (refer to Steps 3.6 or 3.7).<br />
3.6 Drill <strong>and</strong> tap the pipe wall 1/2'' or 1/4'' FNPT.<br />
BALL VALVE<br />
3.61 Drill the proper tap-size hole directly into the pipe<br />
wall (if a hole exists from previous install, be sure it is<br />
cleared of any build up). Use caution when drilling so<br />
as not to drill completely through pipe.<br />
3.62 Using a corresponding size pipe tap, run the tap<br />
into hole 3 to 4 full threads of the tap. DO NOT tap<br />
too deep.<br />
NOTICE: Verify thread fit with the MNPT end of the<br />
injection fitting.<br />
6