Bruksanvisning Cold Line med Dixell XR70 (GB-NO) fra 7-2009
Bruksanvisning Cold Line med Dixell XR70 (GB-NO) fra 7-2009
Bruksanvisning Cold Line med Dixell XR70 (GB-NO) fra 7-2009

You also want an ePaper? Increase the reach of your titles
YUMPU automatically turns print PDFs into web optimized ePapers that Google loves.
ENGLISH<br />
COOLING UNIT<br />
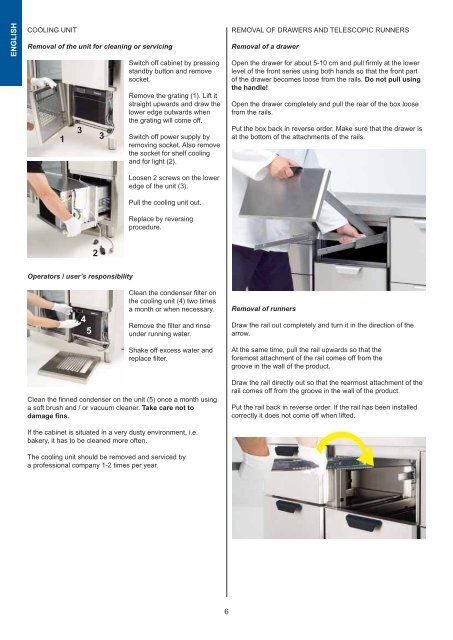
Removal of the unit for cleaning or servicing<br />
Switch off cabinet by pressing<br />
standby button and remove<br />
socket.<br />
Remove the grating (1). Lift it<br />
straight upwards and draw the<br />
lower edge outwards when<br />
the grating will come off.<br />
Switch off power supply by<br />
removing socket. Also remove<br />
the socket for shelf cooling<br />
and for light (2).<br />
REMOVAL OF DRAWERS AND TELESCOPIC RUNNERS<br />
Removal of a drawer<br />
Open the drawer for about 5-10 cm and pull fi rmly at the lower<br />
level of the front series using both hands so that the front part<br />
of the drawer becomes loose from the rails. Do not pull using<br />
the handle!<br />
Open the drawer completely and pull the rear of the box loose<br />
from the rails.<br />
Put the box back in reverse order. Make sure that the drawer is<br />
at the bottom of the attachments of the rails.<br />
Loosen 2 screws on the lower<br />
edge of the unit (3).<br />
Pull the cooling unit out.<br />
Replace by reversing<br />
procedure.<br />
Operators / user’s responsibility<br />
Clean the condenser fi lter on<br />
the cooling unit (4) two times<br />
a month or when necessary.<br />
Remove the fi lter and rinse<br />
under running water.<br />
Shake off excess water and<br />
replace fi lter.<br />
Clean the fi nned condenser on the unit (5) once a month using<br />
a soft brush and / or vacuum cleaner. Take care not to<br />
damage fins.<br />
If the cabinet is situated in a very dusty environment, i.e.<br />
bakery, it has to be cleaned more often.<br />
The cooling unit should be removed and serviced by<br />
a professional company 1-2 times per year.<br />
Removal of runners<br />
Draw the rail out completely and turn it in the direction of the<br />
arrow.<br />
At the same time, pull the rail upwards so that the<br />
foremost attachment of the rail comes off from the<br />
groove in the wall of the product.<br />
Draw the rail directly out so that the rearmost attachment of the<br />
rail comes off from the groove in the wall of the product.<br />
Put the rail back in reverse order. If the rail has been installed<br />
correctly it does not come off when lifted.<br />
6