MNL-Lite2 Series - Quad
MNL-Lite2 Series - Quad
MNL-Lite2 Series - Quad

You also want an ePaper? Increase the reach of your titles
YUMPU automatically turns print PDFs into web optimized ePapers that Google loves.
L-ite<br />
2 <strong>Series</strong><br />
L-ite 2 <strong>Series</strong><br />
Operation<br />
Stereo Connections<br />
Switching On<br />
Standard Connections<br />
Check that all connections to the subwoofer have been properly made and that the main volume control is at minimum.<br />
Plug the supplied power cord into the mains socket on the rear panel.<br />
Plug in the mains plug and switch the power on. Now switch the subwoofer on with the rest of your system.<br />
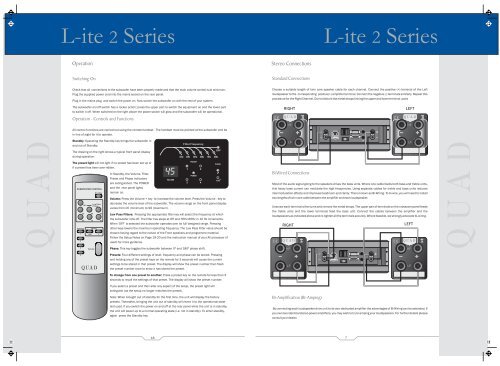
Choose a suitable length of twin core speaker cable for each channel. Connect the positive (+) terminal of the Left<br />
loudspeaker to the corresponding positive(+) amplifier terminal. Connect the negative (-) terminals similarly. Repeat this<br />
procedure for the Right Channel. Do not disturb the metal straps linking the upper and lower terminal pairs<br />
The subwoofer on/off switch has a rocker action; press the upper part to switch the equipment on and the lower part<br />
to switch it off. When switched on the light above the power switch will glow and the subwoofer will be operational.<br />
RIGHT<br />
LEFT<br />
Operation - Controls and Functions.<br />
HF<br />
HF<br />
All control functions are carried out using the remote handset. The handset must be pointed at the subwoofer and be<br />
L<br />
in line of sight for it to operate.<br />
Standby: Operating the Standby key brings the subwoofer in<br />
and out of Standby.<br />
Filter Frequency<br />
LF<br />
R<br />
LF<br />
The drawing on the right shows a typical front panel display<br />
OFF<br />
during operation.<br />
35Hz<br />
45Hz<br />
55Hz<br />
65Hz<br />
75Hz<br />
85Hz<br />
The preset light will not light if no preset has been set up or<br />
if a preset has been over-ridden.<br />
In Standby, the Volume, Filter,<br />
Preset and Phase indicators<br />
are extinguished. The POWER<br />
SUBWOOFER CONTROL<br />
PRESET<br />
PHASE<br />
1 2<br />
0<br />
POWER<br />
VOLUME<br />
180<br />
3 4<br />
and the rear panel lights<br />
remain on.<br />
Volume: Press the Volume + key to increase the volume level. Press the Volume - key to<br />
decrease the volume level of the subwoofer. The volume range on the front panel display<br />
varies from 00 (minimum) to 99 (maximum).<br />
Low Pass Filters: Pressing the appropriate filter key will select the frequency at which<br />
the subwoofer rolls off. The filter has steps at Off and 35Hz-85Hz in 10 Hz increments.<br />
When ‘OFF’ is selected the subwoofer operates over its full designed range. Pressing<br />
other keys lowers the maximum operating frequency. The Low Pass Filter value should be<br />
chosen having regard to the nature of the Front speakers and programme material.<br />
Follow the Setup Notes on Page 19-20 and the instruction manual of your AV processor (if<br />
used) for more guidance.<br />
Bi Wired Connections<br />
Most of the audio signal going to the speakers drives the bass units. Where one cable feeds both bass and treble units,<br />
this heavy bass current can modulate the high frequencies. Using separate cables for treble and bass units reduces<br />
intermodulation effects and improves headroom and clarity. This is known as Bi-Wiring. To bi-wire, you will need to install<br />
two lengths of twin core cable between the amplifier and each loudspeaker.<br />
Unscrew each terminal a few turns and remove the metal straps. The upper pair of terminals on the crossover panel feeds<br />
the treble units and the lower terminals feed the bass unit. Connect the cables between the amplifier and the<br />
loudspeakers as indicated above and re-tighten all the terminals securely. Where feasible, we strongly advocate bi-wiring.<br />
RIGHT<br />
LEFT<br />
Phase: This key toggles the subwoofer between 0º and 180º phase shift.<br />
HF<br />
L<br />
HF<br />
Presets: Four different settings of level, frequency and phase can be stored. Pressing<br />
and holding any of the preset keys on the remote for 3 seconds will cause the current<br />
settings to be stored in that preset. The display will show the preset number then flash<br />
the preset number once to show it has stored the preset.<br />
LF<br />
R<br />
LF<br />
To change from one preset to another: Press a preset key on the remote for less than 3<br />
seconds to recall the settings of that preset. The display will show the preset number:<br />
If you select a preset and then alter any aspect of the setup, the preset light will<br />
extinguish (as the setup no longer matches the preset).<br />
Note: When brought out of standby for the first time, the unit will display the factory<br />
presets. Thereafter, bringing the unit out of standby will revert it to the operational state<br />
last used. If you switch the power on and off at the rear panel while the unit is in standby,<br />
the unit will power up to a normal operating state (i.e. not in standby). To enter standby,<br />
again press the Standby key.<br />
Bi-Amplification (Bi-Amping)<br />
By connecting each loudspeaker drive unit to its own dedicated amplifier the advantages of Bi-Wiring can be extended. If<br />
you own two identical stereo power amplifiers, you may wish to try bi-amping your loudspeakers. For further details please<br />
consult your dealer.<br />
18<br />
7