LCD TV SERVICE MANUAL - Jordans Manuals
LCD TV SERVICE MANUAL - Jordans Manuals
LCD TV SERVICE MANUAL - Jordans Manuals

You also want an ePaper? Increase the reach of your titles
YUMPU automatically turns print PDFs into web optimized ePapers that Google loves.
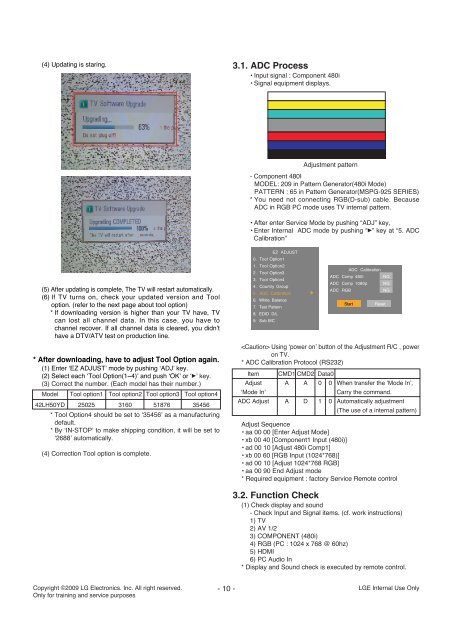
(4) Updating is staring.<br />
3.1. ADC Process<br />
• Input signal : Component 480i<br />
• Signal equipment displays.<br />
Adjustment pattern<br />
- Component 480I<br />
MODEL: 209 in Pattern Generator(480i Mode)<br />
PATTERN : 65 in Pattern Generator(MSPG-925 SERIES)<br />
* You need not connecting RGB(D-sub) cable. Because<br />
ADC in RGB PC mode uses <strong>TV</strong> internal pattern.<br />
• After enter Service Mode by pushing “ADJ” key,<br />
• Enter Internal ADC mode by pushing “G” key at “5. ADC<br />
Calibration”<br />
(5) After updating is complete, The <strong>TV</strong> will restart automatically.<br />
(6) If <strong>TV</strong> turns on, check your updated version and Tool<br />
option. (refer to the next page about tool option)<br />
* If downloading version is higher than your <strong>TV</strong> have, <strong>TV</strong><br />
can lost all channel data. In this case, you have to<br />
channel recover. If all channel data is cleared, you didn’t<br />
have a D<strong>TV</strong>/A<strong>TV</strong> test on production line.<br />
* After downloading, have to adjust Tool Option again.<br />
(1) Enter ‘EZ ADJUST’ mode by pushing ‘ADJ’ key.<br />
(2) Select each ‘Tool Option(1~4)’ and push ‘OK’ or ‘G’ key.<br />
(3) Correct the number. (Each model has their number.)<br />
Model Tool option1 Tool option2 Tool option3 Tool option4<br />
42LH50YD 25025 3160 51876 35456<br />
* Tool Option4 should be set to ‘35456’ as a manufacturing<br />
default.<br />
* By ‘IN-STOP’ to make shipping condition, it will be set to<br />
‘2688’ automatically.<br />
(4) Correction Tool option is complete.<br />
EZ ADJUST<br />
0. Tool Option1<br />
1. Tool Option2<br />
2. Tool Option3<br />
3. Tool Option4<br />
4. Country Group<br />
5. ADC Calibration<br />
6. White Balance<br />
7. Test Pattern<br />
8. EDID D/L<br />
9. Sub B/C<br />
ADC Calibration<br />
ADC Comp 480i NG<br />
ADC Comp 1080p NG<br />
ADC RGB<br />
NG<br />
Using ‘power on’ button of the Adjustment R/C , power<br />
on <strong>TV</strong>.<br />
* ADC Calibration Protocol (RS232)<br />
Item CMD1 CMD2 Data0<br />
Adjust A A 0 0 When transfer the ‘Mode In’,<br />
‘Mode In’<br />
Carry the command.<br />
ADC Adjust A D 1 0 Automatically adjustment<br />
(The use of a internal pattern)<br />
Start<br />
Reset<br />
Adjust Sequence<br />
• aa 00 00 [Enter Adjust Mode]<br />
• xb 00 40 [Component1 Input (480i)]<br />
• ad 00 10 [Adjust 480i Comp1]<br />
• xb 00 60 [RGB Input (1024*768)]<br />
• ad 00 10 [Adjust 1024*768 RGB]<br />
• aa 00 90 End Adjust mode<br />
* Required equipment : factory Service Remote control<br />
3.2. Function Check<br />
(1) Check display and sound<br />
- Check Input and Signal items. (cf. work instructions)<br />
1) <strong>TV</strong><br />
2) AV 1/2<br />
3) COMPONENT (480i)<br />
4) RGB (PC : 1024 x 768 @ 60hz)<br />
5) HDMI<br />
6) PC Audio In<br />
* Display and Sound check is executed by remote control.<br />
Copyright ©2009 LG Electronics. Inc. All right reserved.<br />
Only for training and service purposes<br />
- 10 - LGE Internal Use Only