PBC2112/2210 PortaBass Combo Amplifiers
PBC2112/2210 PortaBass Combo Amplifiers
PBC2112/2210 PortaBass Combo Amplifiers

Create successful ePaper yourself
Turn your PDF publications into a flip-book with our unique Google optimized e-Paper software.
<strong>PBC2112</strong>/<strong>2210</strong> <strong>PortaBass</strong> <strong>Combo</strong> <strong>Amplifiers</strong><br />
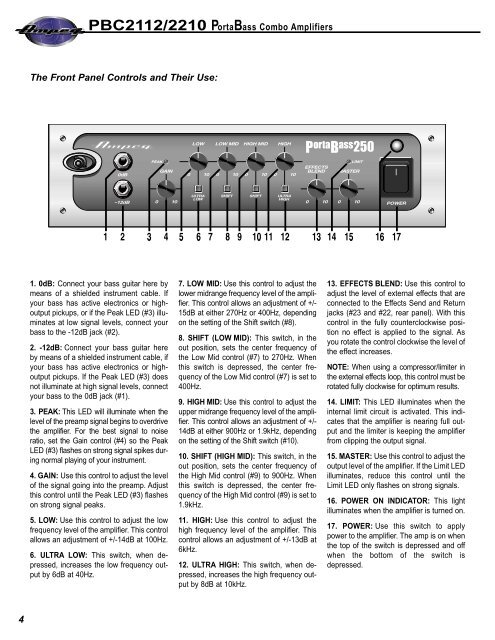
The Front Panel Controls and Their Use:<br />
1. 0dB: Connect your bass guitar here by<br />
means of a shielded instrument cable. If<br />
your bass has active electronics or highoutput<br />
pickups, or if the Peak LED (#3) illuminates<br />
at low signal levels, connect your<br />
bass to the -12dB jack (#2).<br />
2. -12dB: Connect your bass guitar here<br />
by means of a shielded instrument cable, if<br />
your bass has active electronics or highoutput<br />
pickups. If the Peak LED (#3) does<br />
not illuminate at high signal levels, connect<br />
your bass to the 0dB jack (#1).<br />
3. PEAK: This LED will illuminate when the<br />
level of the preamp signal begins to overdrive<br />
the amplifier. For the best signal to noise<br />
ratio, set the Gain control (#4) so the Peak<br />
LED (#3) flashes on strong signal spikes during<br />
normal playing of your instrument.<br />
4. GAIN: Use this control to adjust the level<br />
of the signal going into the preamp. Adjust<br />
this control until the Peak LED (#3) flashes<br />
on strong signal peaks.<br />
5. LOW: Use this control to adjust the low<br />
frequency level of the amplifier. This control<br />
allows an adjustment of +/-14dB at 100Hz.<br />
6. ULTRA LOW: This switch, when depressed,<br />
increases the low frequency output<br />
by 6dB at 40Hz.<br />
7. LOW MID: Use this control to adjust the<br />
lower midrange frequency level of the amplifier.<br />
This control allows an adjustment of +/-<br />
15dB at either 270Hz or 400Hz, depending<br />
on the setting of the Shift switch (#8).<br />
8. SHIFT (LOW MID): This switch, in the<br />
out position, sets the center frequency of<br />
the Low Mid control (#7) to 270Hz. When<br />
this switch is depressed, the center frequency<br />
of the Low Mid control (#7) is set to<br />
400Hz.<br />
9. HIGH MID: Use this control to adjust the<br />
upper midrange frequency level of the amplifier.<br />
This control allows an adjustment of +/-<br />
14dB at either 900Hz or 1.9kHz, depending<br />
on the setting of the Shift switch (#10).<br />
10. SHIFT (HIGH MID): This switch, in the<br />
out position, sets the center frequency of<br />
the High Mid control (#9) to 900Hz. When<br />
this switch is depressed, the center frequency<br />
of the High Mid control (#9) is set to<br />
1.9kHz.<br />
11. HIGH: Use this control to adjust the<br />
high frequency level of the amplifier. This<br />
control allows an adjustment of +/-13dB at<br />
6kHz.<br />
12. ULTRA HIGH: This switch, when depressed,<br />
increases the high frequency output<br />
by 8dB at 10kHz.<br />
13. EFFECTS BLEND: Use this control to<br />
adjust the level of external effects that are<br />
connected to the Effects Send and Return<br />
jacks (#23 and #22, rear panel). With this<br />
control in the fully counterclockwise position<br />
no effect is applied to the signal. As<br />
you rotate the control clockwise the level of<br />
the effect increases.<br />
NOTE: When using a compressor/limiter in<br />
the external effects loop, this control must be<br />
rotated fully clockwise for optimum results.<br />
14. LIMIT: This LED illuminates when the<br />
internal limit circuit is activated. This indicates<br />
that the amplifier is nearing full output<br />
and the limiter is keeping the amplifier<br />
from clipping the output signal.<br />
15. MASTER: Use this control to adjust the<br />
output level of the amplifier. If the Limit LED<br />
illuminates, reduce this control until the<br />
Limit LED only flashes on strong signals.<br />
16. POWER ON INDICATOR: This light<br />
illuminates when the amplifier is turned on.<br />
17. POWER: Use this switch to apply<br />
power to the amplifier. The amp is on when<br />
the top of the switch is depressed and off<br />
when the bottom of the switch is<br />
depressed.<br />
4