OWNERS MANUAL TSUNAMI 10 D
OWNERS MANUAL TSUNAMI 10 D
OWNERS MANUAL TSUNAMI 10 D

Create successful ePaper yourself
Turn your PDF publications into a flip-book with our unique Google optimized e-Paper software.
FUNDAMENTAL ACOUSTIC RESEARCH<br />
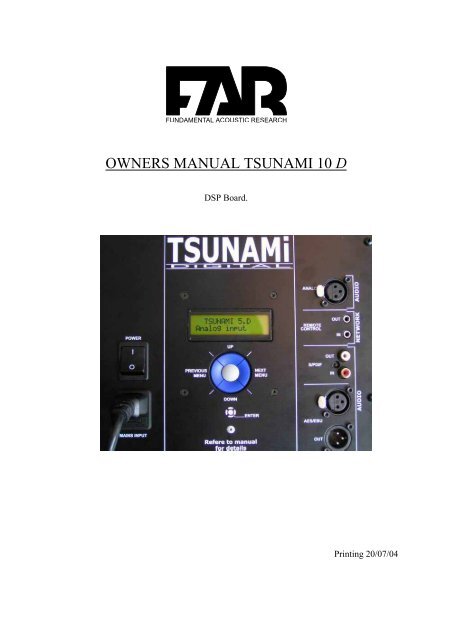
<strong>OWNERS</strong> <strong>MANUAL</strong> <strong>TSUNAMI</strong> <strong>10</strong> D<br />
DSP Board.<br />
Printing 20/07/04
Before using this wonderful tool, please check the different points:<br />
A. Généralities<br />
The front panel is separated in two zones;<br />
1. The two lines screen permit to visualise the status or the settings<br />
2. The control knobs.<br />
Input<br />
format<br />
Name of the speaker<br />
Master Perset curve<br />
Ou Slave<br />
User curve<br />
The top line shows the reference name of the speaker.<br />
The lowest line shows the most important points or the settings status.<br />
control all the system with 5 knobs:<br />
The one in the centre put the mute in function.<br />
To move in the menu please press the left and right knobs.<br />
- Use the left one for the previous stage.<br />
- Use the right one for the next stage.<br />
When you are on the desired position press the top or bottom knob to increase or to<br />
decrease the value until you get the one required.<br />
Summary :<br />
From left to right , I move in the menu.<br />
Up and down I adjust the settings.
B. Volume control<br />
Use the left and right knobs until you find the right menu position.<br />
Use the up and down knobs until you find the desired value.<br />
Min – 40 dB<br />
Max + 23 dB<br />
The rise is done by step of 0.5 dB thanks to the up and down knobs .<br />
Each click represent 0.5 dB.<br />
To get access to the volume settings click right first to get out of the start screen. Now click<br />
once on the left knob . Now you are in the main menu . The main menu start with the volume<br />
control.<br />
The central knob is the mute .<br />
Press at the center to activate the mute.
C. Network adress.<br />
Becarefull : Never give the same adress at two different speakers. If you do so you will create<br />
conflicts.<br />
With the right knob find the right menu position.<br />
With the up and down knobs select the desired value.<br />
The great interest of the DSP speaker from FAR is its fully autonomy. This means that the<br />
digital monitors from FAR are <strong>10</strong>0 % interchangeable. You must give an address from 1 up to<br />
99.<br />
This adress will be used when you want to drive the speakers or when you connect a remote<br />
control on the speaker.<br />
Four different type of remote control are available.<br />
1. The speaker it self. Indeed, the rear panel can control all the other speakers.<br />
That for put the speaker that will control the others in MASTER position and<br />
all the others in slave position. (see chapter master/slave).<br />
2. The remote control CP01<br />
The CP01 is the copy of the rear panel of your speaker. All identical<br />
functions are included. See remote control chapter.<br />
The remote control is the master, All the other speakers will be locked as<br />
slaves.<br />
3. The PC SFPC01 (available NOV 04)<br />
The SFPC01 is the most powerfull control available. This will control your<br />
system with the accuracy needed in professional use.<br />
Description see chapiter remote control.<br />
4. The palm via blue tooth SFPM01(available March 04).<br />
The SFPM01 is identical to the SFPC01 but it has the big advantage to drive<br />
the whole system wireless.<br />
Description see chapiter remote control.<br />
Obviously Never give the same adress at two different speakers. If you do so<br />
you will create conflicts.
.<br />
D. Input selection :<br />
With the right knob find the right menu position.<br />
With the up and down knobs select the desired value.<br />
If you are in automatic mode ( as the settings are stored ) the speaker will find by itself the<br />
signal injected.<br />
The three formats are the followings:<br />
Analogue AES SPDIF<br />
The system will choose automatically the most performant. First the AES, Second the SPDIF<br />
and last the analogue.<br />
You can also force the signal.<br />
So you can for example connect the AES out of the console and the analogue out of the<br />
recorder and listen the difference between each of them by forcing one or another.<br />
Be careful : When you are connected to a Digital signal (AES/SPDIF), the sound level is part<br />
of the signal. To protect the speaker against any damage, please decrease the level down to<br />
- 20 dB at minimum.<br />
When you get an analogue connection, you can select one of the following sensitivity levels:<br />
-<strong>10</strong>.dBu ; 0.dBu ; +4.dBu ; +16.dBu
E. Sensitivity<br />
With the right knob find the right menu position.<br />
With the up and down knobs select the desired value.<br />
.<br />
When you get an analogue connection, you can select one of the following sensitivity levels<br />
available:<br />
- -<strong>10</strong> dB<br />
- 0 dB<br />
- +4 dB<br />
- +16 dB<br />
- If your hearing level is too high go up to : + 16 dB<br />
- If your hearing level is too low go down to 0 db or down to – <strong>10</strong> dB.<br />
-<br />
As professional user, with + 4 output desk use the + 4 sensitivity level.<br />
The dolby rules require at the listening position a sound pressure level of 85 db.<br />
How to set up the 85 db ?<br />
Use a pink noise at 0 dB level out from the mix desk (calibration at 0 db vu at the meters).<br />
Adjust the volume level of the monitor to get 85 dB at the listening position.<br />
In analogue, please select the correct input sensitivity and next adjust the desired volume<br />
level.<br />
In Digital adjust straight the level volume until you get the 85 dB required.
F. Channel A Channel B // Canal A Canal B<br />
With the right knob find the right menu position.<br />
With the up and down knobs select the desired value.<br />
The audio digital signal includes two channels A and B or left and right. A will be connected<br />
to the left and B will be connected to the right audio channel.<br />
When you are digitally connected please:<br />
Use the channel A in the one that will receive the audio first, and place it at the left position<br />
because it is the left channel.<br />
Next, get out of the A speaker and connect it to the second or B speaker that will be at the<br />
right position.<br />
Select the channel B in the second or right speaker.<br />
If you select two times the left channel you will hear twice the left channel.<br />
If you select two times the right channel you will hear twice the right channel.<br />
A strange kind of mono.<br />
For the stereo, you must be in A for the first speaker and in B for the 2 ème speaker.<br />
Why A and B and not left and right?<br />
Just because these are pairs and can be used in other configurations like:<br />
<br />
<br />
<br />
A centre and a sub.<br />
A left surround and a right surround.<br />
Or other configuration you can invent yourself.
Master slave<br />
With the right knob find the right menu position.<br />
With the up and down knobs select the desired value.<br />
One of the most important advantages of the digital is the data’s transfer.<br />
You can drive a speaker from another if you are in the correct configuration.<br />
This means that when you will move a value on one speaker the other entire one will change<br />
the same way. To do so, you need to place yourself in the following position.<br />
<br />
<br />
<br />
The first speaker must be placed in Master position.<br />
Use a stereo mini jack to get out of the remote connector of the first and master<br />
speaker and connect it to the input of the second and slave speaker . Link all the<br />
speakers you want to with a maximum of 99 speakers.<br />
All the others must be placed in slave position.<br />
When it is done, you can do the following test:<br />
Put your first left master speaker on the volume position and press the up and down knobs .<br />
You will hear the level modification. Take a look at the display of any of the other speakers,<br />
you will notice that the digits are changing the same way.<br />
Be careful !!: All the values need to start at the same level except if you want to implement a<br />
difference.<br />
For example:<br />
If the volume level is at -11 dB on the right slave speaker and that the<br />
level of the left master speaker is at -<strong>10</strong> dB, When you increase the<br />
volume of the master speaker of 2 dB it means that the level of the<br />
master will be at -12 dB and the level of the slave speaker will be at –<br />
13 dB . It means that the difference remains.<br />
Why?<br />
Just because if you want to include a difference you still can do it, but<br />
do it when you do the first set up.<br />
What kinds of difference are interesting to implement?<br />
If the left speaker is closer to a corner than the right one you will maybe<br />
decrease the low tilt or shelf of 1 or 2 dB just to balance the bottom end<br />
of the two speakers. When the set up of the correct difference is done,<br />
you can make the adjustments of the entire system and you don’t need<br />
to care about this difference because it is already done.<br />
Take care:<br />
If you don’t know that there is a difference between the speakers you<br />
will keep this difference. This is why we installed a summary on the<br />
display when you power the speaker<br />
Connections: Of course you must link all the speakers you want to drive with the 3.5<br />
mini stereo jack .
G. Curve selection<br />
With the right knob find the right menu position.<br />
With the up and down knobs select the desired value.<br />
For more flexibility and more efficiency, you can select 5 different presets. ( One at a time)<br />
- Flat<br />
- Academy : for film mixing<br />
- TV : for broadcast mixing.<br />
- Car & club : To simulate the feelings in a club or in a car.<br />
- Custom<br />
H. Room adjust<br />
With the right knob find the right menu position.<br />
With the up and down knobs select the desired value.<br />
The room ajust N°1 is flat as standard. The 4 next presets can be optimised following the<br />
wishes of 4 different sound engineers. Adjustment can only be done with PC software FAR<br />
module.
I. Tilt adjustment : bass ; mid ; high ; tilt<br />
With the right knob find the right menu position.<br />
With the up and down knobs select the desired value.<br />
.<br />
A high quality basic equalisation can be done trough the 3 different tilt adjustments. Low, mid<br />
and High tilt can be boosted up to 1 dB and down to -3 dB.<br />
J. Shelf adjust : low high<br />
With the right knob find the right menu position.<br />
With the up and down knobs select the desired value.<br />
These adjustments will help you to match your speakers with their position in the room.<br />
The bottom end , low shelf will be decreased if you place your speaker close to a corner. The<br />
High or high shelf will be decreased if your room is too live.<br />
So you can adjust the settings up to +1 db and adjust the settings down to – 3 dB.
K. Connexions<br />
The digital active FAR speakers need to be connected as any other speaker.<br />
- Power<br />
220 V ou 1<strong>10</strong> V following the country to make the power connection<br />
Power switch (+Fuse) : To open or close your speaker.<br />
- Audio connexions<br />
Audio : digital AES ou SPDIF<br />
In : First connection for the digital pair. Don’t forget to put the speaker in position A.<br />
It is normally done in the factory.<br />
Out : Output for the second connections on a second speaker.<br />
So when you get out of the first peaker you must get in on the second one.<br />
Don’t forget to put the second speaker in B position.<br />
The SPDIF and AES are basically identical. For a better stability choose a symmetrical<br />
adaptation for the SPDIF so you can benefit of the galvanic protection of the AES<br />
input transformer.<br />
Audio : analogue<br />
IN only . Just as any loudspeaker..<br />
Network : In – Out : link the speakers between themselfs. Just connect the output to<br />
the next input and so on until all your system is ready.
L. Caractéristiques techniques<br />
- Loudspeakers<br />
Sensitivity<br />
Max pressure leve<br />
(2 cabinets @ 1m)<br />
Frequency Range<br />
Active Filters<br />
Low Pass<br />
User control<br />
High Pass<br />
User Control<br />
Drivers<br />
Woofer<br />
Tweeter<br />
Cabinet<br />
122dB<br />
38-20000Hz<br />
3,4kHz, 24dB/octave<br />
-1/flat/+1/+2dB<br />
3.4 Hz, 24dB/octave<br />
-3/-2/-1/flat/+1/+2<br />
200 mm<br />
25 mm soft dome<br />
18 mm MDF<br />
- Amplifier<br />
Nominal/Peak Power<br />
LF amplifier<br />
<strong>10</strong>0W/150W<br />
HF amplifier<br />
70W/<strong>10</strong>0W<br />
Power Bandwidth<br />
20-25000Hz<br />
Slew-Rate<br />
35V per microsecond<br />
S/N Ratio<br />
><strong>10</strong>0dB<br />
Distortion<br />
Intermodulation 0.01%<br />
Total Harmonic 0.05%<br />
Input<br />
Sensitivity<br />
0dB<br />
Impedance<br />
><strong>10</strong>kohm<br />
Mode<br />
Electrony balanced<br />
D-A 24 bits signal<br />
Input sample rate<br />
8 – <strong>10</strong>8 KHz<br />
Frequency range<br />
22 KHz (-0.1 dB), 45 KHz (-3 dB)<br />
Linearity<br />
< 1 dB at – 1<strong>10</strong> dBFs<br />
SNR<br />
> 116 dB<br />
Dynamic range<br />
> 113 dB<br />
A-D-A<br />
(24 bit – 96 KHZ)<br />
Balanced analog input (selectable full scale, max + 16 dBu)<br />
THD+N<br />
< 0.002 % at full scale, 1 KHz, flat over<br />
frequency range<br />
Propagation delay<br />
< 70 us (with DSP s activated)
M. External dimensions<br />
Height<br />
Width<br />
Depth<br />
385 mm<br />
2<strong>10</strong> mm<br />
320 mm<br />
N. Graphiques<br />
TS 5 Fréquency<br />
TS 5 impulse Réponse<br />
TS 5 Step