30163 FORZa FeRRaRi - Carrera
30163 FORZa FeRRaRi - Carrera
30163 FORZa FeRRaRi - Carrera

You also want an ePaper? Increase the reach of your titles
YUMPU automatically turns print PDFs into web optimized ePapers that Google loves.
Setting fuel tank capacity<br />
Pit Lane 30356<br />
2 3 1 – 10<br />
3<br />
1<br />
1 – 10<br />
(individually for one and/or several cars)<br />
1 Activate fuelling function at the Black Box.<br />
2 Plug any speed controller in connector 3. Switch off Black Box,<br />
place car/s on the track, push lane-change-button and keep it<br />
pushed while Black Box is switched on again. Don´t release the<br />
lane-change-button until the 1st LED lights red. Fuel capacity is<br />
set by pushing lane-change-button. Confirm by pressing speed<br />
controller´s tappet (=> middle LED will light).<br />
Before the start return speed controller to the original connector!<br />
3<br />
1 LED on = low fuel capacity<br />
5 LEDs on = full tank<br />
Refuelling:<br />
Depending on the fuel capacity the car´s lights start to flash after<br />
some time, the car slows down and might start to stutter. For refuelling<br />
enter the Pit Lane and release the speed controller´s tappet.<br />
(Fuelling amount depends on car´s standing time in the Pit Lane).<br />
a) Filling up: wait until car´s lights stop flashing.<br />
b) Partial refuelling: start while car´s lights still flash.<br />
c) Non-refuelling: car drives on at reduced speed.<br />
Car programming<br />
from DIGITAL 132<br />
to Evolution (analogue)<br />
Place car on the Evolution track and push speed controller´s tappet<br />
three times (thumb). Push the switch for changing the running direction<br />
acc. fig. 1 . For <strong>Carrera</strong> DIGITAL 132 operation mode return<br />
the switch to original position.<br />
Replacement of double sliding<br />
contact and guide keel<br />
1<br />
2 a 2 b<br />
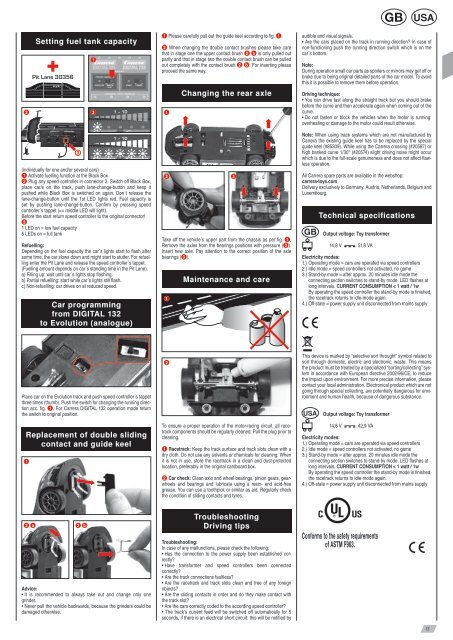
Advice:<br />
• It is recommended to always take out and change only one<br />
grinder.<br />
• Never pull the vehicle backwards, because the grinders could be<br />
damaged otherwise.<br />
1 Please carefully pull out the guide keel according to fig. 1 .<br />
2 When changing the double contact brushes please take care<br />
that in stage one the upper contact brush 2 a is only pulled out<br />
partly and that in stage two the double contact brush can be pulled<br />
out completely with the contact brush 2 b . For inserting please<br />
proceed the same way.<br />
1<br />
Changing the rear axle<br />
2 3<br />
Take off the vehicle´s upper part from the chassis as per fig. 1 .<br />
Remove the axles from the bearings positions with pressure ( 2 ).<br />
Insert new axle. Pay attention to the correct position of the axle<br />
bearings ( 3 ).<br />
1<br />
2<br />
Maintenance and care<br />
To ensure a proper operation of the motor-racing circuit, all racetrack<br />
components should be regularly cleaned. Pull the plug prior to<br />
cleaning.<br />
1 Racetrack: Keep the track surface and track slots clean with a<br />
dry cloth. Do not use any solvents or chemicals for cleaning. When<br />
it is not in use, store the racetrack in a clean and dust-protected<br />
location, preferably in the original cardboard box.<br />
2 Car check: Clean axle and wheel bearings, pinion gears, gearwheels<br />
and bearings and lubricate using a resin- and acid-free<br />
grease. You can use a toothpick or similar as aid. Regularly check<br />
the condition of sliding contacts and tyres.<br />
Troubleshooting<br />
Driving tips<br />
troubleshooting:<br />
In case of any malfunctions, please check the following:<br />
• Has the connection to the power supply been established correctly?<br />
• Have transformer and speed controllers been connected<br />
correctly?<br />
• Are the track connections faultless?<br />
• Are the racetrack and track slots clean and free of any foreign<br />
objects?<br />
• Are the sliding contacts in order and do they make contact with<br />
the track slot?<br />
• Are the cars correctly coded to the according speed controller?<br />
• The track‘s current feed will be switched off automatically for 5<br />
seconds, if there is an electrical short circuit: this will be notified by<br />
audible and visual signals.<br />
• Are the cars placed on the track in running direction? In case of<br />
non-functioning push the running direction switch which is on the<br />
car´s bottom.<br />
Note:<br />
During operation small car parts as spoilers or mirrors may get off or<br />
brake due to being original detailed parts of the car model. To avoid<br />
this it is possible to remove them before operation.<br />
Driving technique:<br />
• You can drive fast along the straight track but you should brake<br />
before the curve and then accelerate again when coming out of the<br />
curve.<br />
• Do not fasten or block the vehicles when the motor is running:<br />
overheating or damage to the motor could result otherwise.<br />
Note: When using track systems which are not manufactured by<br />
<strong>Carrera</strong> the existing guide keel has to be replaced by the special<br />
guide keel (#85309). While using the <strong>Carrera</strong> crossing (#20587) or<br />
high banked curve 1/30° (#20574) slight driving noise might occur<br />
which is due to the full-scale genuineness and does not affect flawless<br />
operation.<br />
All <strong>Carrera</strong> spare parts are available in the webshop:<br />
carrera-toys.com<br />
Delivery exclusively to Germany, Austria, Netherlands, Belgium and<br />
Luxembourg.<br />
Technical specifications<br />
output voltage: toy transformer<br />
14,8 V 51,8 VA<br />
Electricity modes:<br />
1.) Operating mode = cars are operated via speed controllers<br />
2.) Idle mode = speed controllers not activated, no game<br />
3.) Stand-by mode = after approx. 20 minutes idle mode the<br />
connecting section switches to stand-by mode. LED flashes at<br />
long intervals. CURRENt CoNSUmptIoN < 1 watt / 1w<br />
By operating the speed controller the stand-by mode is finished,<br />
the racetrack returns to idle-mode again.<br />
4.) Off-state = power supply unit disconnected from mains supply<br />
This device is marked by “selective sort throught” symbol related to<br />
sort through domestic, electric and electronic, waste. This means<br />
the product must be treated by a specialized “sorting/collecting” system<br />
in accordance with European directive 2002/96/CE, to reduce<br />
the impact upon environment. For more precise information, please<br />
contact your local administration. Electronical product which are not<br />
going through special collecting, are potentially dangerous for environment<br />
and human health, because of dangerous substance.<br />
output voltage: toy transformer<br />
14,8 V 42,9 VA<br />
Electricity modes:<br />
1.) Operating mode = cars are operated via speed controllers<br />
2.) Idle mode = speed controllers not activated, no game<br />
3.) Stand-by mode = after approx. 20 minutes idle mode the<br />
connecting section switches to stand-by mode. LED flashes at<br />
long intervals. CURRENt CoNSUmptIoN < 1 watt / 1w<br />
By operating the speed controller the stand-by mode is finished,<br />
the racetrack returns to idle-mode again.<br />
4.) Off-state = power supply unit disconnected from mains supply<br />
11