TB SIG 226-9
TB SIG 226-9
TB SIG 226-9

You also want an ePaper? Increase the reach of your titles
YUMPU automatically turns print PDFs into web optimized ePapers that Google loves.
ination of batteries that yield 135 to 150 volts<br />
may be used.<br />
c. Tape all exposed wiring so as to prevent<br />
shock to the user and to avoid excessive battery<br />
drain.<br />
Figure 3.<br />
Figure 2. Filing the ball of Plug PL-55.<br />
5. Use.<br />
Note. If the dosimeter has some charge, do not use this<br />
emergency charger. Only use when completely discharged,<br />
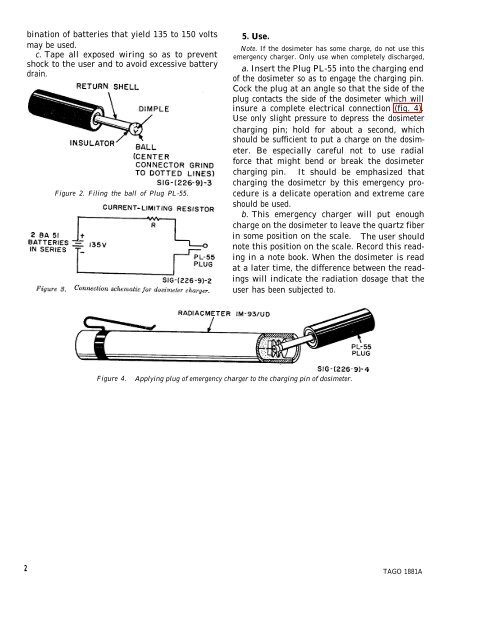
a. Insert the Plug PL-55 into the charging end<br />
of the dosimeter so as to engage the charging pin.<br />
Cock the plug at an angle so that the side of the<br />
plug contacts the side of the dosimeter which will<br />
insure a complete electrical connection (fig. 4).<br />
Use only slight pressure to depress the dosimeter<br />
charging pin; hold for about a second, which<br />
should be sufficient to put a charge on the dosimeter.<br />
Be especially careful not to use radial<br />
force that might bend or break the dosimeter<br />
charging pin. It should be emphasized that<br />
charging the dosimetcr by this emergency procedure<br />
is a delicate operation and extreme care<br />
should be used.<br />
b. This emergency charger will put enough<br />
charge on the dosimeter to leave the quartz fiber<br />
in some position on the scale. The user should<br />
note this position on the scale. Record this reading<br />
in a note book. When the dosimeter is read<br />
at a later time, the difference between the readings<br />
will indicate the radiation dosage that the<br />
user has been subjected to.<br />
Figure 4.<br />
Applying plug of emergency charger to the charging pin of dosimeter.<br />
2 TAGO 1881A