Owners Manual BaByBjörn® Baby Carrier Synergy - Tosia.pl
Owners Manual BaByBjörn® Baby Carrier Synergy - Tosia.pl
Owners Manual BaByBjörn® Baby Carrier Synergy - Tosia.pl

You also want an ePaper? Increase the reach of your titles
YUMPU automatically turns print PDFs into web optimized ePapers that Google loves.
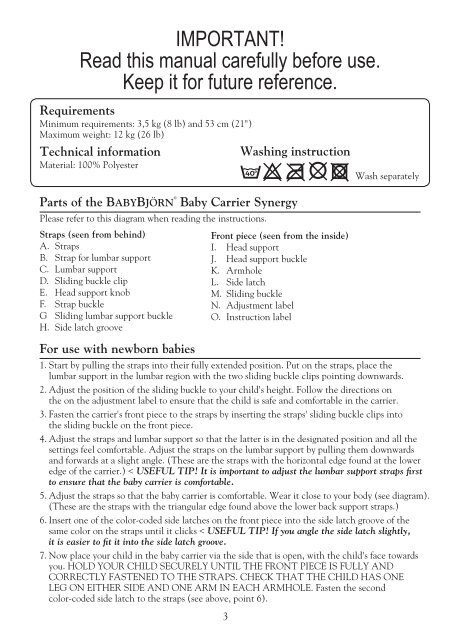
IMPORTANT!<br />
Read this manual carefully before use.<br />
Keep it for future reference.<br />
Requirements<br />
Minimum requirements: 3,5 kg (8 lb) and 53 cm (21")<br />
Maximum weight: 12 kg (26 lb)<br />
Technical information<br />
Material: 100% Polyester<br />
Parts of the <strong>Baby</strong>Björn ®<br />
<strong>Baby</strong> <strong>Carrier</strong> <strong>Synergy</strong><br />
Please refer to this diagram when reading the instructions.<br />
Straps (seen from behind)<br />
A. Straps<br />
B. Strap for lumbar support<br />
C. Lumbar support<br />
D. Sliding buckle clip<br />
E. Head support knob<br />
F. Strap buckle<br />
G Sliding lumbar support buckle<br />
H. Side latch groove<br />
For use with newborn babies<br />
Front piece (seen from the inside)<br />
I. Head support<br />
J. Head support buckle<br />
K. Armhole<br />
L. Side latch<br />
M. Sliding buckle<br />
N. Adjustment label<br />
O. Instruction label<br />
1. Start by pulling the straps into their fully extended position. Put on the straps, <strong>pl</strong>ace the<br />
lumbar support in the lumbar region with the two sliding buckle clips pointing downwards.<br />
2. Adjust the position of the sliding buckle to your child's height. Follow the directions on<br />
the on the adjustment label to ensure that the child is safe and comfortable in the carrier.<br />
3. Fasten the carrier's front piece to the straps by inserting the straps' sliding buckle clips into<br />
the sliding buckle on the front piece.<br />
4. Adjust the straps and lumbar support so that the latter is in the designated position and all the<br />
settings feel comfortable. Adjust the straps on the lumbar support by pulling them downwards<br />
and forwards at a slight angle. (These are the straps with the horizontal edge found at the lower<br />
edge of the carrier.) < USEFUL TIP! It is important to adjust the lumbar support straps first<br />
to ensure that the baby carrier is comfortable.<br />
5. Adjust the straps so that the baby carrier is comfortable. Wear it close to your body (see diagram).<br />
(These are the straps with the triangular edge found above the lower back support straps.)<br />
6. Insert one of the color-coded side latches on the front piece into the side latch groove of the<br />
same color on the straps until it clicks < USEFUL TIP! If you angle the side latch slightly,<br />
it is easier to fit it into the side latch groove.<br />
7. Now <strong>pl</strong>ace your child in the baby carrier via the side that is open, with the child's face towards<br />
you. HOLD YOUR CHILD SECURELY UNTIL THE FRONT PIECE IS FULLY AND<br />
CORRECTLY FASTENED TO THE STRAPS. CHECK THAT THE CHILD HAS ONE<br />
LEG ON EITHER SIDE AND ONE ARM IN EACH ARMHOLE. Fasten the second<br />
color-coded side latch to the straps (see above, point 6).<br />
3<br />
Washing instruction<br />
Wash separately