
Create successful ePaper yourself
Turn your PDF publications into a flip-book with our unique Google optimized e-Paper software.
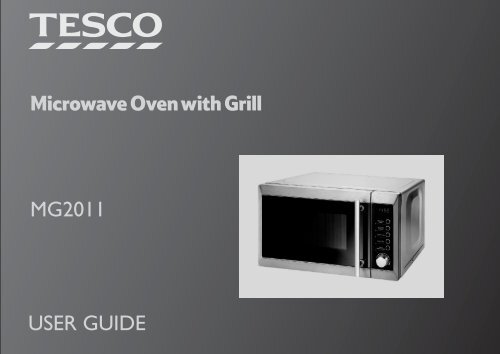
Microwave Oven with Grill<br />
MG2011<br />
USER GUIDE
WARNING<br />
Important Safety Instructions<br />
supervision or instruction concerning use of the appliances by a $Microwave heating of beverages can result in delayed eruptive<br />
person responsible for their safety<br />
boiling, therefore care must be taken when handling the<br />
$Children should be supervised to ensure that they do not play container.<br />
RISK OF ELECTRIC SHOCK. DO NOT DISMANTLE<br />
with the appliance.<br />
$Food can burn if overcooked. If you are unsure about how long to<br />
Please follow all the precautions listed below for safety and to $WARNING: Only allow children to use the oven without cook a food for, start with a short cooking time, and check the food<br />
reduce the risk of injury or electrical shock.<br />
supervision when adequate instructions have been given so that regularly.<br />
$Read all the instructions and retain them.<br />
the child is able to use the oven in a safe way and understands the $Clean the inside of your microwave regularly and remove any food<br />
$Before use check that the voltage stated on the rating plate on the<br />
hazards of improper use.<br />
deposits.<br />
rear of your microwave oven corresponds to your mains voltage. $Heat-insulation (oven) gloves should be used when removing a $Failure to maintain the oven in a clean condition could lead to<br />
$The mains socket must be well earthed. Do not plug the oven into<br />
hot container from the oven.<br />
deterioration of the surface that could adversely affect the life of<br />
a mains adaptor into which other units are connected.<br />
$Do not use the microwave oven for any purpose not expressly the appliance and possibly result in a hazardous situation.<br />
$WARNING: If the door or door seals are damaged, the oven must<br />
specified in this manual.<br />
$If smoke is observed, switch off or unplug the appliance and keep<br />
not be operated until it has been repaired by a competent person. $When not in use, do not store utensils, food or other objects in the the door closed in order to stifle any flames.<br />
$WARNING: It is hazardous for anyone other than a competent<br />
oven.<br />
CAUTION: When Using the Grill:<br />
person to carry out any service or repair operation that involves $There are no user serviceable parts in your microwave oven.<br />
the removal of a cover which gives protection against exposure to Unauthorised dismantling or servicing will void the product Use oven gloves when inserting and removing utensils when the grill<br />
microwave energy;<br />
warranty.<br />
is on. DANGER OF BURNS.<br />
$Do not use the microwave oven with a damaged cord or plug or When cooking with your oven:<br />
When you remove utensils from the oven, place them on a heatproof<br />
after the appliance has malfunctioned or is damaged. Seek expert $Only use utensils that are suitable for use in microwave ovens.<br />
surface, or on an insulating mat.<br />
assistance.<br />
$When heating food in plastic or paper containers, keep an eye on<br />
Keep small children away from the grill and hot dishes<br />
$Do not touch hot surfaces. Use handles or knobs only. Allow the the oven due to the possibility of ignition.<br />
Children should only use the oven under adult supervision due to the<br />
appliance to cool before cleaning.<br />
$If you use plastic film when re-heating or cooking food use only temperatures generated.<br />
$ WARNING: Do not operate the microwave oven empty. This could film designed for microwave ovens and ensure that the film does RAW MEAT AND RAW MEAT PRODUCTS<br />
cause damage to the oven.<br />
not touch the food. If necessary, prick the film all over to allow<br />
$Meat and meat products should not be fully cooked from raw in a<br />
$Do not immerse the body of the microwave oven or the electrical steam to escape.<br />
microwave oven. Raw meat may be partially cooked in a<br />
cord or plug in water or liquids.<br />
$Grill & microwave/grill cooking: Do not use paper or plastic<br />
microwave oven but the final cooking process must be carried<br />
$Do not place the microwave oven on or near a hot gas or electric containers, or plastic film. Utensils for combination-cooking<br />
out by conventional cooking processes, (i.e boiling, roasting,<br />
burner.<br />
should be heatproof and microwave safe.<br />
frying, grilling etc) using a conventional cooker.<br />
$Use the appliance on a stable heat-resistant surface.<br />
$ Use your microwave oven only to heat food.<br />
$When defrosting raw meat and meat products in a microwave<br />
$Never leave the microwave oven unattended when it is $Do not heat oil for frying, or try to fry food in the microwave oven. oven ensure the item is fully defrosted and then immediately<br />
operational.<br />
The oil could catch fire.<br />
cook the meat using conventional cooking processes.<br />
$Make sure that the power cable does not touch any hot surface or $Liquids and other foods must not be heated in sealed containers $Always clean the oven cavity thoroughly after partially cooking or<br />
overhang a table edge.<br />
since they are liable to explod e.<br />
If covered containers are used, the defrosting raw meat.<br />
$Do not use the microwave oven outdoors.<br />
covers should be loose. Move such containers to and from the<br />
oven with care as food may splash and the lid may fall.<br />
ELECTRICAL INFORMATION<br />
$Unplug the oven when not in use and before cleaning.<br />
$ Eggs in their shells (whether raw or cooked), fruits in thick skins Before using this appliance ensure that the voltage of your electricity<br />
$Do not obstruct the ventilation slots or place objects on top of the<br />
and nuts in their shells should not be heated in the microwave as supply is the same as that indicated on the rating plate of the<br />
oven.<br />
they may explode even after microwave heating has ended.<br />
appliance.<br />
$Do not use attachments or accessories not recommended by the<br />
$Items such as potatoes, sausages and chestnuts must be peeled or THIS APPLIANCE MUST BE EARTHED.<br />
manufacturer.<br />
pierced thoroughly before cooking.<br />
The disconnect device for this appliance is the mains plug. The mains<br />
$This appliance is not intended for use by persons (including<br />
$The contents of feeding bottles and baby food jars shall be stirred plug must not be obstructed in any way and must remain readily<br />
children) with reduced physical, sensory or mental capabilities, or<br />
or shaken and the temperature checked before consumption, in removeable from the mains supply.<br />
lack of experience and knowledge, unless they have been given<br />
order to avoid burns.<br />
Page 1
Preliminaries<br />
About Your Microwave Oven<br />
Microwave cooking is very quick and efficient. Microwave<br />
cooking can also help preserve the minerals and vitamins in<br />
many foods.<br />
The microwave power output of your oven is 800 watts.<br />
Because the temperature in a microwave oven is relatively cool<br />
(unlike a normal oven) you have to remember that the food can<br />
be extremely hot. Always take precautions when handling<br />
containers.<br />
Radio Interference:<br />
Operation of the microwave oven can cause interference to your<br />
radio, TV or similar equipment. When there is interference, it may<br />
be reduced or eliminated by taking the following measures:<br />
$Clean the door and sealing surface of the oven.<br />
$Reorient the receiving antenna of radio or television.<br />
$Relocate the microwave oven with respect to the receiver.<br />
$Move the microwave oven away from the receiver.<br />
Cooking In your Oven<br />
Your oven can carry out a number of cooking processes.<br />
$Basic Microwave Cooking<br />
$Basic Grilling<br />
$Microwave/Grill combination cooking<br />
In his last process, food is partially cooked by microwaves and then<br />
finished by grilling. This accelerates the cooking process whilst<br />
maintaining the finish and texture of traditionally cooked foods.<br />
There is also a programme that enables you to defrost frozen food<br />
and then combination cook it thus completing the entire cooking<br />
process in one operation.<br />
Preset cooking programmes<br />
Your oven has 8 preset programmes. These programmes allow<br />
you to automate the cooking of a range of standard foods for<br />
greater convenience.<br />
So you can just select the programme, dial in the amount of food<br />
you want to cook and the oven will do the rest!<br />
Suitable and unsuitable containers<br />
Some basic guidelines are given in the table below.<br />
Cookware<br />
Heat–Resistant Glass<br />
Non Heat–Resistant Glass<br />
Heat–Resistant Ceramics<br />
Microwave–Safe Plastics<br />
Kitchen Paper<br />
Metal Trays / Metal Racks<br />
Aluminium Foil<br />
Metal Foil Containers<br />
Microwave Grill Combination*<br />
(*Combination refers to microwave + grill cooking)<br />
Use heat resistant porcelain, glass or plastic containers made for<br />
microwave ovens, otherwise there is a risk of shrinking,<br />
deforming or burning. Metal containers, or containers having<br />
metal decoration or trim are not suitable for use with your<br />
microwave oven.<br />
When you are combination cooking, the container must be fully<br />
heatproof as well as suitable for microwave cooking.<br />
Avoid containers which narrow at the top as these may cause the<br />
contents to erupt when removed from the oven.<br />
<strong>Tesco</strong> stores stock a wide range of microwave containers and<br />
wraps designed for microwave ovens. Plastic films should not<br />
touch food as they may gas, melt or break down when hot and<br />
contaminate food.<br />
Wax paper, oven cooking bags, parchment paper and white<br />
microwave paper towels are safe for microwave use. Wooden<br />
objects may catch fire - so avoid their use.<br />
Do not use aluminium foil for microwave cooking unless the<br />
recipe requires it. Keep foil at least 25mm away from the oven<br />
walls. Metal skewers, ties, etc. should be removed from food<br />
before cooking.<br />
Getting Started<br />
Please make sure you read all the instructions and the safety<br />
notes carefully and that you familiarise yourself with the features<br />
and operation of your oven before use.<br />
Unpacking the Microwave Oven<br />
Remove the polystyrene top packing pieces and lift out the oven.<br />
Unpack the oven completely removing all the protective tape.<br />
Open the oven door. In the oven compartment you should find<br />
the turntable and rotating support ring, and the grill rack.<br />
Unpack all these items .<br />
Check the oven carefully, especially the door, door seals and the<br />
locking mechanism. If any items are missing or damaged, contact<br />
your nearest <strong>Tesco</strong> store for assistance.<br />
If possible retain the packaging. If you dispose of the packaging,<br />
do so having regard to recycling provisions in your area.<br />
Placement<br />
Place your microwave oven on a flat, level stable work surface<br />
away from sources of cold, heat and damp.<br />
For good ventilation, the rear of the oven should have a clearance<br />
of at least 10 cm from the wall, the free distance above the top<br />
should be at least 30 cm with a gap of at least 5cm at both sides.<br />
7.5cm<br />
7.5cm<br />
30cm<br />
OPEN<br />
Remove all packing materials plastic film, etc. before connecting<br />
the oven.<br />
Page 2
Features and Controls<br />
General Overview<br />
Control Panel<br />
Door Interlocks<br />
Turntable<br />
Oven Door<br />
Assembling the Oven<br />
Always operate your microwave oven<br />
with the turntable assembly properly<br />
installed.<br />
Press the Door Release to open the<br />
door. Drop the Turntable Rotor gently<br />
through the hole in the centre of the<br />
oven and locate it on the spindle<br />
beneath. There is a flat machined on the<br />
spindle to hold the rotor securely<br />
during operation.<br />
Viewing Window<br />
Turntable Rotor<br />
Turntable<br />
Support Ring<br />
Place the support ring in the recess.<br />
Place the turntable on the support ring<br />
with the smooth side uppermost.<br />
Locate the turntable on the rotor and<br />
check that it is central to and properly<br />
supported by the ring. Refer to the<br />
drawing below.<br />
Close the door.<br />
Unwrap the power cord fully. Plug the<br />
oven directly into the wall socket.<br />
Control Panel<br />
Grill Rack<br />
1: MENU ACTION SCREEN<br />
Clock, cooking time, power, action<br />
indicators are displayed.<br />
2: Micro/Grill/Combi<br />
Press repeatedly to choose a power<br />
setting from full power (100%) to 10%.<br />
Further presses will enable you to<br />
select the grill function or set a<br />
microwave/grill combi-programme.<br />
3: W.T/Time Defrost<br />
Press once to defrost food by weight<br />
Press twice to defrost food by time.<br />
Now rotate the TIME/WEIGHT knob to<br />
set the time or weight.<br />
4: Clock/Pre-set<br />
Use to set the time of day or recall the<br />
time of day.<br />
5: Stop/Clear<br />
Press once to stop a cooking process.<br />
Press twice to cancel a program and<br />
clear the setting.<br />
Use to set/cancel the Child Lock.<br />
6: Start/+30SEC./Confirm<br />
Press to confirm an Auto-Cook process.<br />
Touch to start cooking or defrosting.<br />
In Quick Start mode the oven will<br />
auto-start at full power as soon as the<br />
button is pressed. Further presses of<br />
the button will extend cooking time<br />
up to a maximum of 95 minutes.<br />
7: FUNCTION KNOB<br />
Use with other controls to set the<br />
Clock Time, Weight Microwave power<br />
and Auto Menu settings.<br />
From STOP, use to set an Auto Cook<br />
Programme.<br />
: 20 00<br />
1<br />
2<br />
3<br />
4<br />
5<br />
6<br />
7<br />
Page 3
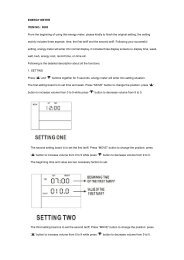
Operation - 1<br />
GETTING STARTED<br />
Plug the oven in<br />
Switch on at the mains point.<br />
The screen will display<br />
SETTING THE CLOCK<br />
The clock is a 24 hour clock. To enter a time of 8:30 pm<br />
$Press the Clock/Preset button<br />
$Rotate the Function<br />
knob to select 20 hours.<br />
$Press Clock/Preset again<br />
$Rotate the Function<br />
knob to select 30 minutes<br />
$Press Clock/Preset again<br />
The time is set To reset the clock follow the above procedure.<br />
BASIC COOKING<br />
$Open the oven door.<br />
Clock/Pre-set<br />
Clock/Pre-set<br />
Clock/Pre-set<br />
$Place the food in a suitable container. Site the container<br />
$Example: Cook food at full power for 10 min.<br />
$Rotate the Function knob one click to the left<br />
$Rotate the Function knob<br />
to set 10 minutes<br />
$Press Start/+30SEC./Confirm.<br />
to start cooking<br />
STOPPING THE OVEN<br />
Open the door to interrupt cooking. To continue cooking, close<br />
the oven door and press the Start/30SEC. Confirm button.<br />
Press Stop/Clear:<br />
The cooking process is interrupted.<br />
To continue cooking press the Start/+30SEC./Confirm button.<br />
Pressing Stop/Clear twice will stop the oven and any<br />
cooking programme will be erased.<br />
WHEN COOKING HAS ENDED<br />
The oven will beep 5 times<br />
The clock time will re-appear.<br />
$Open the door and remove the food. Close the door<br />
Repeatedly pressing Micro/Grill/Combi will also vary the<br />
Power level..<br />
Example: Cook food at 50% power for 10 min.<br />
$Press the Micro/Grill/Combi button<br />
$Rotate the Function knob<br />
to select 50% power<br />
$Press Start/+30SEC./Confirm<br />
$Rotate the Function knob<br />
to set 10 minutes<br />
$Press Start/+30SEC./Confirm<br />
to start cooking<br />
QUICK START (EXPRESS) COOKING<br />
By pressing the Start/+30SEC./Confirm.button repeatedly you<br />
can program the oven for Express cooking. at FULL power(100%).<br />
$Each press of the Start/+30SEC./Confirm button increases<br />
the cooking time in 30 second intervals.<br />
$The oven will start almost as soon you press the Start/<br />
+30SEC./Confirm button so be prepared!!<br />
$During the cooking cycle, you can top up the remaining time<br />
to a maximum of 95 minutes by further presses of the<br />
centrally within the rim of the turntable. Close the door. VARYING THE MICROWAVE POWER Start/+30SEC./Confirm button.<br />
$Rotate the Function knob one click to the left<br />
$Rotate the Function knob in either direction to set a cooking<br />
time from 10 seconds to a maximum of 95 minutes.<br />
X1<br />
Start<br />
30SEC.Confirm<br />
The default setting of the oven is full (100%) power. Many recipes<br />
call for lower power settings. There are 5 power settings available<br />
on your oven. 100% - 80% - 50% - 30% - 10%<br />
$Express cooking is a very good way of rapidly heating small<br />
portions of food, or easily adding a small amount of cooking<br />
time to finish dishes that are slightly undercooked.<br />
Each click increases/decreases the time interval as follows: To alter the microwave power level<br />
All cooking programs can be set up with the oven<br />
0 -1 min : 5 seconds: 1- 5 min : 10 seconds: 5 -10 min : 30 seconds Press Micro/Grill/Combi. door open or closed with the exception of the Quick<br />
10 - 30 min : 1 minute: 30 - 95 min : 5 minute intervals<br />
Rotate the Function knob<br />
Start program which requires the door to be closed.<br />
$Press Start/+30SEC./Confirm. The oven will commence If you are setting up a program when the door is<br />
cooking at full power. The clock displays the remaining time<br />
open, pressing the Stop/Clear button once will<br />
left for the cooking programme.<br />
ROTATE<br />
erase the program.<br />
Stop/Clear<br />
Start/<br />
+30SEC./Confirm<br />
X2<br />
Start/<br />
+30SEC./Confirm<br />
Page 4
AUTO DEFROST<br />
There are two auto-defrosting programmes<br />
DEFROST PROGRAMME 1 (DEF 1) - defrost by weight. You can<br />
auto defrost 100g to 2kg of food (in 100g increments)<br />
DEFROST PROGRAMME 2 (DEF 2) - defrost by time.<br />
Example 1: Auto Defrost 1 kg of food<br />
$Press W.T/ Time Defrost<br />
$Dial in the weight<br />
of the food<br />
Press Start/+30SEC./Confirm<br />
to start cooking<br />
The programme automatically calculates the time required.<br />
Example 2. Auto-Defrost food for 20 minutes<br />
$Press W.T/ Time Defrost<br />
twice<br />
$Dial in the time<br />
$Press Start/+30SEC./Confirm<br />
to start cooking<br />
During Defrosting:<br />
$It is good practice to periodically check food during the<br />
defrosting process, turning it if necessary.<br />
After Defrosting:<br />
W.T/Time<br />
Defrost<br />
W.T/Time<br />
Defrost<br />
Start/<br />
+30SEC./Confirm<br />
X2<br />
Start/<br />
+30SEC./Confirm<br />
$Open the oven door. Remove the food and check that it has<br />
fully defrosted. If the food is partially defrosted, replace it in the<br />
oven and re-select Auto Defrost programme 2 (DEF 2) and add<br />
sufficient time to fully defrost the food.<br />
AUTO COOKING<br />
Your oven can calculate the cooking time of various foods. Just<br />
select the program from the table below and enter the weight.<br />
The results of auto-cooking depend on many factors, the actual<br />
type of food, the temperature it goes into the oven at, etc. If after<br />
the program has ended the food is underdone, use the Basic<br />
Cooking Procedure for a short time to complete the process.<br />
$Rotate the Function knob to the right. Each click brings<br />
up an Auto cook Menu. There are 8 menus.<br />
DA-1 DA-2 DA-3 DA-4 DA-5 DA-6DA-7DA-8<br />
$Press Start/+30SEC./Confirm<br />
$Dial in the weight (use the table below)<br />
MENU SUGGESTED FOOD POWER<br />
A-1<br />
A-2<br />
A-3<br />
Reheat Food<br />
Most Vegetables<br />
Fish<br />
100%<br />
100%<br />
80%<br />
* NOTE: Add enough boiling water to the food before cooking.<br />
$Press Start/+30SEC./Confirm<br />
ROTATE TO THE RIGHT TO INCREASE WEIGHT<br />
ROTATE TO THE LEFT TO DECREASE WEIGHT<br />
200g<br />
200g<br />
250g<br />
A-4 Pasta* 80% 50g<br />
plus 450g water<br />
A-5<br />
A-6<br />
A-7<br />
A-8<br />
Pasta*<br />
Baked Potato<br />
Pizza<br />
Soup<br />
80%<br />
100%<br />
100%<br />
80%<br />
1<br />
200g<br />
200g<br />
200g<br />
Start/<br />
+30SEC./Confirm<br />
NUMBER OF CLICKS<br />
2<br />
400g<br />
300g<br />
350g<br />
100g<br />
plus 750g water<br />
50g<br />
100g<br />
plus 450ml water plus 800ml water<br />
400g<br />
400g<br />
400g<br />
Start/<br />
+30SEC./Confirm<br />
3<br />
600g<br />
400g<br />
450g<br />
600g<br />
450g<br />
Example: Auto Cook 450g of Fish:<br />
$Select Fish: Menu A-3<br />
$Press Start/<br />
30SEC.Confirm<br />
Select 450 grammes<br />
$Press Start/+30SEC./Confirmto start cooking<br />
CHILD LOCK<br />
Operation - 2<br />
The Child safety lock prevents operation by small children.<br />
All oven functions are disabled including the clock when<br />
the child lock is on.<br />
X3<br />
Start/<br />
+30SEC./Confirm<br />
X3<br />
Start/<br />
+30SEC./Confirm<br />
$Press and hold the Stop/Clear<br />
button for about five seconds after<br />
which time a beep sounds and the<br />
LOCK indicator appears.<br />
$To cancel, press and hold the<br />
Stop/Clear button until the beep<br />
sounds and the clock re- appears.<br />
Page 5
Operation - 3<br />
USING THE GRILL<br />
The grill is useful for cooking thin slices of meat, steaks, kebabs,<br />
sausages and pieces of chicken. It is also suitable for hot<br />
sandwiches and au gratin dishes. Grilling takes place at full power.<br />
The maximum time available for grilling is 95 minutes.<br />
Example: To grill food for 10 minutes:<br />
1: Press Stop/ Clear to clear any program.<br />
2: Press Micro/Grill/Combi six times until “G” (Grill) appears.<br />
3: Press the Start/+30 Sec./Confirm button to confirm<br />
4: Rotate the Function knob to the right to select 10 minutes.<br />
5: Press the Start/+30 Sec./Confirm button to start<br />
$Press the Micro/Grill/Combi button six times<br />
X6<br />
$Press Start/+30SEC./Confirm<br />
Start/<br />
+30SEC./Confirm<br />
$Rotate the Function knob<br />
to set 10 minutes<br />
$Press Start/+30SEC./Confirm<br />
to start cooking<br />
Start/<br />
+30SEC./Confirm<br />
Half way through cooking the oven will beep twice. This to<br />
remind you that you need to turn the food over.<br />
Open the door, turn the food with heatproof tongs and close the<br />
door and press the Start/+30 Sec./Confirm button to continue.<br />
When the cooking cycle is over: The oven will ‘beep’ five times,<br />
and reset to the clock time.<br />
Points to remember when grilling:<br />
$Use a metal grill rack (supplied) so that food can drain.<br />
$Do not overload the grill rack. Space the food out.<br />
$Brushing the grill rack very sparingly with vegetable oil will<br />
stop food adhering to it and make washing up easier.<br />
$Always stand the grill rack in a heatproof ceramic dish. This<br />
will catch drips and help keep the oven clean.<br />
$Do not use the grill without the turntable in place. The<br />
turntable helps the food to cook evenly.<br />
$When removing or turning over food use heatproof tongs or<br />
a similar implement.<br />
$When removing or inserting the provided grill rack into a hot<br />
oven use a suitable heatproof implement.<br />
CAUTION:<br />
When you use the grill, the cooking utensils and the interior of<br />
the oven get very hot, much hotter than when you are using the<br />
oven as a regular microwave.<br />
Always stir food with long handled implements, tongs, etc.<br />
Always use oven gloves when removing or placing utensils in<br />
an oven where the grill has recently been on. When you set<br />
utensils down on a surface make sure it is heatproof or use an<br />
insulating mat.<br />
After use allow an extra long period for the oven to cool down<br />
before cleaning or re-use.<br />
COMBINATION COOKING<br />
Combination Microwave and grill cooking offers you the speed<br />
of a microwave oven with the finish and taste of a conventional<br />
grill. To help you realise the potential of this form of cooking, we<br />
advise you to buy a recipe book dedicated to this cooking art.<br />
There are two Combi-grill programs. They both work in exactly<br />
the same way but have different settings. Both microwave the<br />
food first and then grill it to give a browned, tasty finish.<br />
COMBINATION 1: Microwaves the food for55% of the total time<br />
and grills it for 45%. Use this program for puddings omelettes,<br />
baked potatoes and poultry.<br />
COMBINATION 2: Microwaves the food for36% of the total time<br />
and grills it for 64%. Use this program for fish, potatoes, and ‘au<br />
gratin’ dishes.<br />
Setting a combi -grill program<br />
1: Press Stop/ Clear to clear any program.<br />
2: Press Micro/Grill/Combi until “C-1” or “C-2”appears.<br />
3: Press the Start/+30 Sec./Confirm button to confirm<br />
4: Rotate the Function knob to select the time (5 sec.-95 min).<br />
5: Press the Start/+30 Sec./Confirm button to start<br />
Example: To set a Com 2 cooking program taking 20 minutes:<br />
$Press the Micro/Grill/Combi button until C-2 appears<br />
$Press Start/+30SEC./Confirm<br />
Start/<br />
+30SEC./Confirm<br />
$Rotate the Function knob<br />
to set 20 minutes<br />
X8<br />
$Press Start/+30SEC./Confirm<br />
to start cooking.<br />
Start/<br />
+30SEC./Confirm<br />
Page 6
MULTI-STAGE COOKING<br />
TIME DELAYED COOKING<br />
NOTES ON TIME DELAYED COOKING:<br />
You can combine cooking processes in a two stage programme. You can preset the time at which the cooking process starts.<br />
You can use a single program, a multistage program or an Auto-<br />
There are two main uses for this process.<br />
cook menu. You cannot use Express cooking.<br />
A Make sure the clock is set to the correct time<br />
Do not use raw or frozen fish products or foods which may<br />
A Cook food for a period at one power setting and then finish B Input the cooking program. Do NOT press the START button deteriorate during the waiting period.<br />
with another power setting. You can for example, cook food and C Set the clock to the required start time -see Page 4 Do not use time-delayed cooking with a defrost programme.<br />
then keep it warm by setting a low power for the second process.<br />
D Press Start/+30SEC./Confirm to set the programme. The clock must be set!<br />
B Defrost and grill or microwave food in a combined process.<br />
Example: Cook food at 50% power for 10 min starting at21:20<br />
After the first stage, the buzzer will sound once and the next<br />
QUERIES<br />
stage will automatically start.<br />
$Press the Micro/|Grill/Combi.<br />
$During cooking: press the POWER button to briefly display<br />
If you are defrosting, this must be the first process.<br />
button<br />
the microwave power in the current programme.<br />
You can use multi-cooking with combi -cooking so<br />
$During cooking: press the CLOCK button to briefly display<br />
$Select 50% power.<br />
you can defrost, microwave and grill all in one. The<br />
X2<br />
the clock time.<br />
Auto-Cook menu cannot be used in multi-cooking.<br />
$In Time Delay mode: pressing the CLOCK button will briefly<br />
$Press Start/+30SEC./Confirm<br />
display the start time of the pre-set process.<br />
Example: Defrost the food for 20 minutes, then cook at 50%<br />
Start/<br />
microwave power for 10 minutes.<br />
+30SEC./Confirm<br />
ADDING TIME DURING COOKING<br />
1 Press W.T/Time Defrost $Rotate the Function knob<br />
$During normal cooking and the “defrost by time”<br />
Twice<br />
to set 10 minutes<br />
programme, you can increase the cooking time by<br />
W.T/Time X2<br />
Defrost<br />
repeatedly pressing the Start/+30SEC./Confirm button.<br />
$Press the<br />
$You cannot add time during Grilling, ‘Defrost by Weight’ or<br />
2 Dial in the time<br />
Clock/Pre-set button<br />
‘Auto-Cook’ programs.<br />
DISPLAYS AND OVEN STATES<br />
Operation -4<br />
3<br />
$Rotate the Function<br />
Press the Micro/|Grill/Combi.<br />
knob to select 21 hours.<br />
button<br />
$Every time you press a button, the oven will beep once. If the<br />
4<br />
button is not fully depressed, or the action is not part of the<br />
$Press the Clock/Pre-set<br />
Rotate the Function knob process you will not hear a beep and nothing will happen..<br />
button again.<br />
to select 50% power X2<br />
Clock/Pre-set<br />
$When you first rotate the Function knob in either direction<br />
5 Press Start/+30SEC./Confirm<br />
$Rotate the Function<br />
during a cooking process the oven will beep once.<br />
knob to select 20 minutes<br />
$When setting a cooking process, if you do not confirm the<br />
Start/<br />
process by pressing the Start/+30SEC./Confirm button<br />
+30SEC./Confirm<br />
$Press Start/+30SEC./Confirm<br />
within one minute, the process will be cancelled and the<br />
6 Rotate the Function knob<br />
Start/<br />
oven will revert to displaying the clock time.<br />
+30SEC./Confirm<br />
to set 10 minutes<br />
$The buzzer will sound five times to remind you when cooking<br />
The display reverts to clock time: When the preset time comes is finished.<br />
7 Press Start/+30SEC./Confirm the buzzer sounds twice and the oven will begin the programme. $Before inputting any cooking process, it is good practice to<br />
Start/<br />
When Time Delayed cooking is preset:<br />
press the Stop/Clear button twice to clear the oven memory.<br />
+30SEC./Confirm<br />
$You cannot operate other oven functions.<br />
The defrost cycle will commence. When the defrost cycle has $Press Stop/Clear to clear a Pre-set program and revert to<br />
ended the oven will move on to the cooking process.<br />
normal operation.<br />
Clock/Pre-set<br />
Page 7
General Guidance<br />
TIPS FOR GOOD COOKING<br />
Please read this section together with the Safety Guide on Page 2.<br />
$Stir liquids and purees before during and after cooking to<br />
distribute the heat evenly. Mashed potato will cook more<br />
evenly and more thoroughly if lightly covered.<br />
$Never tightly cover food. Always cover it loosely.<br />
$ Do not allow plastic film to touch food as it may chemically<br />
break down, melt or even catch fire and contaminate the<br />
food.<br />
$Arrange food in the dish so that the thicker part is on the<br />
outside and the thinner part inside for more even cooking.<br />
Fold under the thin edges of fish fillets and tapered foods.<br />
$6-7 minutes per 500 gr. will cook most fruit and vegetables.<br />
Seafood takes less time.<br />
$Different foods require different temperatures to cook. Add<br />
more minutes as you drop the power.<br />
$Up to 20% of the cooking takes place after the oven turns off<br />
so always remember that your food will continue cooking<br />
after you've removed it.<br />
$Food that takes an hour in to cook in a regular oven should<br />
take around 15 minutes in the microwave.<br />
$Foods with baking powder should stand a few minutes<br />
before cooking to allow the leavening agents to work.<br />
$If a recipe calls for milk and water, reduce the water.<br />
$Rotate large items of food occasionally during cooking to<br />
encourage even heat distribution.<br />
should be hot and steaming before it is served.<br />
$When re-heating liquids such as meat stews see that the<br />
liquid boils for around 3-5 minutes to ensure the pieces of<br />
meat are completely heated through.<br />
Is it cooked?<br />
$Temperature should reach 70º C for meat, fish and eggs.<br />
$Fish should be opaque and flake easily.<br />
$Only defrost food in the microwave if you plan to cook the<br />
food immediately after it has thawed. Some areas of the food<br />
may begin to cook during defrosting, which can allow<br />
bacteria can flourish. Do not cook defrosted raw meat in a<br />
microwave oven.<br />
$Remove the food from the wrapping, place it on a microwave<br />
safe dish. Rotate and re-arrange food during defrosting.<br />
Where appropriate, stir the food and if possible, separate the<br />
food items and remove those which have already defrosted.<br />
GENERAL NOTES<br />
CLEANING AND CARE<br />
These steps should be taken after every use.<br />
$Disconnect the power supply and wait for the appliance to<br />
completely cool down.<br />
$Remove the turntable support ring and the turntable and<br />
wash then in warm soapy water.<br />
$Clean the oven cavity, the outer edge of the cavity, and the<br />
oven door with water and a mild detergent. A special<br />
microwave oven cleaner is not necessary. Do not use<br />
scouring pads, or other abrasives.<br />
$Wipe outer surfaces and control panel with a damp soft cloth.<br />
$If liquids have been splashed on the wall of the oven cavity,<br />
they must be fully removed otherwise smoke may occur<br />
when the appliance is next used.<br />
$If the cavity emits odours, boil a cup of water with a squeeze<br />
of lemon juice for 5-7 min. to remove them.<br />
$Dry all parts thoroughly and replace them.<br />
TROUBLESHOOTING<br />
Steam: Steam is a natural product of microwave cooking. It<br />
If the oven fails to operate:<br />
escapes from the vents in the appliance. These vents should $Check that the oven is plugged in securely. If it is not, unplug<br />
never be blocked. Steam may condense in and around the oven from the outlet, wait 10 seconds and plug it in again securely.<br />
during cooking and should be dried off after use.<br />
$Check for a blown fuse or a tripped circuit breaker. If these are<br />
Smoke: If during cooking, smoke starts to come from the oven<br />
intact, test the outlet with another appliance.<br />
do NOT open the oven door! Immediately switch off at the mains, $Check that the clock is set and that the child lock is off.<br />
unplug the oven and wait for the smoke to completely subside $Make sure that the oven door closes fully and securely.<br />
and the oven to fully cool down before removing the food. Before If none of the above rectifies the situation, contact the <strong>Tesco</strong><br />
$Food cooks best and reheats better in a round dish or a dish you use your microwave oven again, consult a service technician helpline. Do not try to adjust or repair the oven yourself.<br />
with curved sides. and have the oven tested .<br />
$Salt attracts microwaves. Don't just sprinkle it on food before<br />
cooking, stir it in or add it later.<br />
$Fats and sugars attract microwaves - thoroughly mix sugar<br />
with other ingredients. Care should be taken when cooking<br />
foods with high sugar or fat contents as they can reach very<br />
high temperatures.<br />
$Handle pastry-wrapped foods like mince pies carefully as the<br />
filling gets hotter than the pastry.<br />
Hints for reheating food<br />
$Heat leftovers and pre-cooked food to at least 70°C. Food<br />
Hints for defrosting<br />
Testing Your Oven: Place a cup of water in the oven and heat it<br />
on full power for 2 minutes. If the water gets hot the oven is<br />
working.<br />
Dim Oven Light: During low power microwave cooking the<br />
oven light may appear to dim slightly. This is normal and not a<br />
cause for concern.<br />
If the oven fails to work or will not respond to commands:<br />
Unplug the oven and inspect the plug fuse. If this is intact, leave<br />
the oven for 30 minutes and then plug the oven in again. The<br />
oven should now work normally.<br />
Page 8
Suggested Cooking Times<br />
Warranty & Specifications<br />
APPROXIMATE COOKING TIMES FOR FISH (ON FULL POWER)<br />
Item Weight Cooking Time StandingTime<br />
Cod fillets 450g 3-4 minutes 4-10 minutes<br />
Cod steaks 225g 3-4 minutes 4-10 minutes<br />
Haddock fillets 225g 3-4 minutes 4-10 minutes<br />
Kipper fillets 450g 3.4 minutes 4-6 minutes<br />
Plaice fillets 225g 3-4 minutes 6-8 minutes<br />
Trout (2 fish, gutted but whole) turn fish over half way through 3.5-5 minutes 4-6 minutes<br />
The times given above are approximate and should be adjusted to suit portion sizes and individual taste. The average cooking<br />
time for fish is around 3.5 minutes per 450 g (1 lb). The fish should be lightly covered during the standing period.<br />
Temperature of the fish should reach 70º C. The fish should be opaque and flake easily.<br />
APPROXIMATE COOKING TIMES FOR FRESH VEGETABLES (ON FULL POWER)<br />
Item Weight Added water Cooking Time<br />
Aubergines (peeled and diced) 450g 30-40 ml 4.5-5.5 minutes<br />
Broccoli (trimmed and sliced into spears) 225g 50 ml 3.5-4.5 minutes<br />
Brussels Sprouts(peeled) 225g 50 ml 5.5-7.5 minutes<br />
Carrots (diced) 225g 30 ml 5.5-7.5 minutes<br />
Cauliflower (in florets) 450g 50-60 ml 7-9 minutes<br />
Courgettes (diced or sliced) 450g 10 ml 5.5-7.5 minutes<br />
Peas (removed from pods) 225g 40-50 ml 4.5-5.5 minutes<br />
Potatoes, jacket ( 2, scrubbed and pierced all round) 225g None 7-9 minutes<br />
Potatoes, (in 40mm pieces) 450 g 40-50 ml 6-7 minutes<br />
Spinach (shredded) 225g None 3.5-5.5 minutes<br />
The times given above are approximate and should be adjusted to suit quantities, portion sizes and individual taste. The average<br />
cooking time for vegetables is around 5.5 minutes per 450 g (1 lb). When adding salt, mix it with the water or add it after cooking.<br />
To cook vegetables: Mix them with the water in a ceramic curved bottomed bowl and cover lightly. After cooking leave the<br />
vegetables to stand for 2-3 minutes before straining (if necessary) and serving.<br />
WARRANTY<br />
Your <strong>Tesco</strong> appliance is covered by a warranty for 12 months<br />
from the date of purchase. If a fault develops during this period,<br />
please contact the TESCO electrical help line on 0845 456 6767.<br />
Please have your original purchase receipt with you when you<br />
call. This warranty in no way affects your consumer rights.<br />
SPECIFICATIONS<br />
Mains Supply: 230V-240V AC, 50 Hz: 1200-1270W<br />
Microwave Output: 750-800W, 2450MHz<br />
Grill Output Power: 950-1000 Watts<br />
Dimensions: 258mm(H)x440mm(W)x293mm(D)<br />
Oven Capacity: 20 Litres<br />
Net Weight: 11.3kg<br />
UK: Waste electrical products should not be<br />
disposed of with household waste. Separate<br />
disposal facilities exist, for your nearest facilities see<br />
www.recycle-more.co.uk or in-store for details.<br />
ROI: Produced after 13th August 2005. Waste<br />
electrical products should not be disposed of with<br />
household waste. Please recycle where facilities<br />
exist. Check with your Local Authority or retailer for<br />
recycling advice.<br />
Page 9
<strong>Tesco</strong> Stores Ltd,<br />
Delamare Road, Cheshunt, Herts, EN8 9SL