RC 3000 - Crown Equipment Corporation
RC 3000 - Crown Equipment Corporation
RC 3000 - Crown Equipment Corporation

You also want an ePaper? Increase the reach of your titles
YUMPU automatically turns print PDFs into web optimized ePapers that Google loves.
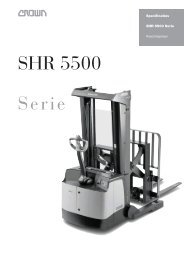
<strong>RC</strong><br />
<strong>3000</strong> S E R I E S<br />
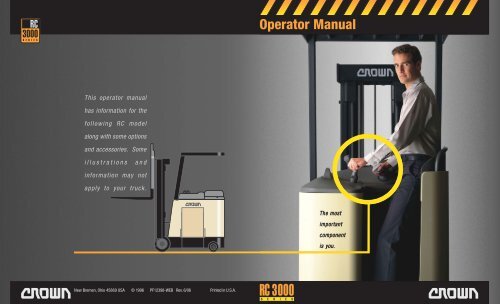
This operator manual<br />
has information for the<br />
following <strong>RC</strong> model<br />
along with some options<br />
and accessories. Some<br />
i l l u s t r a t i o n s a n d<br />
information may not<br />
apply to your truck.<br />
New Bremen, Ohio 45869 USA © 1996 PF12398-WEB Rev. 6/06 Printed in U.S.A.<br />
Operator Manual<br />
<strong>RC</strong> <strong>3000</strong><br />
S E R I E S<br />
The most<br />
important<br />
component<br />
is you.
1 Warning<br />
It’s the law, you must be trained and certified to<br />
operate this truck. (OSHA § 1910.178, Rev. 1999)<br />
You or others around you can be seriously injured or even killed<br />
if you don't use this truck correctly.<br />
Read and obey all warnings and instructions in this Manual* and<br />
on the truck.<br />
Head, arms, hands, legs or feet outside the operator area can be<br />
pinned or crushed whenever the truck is moving. Stay within the<br />
operator area and stop the truck completely before getting off.<br />
However, tipovers and falls from docks can cause serious injury<br />
or even death. Immediately exit and move away from the truck<br />
in these emergencies.<br />
You can be trapped or crushed by driving the operator area under<br />
racks or other objects. Look where you are going.<br />
Inspect your truck before starting work, make sure it is in good<br />
working order.<br />
* Additional copies of this Operator Manual and all Truck Labels can be obtained<br />
from <strong>Crown</strong> <strong>Equipment</strong> <strong>Corporation</strong>, New Bremen, Ohio 45869 U.S.A.<br />
All rights reserved under International<br />
and Pan American copyright conventions<br />
Copyright 1996 <strong>Crown</strong> <strong>Equipment</strong> Corp.<br />
You Must be Certified<br />
STOP<br />
IT'S THE LAW, YOU MUST BE TRAINED AND CERTIFIED<br />
Federal law states that only properly trained operators are<br />
permitted to operate a powered industrial truck and that<br />
your employer must train you and certify that you are<br />
qualified to operate this powered industrial truck.<br />
(OSHA §1910.178, Rev. 1999)<br />
Do not operate this truck in your work place until you<br />
have been certified by your employer.<br />
You could be killed or seriously injured if you are not<br />
adequately trained for lift truck operation!<br />
You Must be Certified 2
Protect Yourself<br />
Know the Hazards<br />
3 Protect Yourself<br />
DRIVE CAREFULLY<br />
• Keep your hands on the controls and feet on the pedals.<br />
Keep your entire body in the operator area.<br />
• Never stick a foot or any part of your body outside the<br />
operator area, no matter how slow the truck is moving.<br />
You cannot stop 3630 kg (8000 pounds) with any part<br />
of your body. A foot or hand caught between the truck<br />
and a fixed object will be crushed or even cut off.<br />
• Stay away from the edge of docks and ramps. Make<br />
sure dockboards are secure. Check that trailer wheels<br />
are chocked. You could be seriously injured or even<br />
killed in a fall from a dock or dockboard.<br />
• Keep your truck under control at all times. Drive at<br />
a speed that allows you to stop safely. Be even more<br />
careful on slippery or uneven surfaces. Do not drive<br />
over objects on the floor.<br />
LOOK WHERE YOU'RE DRIVING<br />
• Always be alert to the area around you and watch where<br />
you are driving. You could be pinned or crushed by<br />
objects intruding or poking into the operator area.<br />
Know the Hazards<br />
WARNING<br />
Stay clear of all<br />
moving parts.<br />
Moving parts can<br />
cut or crush hands,<br />
feet, arms or legs.<br />
AVOID FALLS AND TIPOVERS<br />
Falls from docks and tipovers are very serious accidents;<br />
you can be crushed or even killed. Immediately exit and<br />
move away from the truck in these emergencies.<br />
Note: This is not like sit-down rider trucks, where it is<br />
recommended that the operator stay with the truck.<br />
The best way to prevent injury is to know where you are<br />
at all times and follow the rules of safe truck operation.<br />
• Be extremely careful when working around docks,<br />
dockboards and trailers.<br />
• Use forward tilt only when you have the load over a<br />
stack or close to the floor.<br />
• Travel with the load or forks close to the ground and<br />
tilted back. Watch for overhead obstructions. Perform<br />
all truck movements smoothly and at a speed that will<br />
give you time to react in an emergency.<br />
• An unloaded truck can tip over also. Be just as careful<br />
using an unloaded truck as you are using a loaded one.<br />
USE YOUR TRUCK SAFELY<br />
• Keep your hands and feet away from all moving parts<br />
such as masts, chains, forks or wheels. Make sure the<br />
overhead guard and load backrest are in place.<br />
• Never stand on or under the forks, or allow anyone else<br />
to stand on or under them. The only way to lift people<br />
is with an approved platform. Never allow passengers<br />
on the truck. There is no safe place for them.<br />
• Before you leave your truck:<br />
• Come to a complete stop and lower forks to the floor.<br />
• Shut the truck off with the key or power disconnect.<br />
Protect Yourself 4
Contents<br />
Warning<br />
You Must be Trained<br />
Protect Yourself<br />
Contents<br />
What's in it for You?<br />
Your Stand-Up Rider<br />
Lift Truck Parts<br />
Capacity & Load Center<br />
Capacity Plate<br />
Power On & Off<br />
Foot Brake<br />
Traveling & Plugging<br />
Steering & Travel<br />
Two Types of Steering<br />
Fork Function<br />
Retractable Guard optional<br />
Hydraulic Accessories<br />
Daily Safety Check<br />
Be a Safe Driver<br />
Battery Maintenance<br />
Warning Labels<br />
5 Contents<br />
1<br />
2<br />
3<br />
5<br />
6<br />
7<br />
9<br />
11<br />
13<br />
15<br />
17<br />
19<br />
21<br />
23<br />
25<br />
27<br />
28<br />
29<br />
31<br />
35<br />
38<br />
Capacity & Load Center<br />
11 Capacity & Load Center<br />
SAMPLE<br />
<strong>RC</strong><br />
<strong>3000</strong><br />
S E R I E S<br />
What's in it for You?<br />
Know the Hazards<br />
Units of measure, kg/mm(lb/in)<br />
Truck Weight with Max. Battery<br />
4075(8985)<br />
Truck Type<br />
E<br />
Attachment Data<br />
SIDESHIFTER<br />
Serial Number<br />
Load A1234567<br />
Capacity with Mast Vertical<br />
Center<br />
Capacity<br />
1405(3100) 4370(172) 600(24)<br />
1450(3200) 3910(154) 600(24)<br />
1020(2250) 4370(172)<br />
1045(2300) 3910(154)<br />
403-B<br />
WHAT'S IN IT FOR YOU?<br />
The better you understand your truck and how to use it,<br />
the better and safer operator you can be. Here are some<br />
guides to using this manual.<br />
Capacity & Load Center 12<br />
QUICK LOCATORS<br />
In addition to the "Contents" page<br />
you can use page headings to find<br />
topics. Some pages also have a picture<br />
of the truck in the corner showing<br />
features or functions covered on that<br />
page.<br />
"KNOW THE HAZARDS"<br />
Watch for and read these special<br />
blocks. You will find information<br />
about possible safety hazards and how<br />
to avoid them.<br />
HOW-TO-DRAWINGS<br />
On many pages you will find pictures<br />
as well as text to help you understand<br />
how to use your truck safely and<br />
productively.<br />
What's in it for You? 6
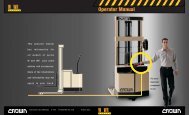
Lift Truck Parts<br />
9 Lift Truck Parts<br />
TILT<br />
Accessory Levers<br />
(Optional)<br />
Battery Charge Meter<br />
Key Switch<br />
Hour Meter<br />
Multi-Function<br />
Information<br />
Retractable Guard<br />
Control (Optional)<br />
Power Disconnect<br />
Multi-Function Handle<br />
Back Pad<br />
Steering Handle<br />
Capacity Plate<br />
Overhead Guard<br />
Tilting Mast<br />
Battery<br />
Power Unit<br />
Power-On Pedal<br />
Brake Pedal<br />
Battery Retainer<br />
Steer Wheels<br />
Drive Wheel<br />
Load Backrest<br />
Fork<br />
Lift Truck Parts 10
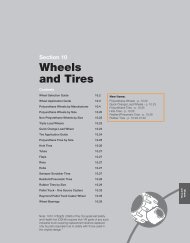
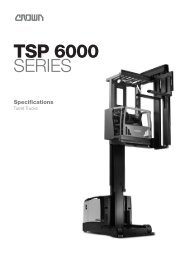
Capacity & Load Center<br />
Load<br />
Center<br />
Center of evenly<br />
distributed load<br />
600mm<br />
(24 in.) Max<br />
11 Capacity & Load Center<br />
WHAT IS YOUR TRUCK CAPACITY?<br />
Capacity is the load (including pallet or<br />
container) that can be lifted to a given height<br />
at a given load center. See the capacity plate on<br />
your truck. Make certain you use the correct units<br />
of measure.<br />
WHAT IS LOAD CENTER?<br />
Load center is the distance from the load backrest or<br />
vertical face of the fork to the center of an evenly<br />
distributed load.<br />
LOADS MUST BE EVENLY DISTRIBUTED<br />
Your truck could tip over, in any direction, if a load<br />
is shifted to the front or side of a pallet or container.<br />
<strong>RC</strong><br />
<strong>3000</strong><br />
S E R I E S<br />
Know the Hazards<br />
Load<br />
Center<br />
403-B<br />
Units of measure, kg/mm(lb/in)<br />
Truck Weight with Max. Battery<br />
4075(8985)<br />
Truck Type<br />
E<br />
Attachment Data<br />
SIDESHIFTER<br />
Serial Number<br />
A1234567<br />
Capacity with Mast Vertical<br />
Capacity<br />
1405(3100) 4370(172) 600(24)<br />
1450(3200) 3910(154) 600(24)<br />
1020(2250) 4370(172)<br />
1045(2300) 3910(154)<br />
KNOW YOUR LOAD<br />
Do not exceed the capacity shown on your truck's capacity<br />
plate. Be careful when handling long, high or wide loads.<br />
Do not handle unstable loads.<br />
EXCEEDING TRUCK CAPACITY CAN CAUSE AN ACCIDENT<br />
Know the capacity of your truck as shown on your capacity<br />
plate. Make certain you use the correct units of measure.<br />
Pay attention to:<br />
• Weight of load<br />
• Load center<br />
• Lift height<br />
HYDRAULIC OPERATIONS CAN AFFECT STABILITY<br />
Capacities given on your capacity plate are for loads that<br />
are centered and level. Be extra careful when tilting a<br />
load. (This also applies to other accessories or attachments<br />
your truck may have, such as sideshift, carton clamp,<br />
push-pull, etc.)<br />
CENTER THE LOAD<br />
Your truck could tip over if a load is shifted to the front<br />
or side of a pallet or container. Make sure your load is<br />
evenly distributed and centered over the forks.<br />
Capacity & Load Center 12
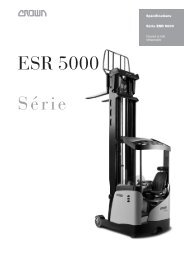
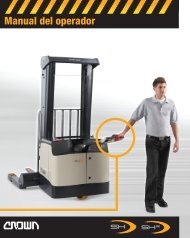
Capacity Plate<br />
SAMPLE<br />
CAPACITY PLATE<br />
The information shown<br />
on this sample plate<br />
does not apply to your<br />
truck.<br />
<strong>RC</strong><br />
<strong>3000</strong><br />
S E R I E S<br />
Load<br />
Center<br />
403-B<br />
Units of measure, kg/mm(lb/in)<br />
Truck Weight with Max. Battery<br />
4075(8985)<br />
Truck Type<br />
E<br />
Attachment Data<br />
SIDESHIFTER<br />
Serial Number<br />
A1234567<br />
13 Capacity Plate<br />
Capacity with Mast Vertical<br />
Capacity<br />
CAPACITY PLATE INFORMATION<br />
The capacity plate is on a console in<br />
the operator area. It contains:<br />
• Serial number<br />
• Capacity information (load, load center and lift height)<br />
• Truck type (a fire safety rating)<br />
• Truck weight with battery (does not include load)<br />
• Attachment information (if any)<br />
READING YOUR CAPACITY PLATE<br />
Capacity may be reduced as lift height A increases.<br />
For example: On the sample plate, 1450kg (3200 lb) can<br />
be lifted to 3910mm (154 in.). But above 3910 (154),<br />
to 4370 (172), capacity is reduced from 1450 (3200) to<br />
1405 (3100).<br />
Capacity is reduced as load center B increases.<br />
For example: On the sample plate, 1450kg (3200 lb) can<br />
be lifted if the load center is 600mm (24 in.) But if the<br />
load center is increased to 830mm (33 in.), capacity is<br />
reduced from 1450 (3200) to 1045 (2300).<br />
SAMPLE<br />
1405(3100) 4370(172) 600(24)<br />
1450(3200) 3910(154) 600(24)<br />
1020(2250) 4370(172)<br />
1045(2300) 3910(154)<br />
CAUTION<br />
You may not increase capacity if load<br />
center is less than shown on your<br />
capacity plate.<br />
Note: ANSI B56.1 requires that all<br />
data be shown first in Metric units and<br />
then USA units.<br />
Know the Hazards<br />
TRUCK WEIGHT<br />
Dockboards, elevators and some floors have limited<br />
capacity. Check your capacity plate for the weight of<br />
your truck. Make certain you use the correct units of<br />
measure. Remember to add the weight of the load<br />
you have on the forks.<br />
ATTACHMENT DATA<br />
If an attachment on your truck does not match the<br />
information given here on your capacity plate, don't operate<br />
your truck. Your capacity plate may be wrong. Report<br />
the problem to your supervisor.<br />
TRUCK TYPE<br />
Some truck types are not permitted in areas where there<br />
are fire hazards. Watch for marked areas. For example:<br />
You must not drive a type E or ES truck in an area restricted<br />
to EE or EX trucks.<br />
Capacity Plate 14
Power On & Off<br />
15 Power On & Off<br />
KEY SWITCH<br />
• Turn the key clockwise to the green dot<br />
to turn the truck ON.<br />
• When leaving the truck, turn the key back to the red dot<br />
to to shut the truck OFF.<br />
POWER-ON PEDAL<br />
Step down on the right pedal. If the key is turned ON,<br />
the steering pump will start running and you can operate<br />
the truck.<br />
Note: You must keep the power-on pedal down for power<br />
steering to work.<br />
POWER DISCONNECT<br />
Push the Power Disconnect in the direction of the forks<br />
to disconnect the battery and cut all power.<br />
Always use the Power Disconnect any time the truck isn't<br />
working right. The key switch does not cut all power to<br />
the truck.<br />
Don't use the truck if it's not working right. Report the<br />
problem to your supervisor.<br />
BATTERY CHARGE METER<br />
The lighted bar shows how much charge is left in your<br />
battery. A flashing light will warn you that the battery is<br />
getting low. Two flashing lights mean you must have the<br />
battery changed or recharged.<br />
34<br />
Know the Hazards<br />
Attach block #77034 to<br />
Battery Connector<br />
Use (2) 1/4 x 1-1/4<br />
screws, lockwashers<br />
& nuts.<br />
WARNING<br />
Emergency disconnect<br />
lever will not work if<br />
block #77034 isn't<br />
bolted to the battery<br />
half of the connector.<br />
Never use a battery<br />
without the block in<br />
place.<br />
ENTRY BAR<br />
Keep your feet in the operator area and clear of entry bar.<br />
If you put your foot on the entry bar while traveling, the<br />
alarm will sound a warning and travel speed is limited to<br />
2.4km/h (1.5 mph). Plugging is reduced. Braking is not<br />
affected.<br />
Below 2.4km/h (1.5mph) the alarm will sound a warning<br />
but travel speed, plugging and braking are not affected.<br />
BEFORE CONNECTING THE BATTERY<br />
Make certain the block (<strong>Crown</strong> #77034) is bolted to the<br />
back of the battery half of the connector. Without that<br />
block the Power Disconnect won't work. In an emergency<br />
you will not be able to cut power to the truck.<br />
Power On & Off 16
Foot Brake<br />
BRAKES OFF<br />
Step all the way down on the left pedal.<br />
The brakes are now "off" and you can travel.<br />
Note: Slowing or stopping the truck by plugging (see<br />
page 19), requires power to the drive motors. You must<br />
have the brake pedal all the way down for plugging to<br />
work.<br />
BRAKES ON<br />
Lift your left heel. Let the left pedal rise until you have<br />
the desired braking force. Let the pedal come up all the<br />
way for full braking.<br />
As the brake pedal starts to lift, power is cut to the drive<br />
motors. Remember, without power to the drive motors<br />
you can't use plugging.<br />
Know the Hazards<br />
?<br />
WATCH YOUR FEET<br />
Keep your feet inside the truck and on the pedals at all<br />
times. This truck weighs about 3630kg (8000 pounds)<br />
even without a load. You cannot stop or even slow down<br />
that much weight with your foot or any part of your body,<br />
no matter how slow the truck is moving.<br />
A foot or hand caught between the truck and a wall, post<br />
or any fixed object will be crushed or even cut off.<br />
MAKE SURE YOUR BRAKES WORK<br />
Test the brakes on your truck at the start of each shift.<br />
Know the distance it takes to stop before you start<br />
working.<br />
If at any time the stopping distance is too long for you to<br />
stop safely, don't drive the truck. Report any problem to<br />
your supervisor.<br />
17 Foot Brake Foot Brake 18
Traveling & Plugging<br />
TILT<br />
19 Traveling & Plugging<br />
TRAVEL, POWER UNIT FIRST<br />
Pull the multi-function handle toward you to<br />
travel in the direction of the power unit (power<br />
unit first).<br />
The farther you pull the handle from the neutral<br />
position, the faster the truck will travel.<br />
TRAVEL, FORKS FIRST<br />
Push the multi-function handle away from<br />
you to travel in the direction of the forks<br />
(forks first).<br />
The farther you push the handle from the<br />
neutral position, the faster the truck will travel.<br />
PLUGGING<br />
Plugging is another way to slow down or<br />
stop your truck.<br />
While the truck is moving, in either direction,<br />
pull or push the multi-function handle through<br />
neutral to the opposite direction of travel.<br />
This will not hurt your truck.<br />
Travel,<br />
forks first<br />
Know the Hazards<br />
Pull the<br />
multi-function<br />
control<br />
Push the<br />
multi-function<br />
control<br />
Travel,<br />
power unit first<br />
HORN<br />
Press the blue button on the multi-function handle to<br />
sound the horn. Use it to warn pedestrians and other<br />
drivers.<br />
Use your horn when you come to an intersection or a<br />
crosswalk.<br />
PLUGGING VS. BRAKING<br />
Of the two, the foot brake is designed to stop the truck in<br />
the shortest distance. Use the foot brake in an emergency,<br />
on ramps or in busy areas.<br />
YOU CAN'T HAVE BOTH<br />
Plugging works only when you have the brake pedal all<br />
the way down. When the brake pedal begins to lift, power<br />
is cut to the drive motor and you will not be able to plug.<br />
Traveling & Plugging 20
Steering & Travel<br />
21 Steering & Travel<br />
LIFT TRUCKS ARE NOT LIKE AUTOMOBILES<br />
Your lift truck does not steer or drive like an<br />
automobile. Be sure you are trained to operate<br />
this truck. Drive slowly until you get used to the<br />
steering and all other controls.<br />
STEERING AND DRIVING<br />
You will need to drive your truck both in the direction of<br />
the forks (forks first) and also away from the forks (power<br />
unit first or forks trailing). Steering is not the same in<br />
both directions. Be careful.<br />
SIMILAR TRUCKS CAN BE DIFFERENT<br />
This style truck can be built with one of two different types<br />
of steering. Your company has selected the type which is<br />
best for your work area.<br />
Caution: If you ever drive a different truck, even one that<br />
looks just like yours, be careful. The steering may be<br />
different (see pages 23 and 24).<br />
Know the Hazards<br />
POWER UNIT SWING<br />
Be careful turning while traveling forks first. The power<br />
unit will swing wide in the opposite direction. Make sure<br />
you have clearance, and watch out for people in the area.<br />
SLOW DOWN FOR SPILLS OR WET FLOORS<br />
Powder or liquid spills can cause slippery floors. Slow<br />
down or you could lose control of steering and braking.<br />
Be careful and allow for a longer stopping distance.<br />
Don't run over objects on the floor.<br />
Steering & Travel 22
Two Types of Steering<br />
THERE ARE TWO TYPES OF STEERING<br />
This style truck can be built with one of two different types of steering.<br />
Your company has selected the type which is best for your work area.<br />
Caution:<br />
• Don't drive if you have not been trained.<br />
• Your truck does not steer like an automobile.<br />
• Drive slowly until you get use to the truck.<br />
• Trucks that look like yours may steer differently.<br />
1 REAR<br />
DIRECTIONAL STEERING (Sometimes called Reverse Steering.)<br />
Shows direction truck will turn when steering handle is turned clockwise.<br />
Travel, power<br />
unit first<br />
Direction<br />
of Turn<br />
23 Two Types of Steering<br />
of Turn<br />
Direction<br />
Travel,<br />
forks first<br />
2<br />
FRONT DIRECTIONAL STEERING (Sometimes called Forward Steering.)<br />
Shows direction truck will turn when steering handle is turned clockwise.<br />
Travel, power<br />
unit first<br />
Direction<br />
Turn<br />
of of<br />
Direction<br />
of Turn<br />
of Turn<br />
Travel,<br />
forks first<br />
Two Types of Steering 24
Fork Function<br />
TILT<br />
25 Fork Function<br />
AVAILABLE FORK OR<br />
HYDRAULIC FUNCTIONS<br />
Raising and Lowering the forks plus Fork Tilt<br />
are standard. You control these two functions with the<br />
multi-function handle.<br />
Your truck may also have accessory functions like Sideshift,<br />
Carton Clamp or Push-Pull. You control these functions<br />
with the accessory control levers.<br />
Use these hydraulic functions when you move, put away<br />
or take down loads.<br />
RAISE/LOWER<br />
You are always in the Raise/Lower function unless you<br />
select the Fork Tilt function.<br />
SELECTING FORK TILT<br />
Press the orange button on the multi-function handle to<br />
select Fork Tilt.<br />
Note:<br />
• You are always in the Raise/Lower function when you<br />
turn the truck on.<br />
• You must have the handle in neutral to select Tilt.<br />
• You must hold the orange button in until you move the<br />
handle from neutral and the forks and mast start to tilt.<br />
LIFT UP MULTI-FUNCTION<br />
Select a function and lift the multi-function handle up.<br />
The forks will raise or the forks will tilt up (mast will tilt<br />
back), depending on which function you selected.<br />
The further you lift the handle up, the faster the movement<br />
will be.<br />
NEUTRAL<br />
You must have the control in neutral to select the Tilt<br />
function. Hold the orange button in until you move the<br />
control and the mast starts to tilt.<br />
Return the handle to neutral and you will be back in the<br />
Raise/Lower function.<br />
PUSH DOWN MULTI-FUNCTION<br />
Select a function and push the multi-function handle down.<br />
The forks will lower or the forks will tilt down (mast will<br />
tilt forward), depending on which function you selected.<br />
The further you push the handle down, the faster the<br />
movement will be.<br />
Fork Function 26
Retractable Guard optional<br />
Know the Hazards<br />
27 Retractable Guard optional<br />
RETRACTABLE OVERHEAD GUARD<br />
Turn the knob clockwise to lower the<br />
guard about 150mm (5.9 in.). Turn the<br />
knob counterclockwise to raise the guard.<br />
Lower the guard if you must work in areas with low<br />
overhead clearance. Always raise the guard for overhead<br />
protection whenever you leave a low clearance area.<br />
2300mm (90.5 in.) raised height<br />
2150mm (84.6 in.) lowered height<br />
OPERATING LIMITS<br />
• You cannot lower the guard if you have the forks raised<br />
above operator compartment height.<br />
• You cannot raise the forks above operator compartment<br />
height if you have the guard lowered.<br />
CHECK OVERHEAD CLEARANCE<br />
Know the height of your truck and when you must lower<br />
the guard to clear low obstructions.<br />
PROTECT YOURSELF<br />
Falling objects can cause injury. Always raise the retractable<br />
guard when you leave a low clearance area.<br />
WATCH YOUR HEAD WHEN THE GUARD IS DOWN<br />
Look where you're going and check for objects that could<br />
intrude or poke into the operator area.<br />
Hydraulic Accessories<br />
Hydraulic accessory levers (optional)<br />
HYDRAULIC ACCESSORY OPERATION<br />
Pull the lever toward you and you'll get the action shown<br />
by the symbol in the top of the knob. Push the lever away<br />
from you and you'll get the opposite action.<br />
For example: If you have a Sideshift accessory,<br />
pull the lever toward you to shift the forks to<br />
the right, or push the lever away from you to<br />
shift the forks to the left.<br />
Hydraulic Accessories 28
Daily Safety Check<br />
CHECK YOUR TRUCK BEFORE STARTING WORK<br />
You must make sure your truck is safe to use.<br />
1. Walk around your truck and check it over.<br />
• Check to make sure the battery is charged, water level<br />
is OK and vent caps are in place. Don't use an open<br />
flame to check the battery.<br />
• Make certain the battery retainers on both sides of the<br />
truck are properly installed.<br />
• See that all wheels are in good condition.<br />
• Check that both forks are secure and not bent, cracked<br />
or badly worn.<br />
• Inspect lift chains for damage.<br />
• See that the load backrest and overhead guard are in<br />
place and fastened.<br />
• Look under the truck for signs of hydraulic leaks.<br />
• Test the horn.<br />
• Make sure the power disconnect works.<br />
29 Daily Safety Check<br />
2. Test drive your truck in an uncongested area.<br />
• Try all the hydraulic functions.<br />
• Check that the steering is easy and smooth.<br />
• Drive the truck slowly in both directions.<br />
• Drive through the full speed range in both forward<br />
and reverse.<br />
• Check braking and plugging distances in forward<br />
and reverse. Load size and floor conditions can affect<br />
these distances.<br />
• Know the distance it takes to stop before you start<br />
working. If the braking distance is too long to stop<br />
safely, don't drive the truck.<br />
If anything doesn't look or feel right, don't drive the truck.<br />
Report the problem to your supervisor.<br />
You can get checklist forms from your <strong>Crown</strong> dealer<br />
(part no. OF-3772). Used properly, this checklist can alert<br />
service people to needed repairs.<br />
Daily Safety Check 30
Be a Safe Driver<br />
The most<br />
important<br />
component<br />
is you.<br />
31 Be a Safe Driver<br />
MAKE SURE YOU ARE READY TO DRIVE<br />
• Do not use this truck unless you are trained<br />
and certified.<br />
• Be certain you understand how your truck works and<br />
the hazards that go with it. Don't drive the truck if you<br />
have any doubts.<br />
• Know the capacity of your truck (Load Weight, Load<br />
Center and Lift Height). Make certain you use the<br />
correct units of measure.<br />
• Some trucks are not allowed in areas where there are<br />
fire hazards. Be certain your truck is the correct fire<br />
safety type for the area.<br />
• Make sure your hands and shoes are clean and dry, and<br />
your clothing is proper for the job.<br />
MAKE SURE YOUR TRUCK IS READY<br />
• Inspect your truck before using it (see pages 29 and 30).<br />
If it's not working right, or something is broken, report<br />
the problem to your supervisor. Don't use the truck.<br />
• In an open area, test the brakes and plugging. Check at<br />
a slow travel speed first, then a faster one. Know the<br />
distance it takes to stop before you start work.<br />
DRIVE CAUTIOUSLY, BE ALERT<br />
• Never stick a foot or any part of your body outside the<br />
operator area, no matter how slow the truck is moving.<br />
You cannot stop 3630 kg (8000 pounds) with any part of<br />
your body. A foot or hand caught between the truck and<br />
a fixed object will be crushed or even cut off.<br />
• Keep your hands on the controls and your feet on the<br />
pedals.<br />
• Travel in the direction that gives you the best view. Look<br />
where you are going and slow down in congested areas.<br />
• Slow down for wet or slippery floors. Don't run over<br />
things.<br />
• Travel with the forks close to the ground, retracted and<br />
tilted up. Place the load against the load backrest (vertical<br />
face of the forks).<br />
• Look where you are going before you change direction<br />
of travel.<br />
• See that you have room to drive and turn. Always check<br />
for overhead objects. Watch out for power unit swing.<br />
• Slow down when making turns.<br />
• Avoid sudden movement of controls. Learn to use them<br />
smoothly at a moderate, even rate.<br />
• Check clearances before raising or lowering the forks<br />
or load.<br />
• Be extra careful if you must use your truck in an area where<br />
there is a risk of falling objects. Don't operate your truck<br />
with the retractable overhead guard lowered.<br />
Continued next page...<br />
Be a Safe Driver 32
Be a Safe Driver continued<br />
33 Be a Safe Driver continued<br />
WATCH OUT FOR OTHER PEOPLE<br />
• Slow down. Yield or stop for pedestrians.<br />
Use your horn when you come to a crosswalk<br />
or intersection.<br />
• Be careful that you don't pin or crush someone.<br />
For example: Never drive your truck toward anyone<br />
standing in front of a fixed object.<br />
• Never allow passengers on your truck.<br />
• Watch out for power unit swing.<br />
• Keep others away from your truck while you're working.<br />
Don't ever allow anyone on or under the load or forks.<br />
• Don't let anyone use your truck unless they are trained<br />
and certified.<br />
• Never lift anyone with the forks unless they are using<br />
an approved platform. Even then use extreme caution:<br />
• Use a securely attached and approved safety platform.<br />
• Make certain lifting mechanism is operating properly.<br />
• Have load backrest vertical (never tilt when elevated).<br />
• Make certain truck is in neutral and brake is applied.<br />
• Lift and lower slowly.<br />
• Watch for overhead obstructions.<br />
• Be sure you can see and hear the person being lifted.<br />
• Never transport anyone on the platform from one<br />
location to another.<br />
AVOID FALLS AND TIPOVERS<br />
• Stay away from the edge of docks and ramps.<br />
• Check that bridgeplates and dockboards are secure. Be<br />
certain that either the trailer wheels are chocked or the<br />
trailer is locked to the dock. Check capacities. Be sure<br />
your truck, with load, isn't too heavy for where you are<br />
driving.<br />
• Make sure the load you are moving is stable. Spread<br />
the forks as far as you can and center the load. Insert<br />
the forks as far under the load as you can. Be even more<br />
careful with long, high or wide loads. They can be less<br />
stable.<br />
• Use forward tilt only when you have the load over a<br />
stack or close to the floor. Use minimum fork tilt to<br />
pick up or place a load. When lifting or lowering<br />
outside a rack, keep the load backrest vertical or tilted<br />
back slightly.<br />
• When moving loads on grades or ramps, drive with your<br />
forks pointed upgrade. Without a load, drive with forks<br />
downgrade. Slow down, and don't turn on grades or<br />
ramps.<br />
LEAVING YOUR TRUCK<br />
• Stop your truck completely before getting off.<br />
• Lower the forks to the floor. Turn the truck off or<br />
disconnect the battery.<br />
• Avoid parking on inclines. But if you must, block the<br />
wheels of your truck.<br />
Be a Safe Driver continued 34
Battery Maintenance<br />
35 Battery Maintenance<br />
WHEN YOU INSTALL OR CHANGE BATTERIES<br />
• Turn the truck OFF. Check that all controls<br />
are in neutral.<br />
• Make certain you use the correct size and weight<br />
battery. Never operate a truck that has an underweight<br />
or undersize battery installed.<br />
• Use a roller stand to install or remove a battery. Make<br />
sure the roller stand is the same height as the rollers in<br />
the truck's battery compartment. Also make sure the<br />
roller stand is at least as long as your battery.<br />
• Never let anything metal touch the top of the cells.<br />
You could cause sparks or do damage to the battery.<br />
Use an insulator (such as plywood) when necessary.<br />
• Use an approved spreader bar to place a battery on, or<br />
remove it from a stand. Make sure you adjust the<br />
spreader bar hooks to fit the battery.<br />
AFTER INSTALLING YOUR BATTERY<br />
• Replace the battery retainer. Make certain the retainers<br />
on both sides of the truck are in place.<br />
• Be sure the block #77034 is bolted to the back of the<br />
battery half of the connector.<br />
• Connect the battery. Turn the truck ON and check truck<br />
operation.<br />
Know the Hazards<br />
DANGER<br />
Batteries produce explosive gas.<br />
Do not smoke, use open flame, or<br />
create an arc or sparks near this<br />
battery. Ventilate well in enclosed<br />
areas and when charging.<br />
Batteries contain Sulfuric Acid which<br />
causes severe burns. Do not get in<br />
eyes, on skin, or clothing. In case of<br />
contact, flush immediately. Get medical<br />
attention if your eyes are affected.<br />
WARNING<br />
107<br />
Minimum battery size allowed<br />
XXX mm (XX.XX in.) wide<br />
XXX mm (XX.XX in.) long<br />
Undersize battery can affect truck<br />
handling and stability. You could have<br />
an accident.<br />
Use U.L. classified Type EO battery.<br />
TRUCK BATTERIES CAN BE DANGEROUS<br />
Your truck battery produces fumes that can explode.<br />
It also contains acid that could burn or disfigure you.<br />
• Do not try to install, remove, charge or service your<br />
truck battery unless you are trained and authorized.<br />
• Never smoke or use an open flame around batteries.<br />
• Your company should provide an area where it is safe<br />
to work on batteries. Use that area for all battery work.<br />
• Use protective equipment such as gloves, eye shields,<br />
aprons etc.<br />
BATTERY SIZE<br />
Make certain you use the correct size and weight battery.<br />
Never operate a truck that has an underweight or undersized<br />
battery installed.<br />
Continued next page...<br />
Battery Maintenance 36
Battery Maintenance continued<br />
Attach block #77034 to<br />
Battery Connector<br />
34<br />
Know the Hazards<br />
Use (2) 1/4 x 1-1/4<br />
screws, lockwashers<br />
& nuts.<br />
WARNING<br />
Emergency disconnect<br />
lever will not work if<br />
block #77034 isn't<br />
bolted to the battery<br />
half of the connector.<br />
Never use a battery<br />
without the block in<br />
place.<br />
37 Battery Maintenance continued<br />
BEFORE CHARGING YOUR TRUCK BATTERY<br />
• Charge the battery only in areas designated for that use.<br />
• See that the battery cells are filled to the proper level.<br />
Never use an open flame to check the battery.<br />
• Make certain the charger is the same voltage and<br />
amperage as your battery.<br />
• Read the battery charger instructions.<br />
• Be sure the charger is turned OFF before connecting the<br />
battery to the charger. Otherwise you might create a<br />
spark which could cause the battery to explode.<br />
BEFORE CONNECTING YOUR BATTERY<br />
Make certain the block (<strong>Crown</strong> #77034) is bolted to the<br />
back of the battery half of the connector. Without that<br />
block the Power Disconnect won't work. In an emergency<br />
you will not be able to cut power to the truck.<br />
Make sure the truck key switch is turned off and all controls<br />
are in the off position.<br />
Warning Labels<br />
07 WARNI NG<br />
Falling objects or lowering forks can<br />
cause serious injury or death.<br />
Never stand under the forks.<br />
WARNI NG<br />
Stay clear of all<br />
moving parts.<br />
Moving parts can<br />
cut or crush hands,<br />
feet, arms or legs.<br />
WARNI NG<br />
Standing or riding on the forks can<br />
cause a fall. You can be seriously<br />
injured or killed.<br />
Never stand or ride on forks<br />
for any reason.<br />
09<br />
While servicing, block the forks so<br />
they won't fall. WARNI NG<br />
10<br />
CAUTION It’s the law, you must be trained<br />
and certified to operate this truck.<br />
(OSHA § 1910.178, Rev. 1999)<br />
You or people around you could be<br />
seriously injured or even killed if you<br />
don't use this truck correctly.<br />
Connect charger Obey all warnings and instructions on the truck<br />
properly or and truck in the operator manual*.<br />
can be damaged.<br />
Inspect your truck before starting work, make<br />
Make certain<br />
sure it is in good working order.<br />
charger is plugged<br />
into the battery * Additional copies of the Operators Manual and Truck<br />
connector, Labels not the can be obtained from <strong>Crown</strong> Equip. Corp., New<br />
truck connector. Bremen, Ohio 45869 U.S.A. WARNING<br />
47<br />
XXX<br />
Minimum battery size allowed<br />
XXX mm (XX.XX in.) wide<br />
20<br />
XXX mm (XX.XX in.) long<br />
Undersize battery can affect truck<br />
handling and stability. You could have<br />
an accident.<br />
Use U.L. classified Type EO battery.<br />
EACH WARNING LABEL<br />
ON YOUR TRUCK IS IMPORTANT<br />
Read and obey all of them to protect<br />
yourself and others.<br />
WARNI NG<br />
Avoid being crushed during normal<br />
truck operation. Stay within the<br />
operator area. Stop truck completely<br />
before getting off.<br />
However, tipovers and falls from<br />
docks can cause serious injury or<br />
even death. Immediately exit and<br />
move away from the truck in these<br />
emergencies.<br />
You can be trapped or crushed by<br />
driving the operator area under racks<br />
or other objects. Look where you are<br />
going.<br />
XXX DANGER<br />
Batteries can produce explosive gas. Do not<br />
smoke, use open flame, or create an arc or sparks<br />
near this battery. Ventilate well when in an enclosed<br />
area and when charging.<br />
This battery contains Sulfuric Acid which causes<br />
severe burns. Do not get in eyes, on skin, or clothing.<br />
In case of contact, flush immediately and thoroughly<br />
Attach block #77034 to Emergency disconnect<br />
with water. Get medical attention Battery if Connector your eyes are<br />
lever will not work if<br />
affected.<br />
block #77034 isn't<br />
bolted to the battery<br />
half of the connector.<br />
WARNI NG<br />
Tilting mast forward<br />
when forks are raised<br />
and loaded can tip the<br />
truck over causing<br />
injury or death.<br />
Do not tilt elevated<br />
load forward unless<br />
it is over a stack.<br />
14-001<br />
34<br />
WARNI NG<br />
Use (2) 1/4 x 1-1/4<br />
screws, lockwashers<br />
& nuts.<br />
Never use a battery<br />
without the block in<br />
place.<br />
All rights reserved under International<br />
and Pan American copyright conventions<br />
Copyright 1996 <strong>Crown</strong> <strong>Equipment</strong> Corp.<br />
Warning Labels 38