Untitled
Untitled
Untitled

Create successful ePaper yourself
Turn your PDF publications into a flip-book with our unique Google optimized e-Paper software.
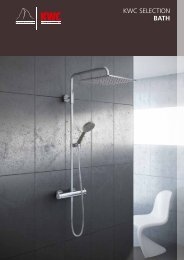
ACCESSORIES 156/157<br />
INSTALL FLOOR-LEVEL SHOWERS<br />
SIMPLY WITH THE INSTALLATION<br />
SYSTEM FRAME ESR II<br />
THE MOST COMPELLING ARGUMENTS FOR THE ESR II:<br />
• no moisture or building damage of any kind caused by defective<br />
silicon sealant<br />
• optimal safety with creep water connection on ESR II<br />
• very short assembly times and extremely versatile height<br />
adjustment<br />
• straightforward maintenance is possible<br />
• perfect noise insulation in accordance with DIN 4109/A1 and<br />
SIA 181<br />
• long-term price advantages for operators and investors<br />
• suitable ESR II for each of the following models (for depths 6 cm<br />
and below): ARRONDO, BELLEZZA, CONOFLAT, CORNEZZA,<br />
FONTANA, SUPERPLAN and SUPERPLAN XXL<br />
STRAIGHTFORWARD, SIMPLE INSTALLATION<br />
The ESR II allows fl oor-level shower trays to be<br />
installed quickly and precisely with optimal stability.<br />
Depending on the requirements, various siphon<br />
variants are available each with creep water<br />
connection. With this complete system you have all<br />
the components required to install super-fl at<br />
shower trays quickly and easily.<br />
The Kaldewei ESR II guarantees floor-level showers<br />
to be installed without damage caused by moisture<br />
penetration.<br />
ESR II<br />
Establish the siphon position and the<br />
course of the connection. Create the<br />
fl oor cavity or recess with suitable aids.<br />
Connect siphon trap to the waste<br />
water pipe and carry out drainage test.<br />
Then insert the ESR II pre set.<br />
Assemble creep water connection and<br />
adjust the ESR II accurately. Then fix the<br />
frame with the enclosed fi ttings.<br />
Stick on fleece butyl sealing tape. If<br />
necessary, fi ll the gap between the floor<br />
tiles and the foot frame with supporting<br />
material.<br />
By inserting the installation aids, the<br />
walls and fl oors can now be tiled without<br />
having to install the shower tray.<br />
The shower tray is installed and the<br />
siphon connected to the shower<br />
tray. Then the grooves are fi lled with<br />
permanent elastic sealant.