

F/A-18 Hornet Article - Steve's RC Homepage
F/A-18 Hornet Article - Steve's RC Homepage
F/A-18 Hornet Article - Steve's RC Homepage

Create successful ePaper yourself
Turn your PDF publications into a flip-book with our unique Google optimized e-Paper software.
HOMEBUILT<br />
This is the finished model after painting. Since the model was inspired by<br />
the Blue Angels, that was the only paint scheme that would do!<br />
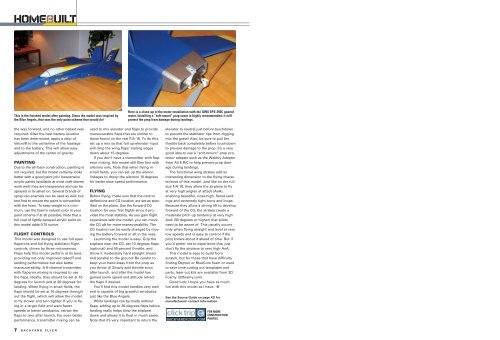
Here is a close-up of the motor installation with the GWS EPS-350C geared<br />
motor. Installing a “soft-mount” prop saver is highly recommended; it will<br />
protect the prop from damage during landings.<br />
the way forward, and no other ballast was<br />
required. After the best battery location<br />
has been determined, apply a strip of<br />
Velcro® to the centerline of the fuselage<br />
and to the battery. This will allow easy<br />
adjustments of the center of gravity.<br />
PAINTING<br />
Due to the all-foam construction, painting is<br />
not required, but the model certainly looks<br />
better with a good paint job! Inexpensive<br />
acrylic paints (available at most craft stores)<br />
work well; they are inexpensive and can be<br />
sprayed or brushed on. Several brands of<br />
spray-can enamels can be used as well, but<br />
test first to ensure the paint is compatible<br />
with the foam. To keep weight to a minimum,<br />
use the foam’s natural color in your<br />
paint scheme if at all possible. Note that a<br />
full coat of lightly-sprayed acrylic paint on<br />
this model adds 0.75 ounce.<br />
FLIGHT CONTROLS<br />
This model was designed to use full-span<br />
flaperons and full-flying stabilator flight<br />
controls, driven by three microservos.<br />
Flaps help this model perform at its best,<br />
providing not only improved takeoff and<br />
landing performance but also better<br />
maneuverability. A 6-channel transmitter<br />
with flaperon mixing is required to use<br />
the flaps. Ideally, they should be set at 10<br />
degrees for launch and at 30 degrees for<br />
landing. When flying in small fields, the<br />
flaps should be set at 10 degrees throughout<br />
the flight, which will allow the model<br />
to fly slower and turn tighter. If you’re flying<br />
in a larger field and want faster<br />
speeds or better aerobatics, retract the<br />
flaps to zero after launch. For even better<br />
performance, transmitter mixing can be<br />
used to mix elevator and flaps to provide<br />
maneuverable flaps that are similar to<br />
those found on the real F/A-<strong>18</strong>. To do this,<br />
set up a mix so that full up-elevator input<br />
will drop the wing flaps’ trailing edges<br />
down about 15 degrees.<br />
If you don’t have a transmitter with flaperon<br />
mixing, this model still flies fine with<br />
ailerons only. Note that when flying in<br />
small fields, you can set up the aileron<br />
linkages to droop the ailerons 10 degrees<br />
for better slow speed performance.<br />
FLYING<br />
Before flying, make sure that the control<br />
deflections and CG location are set as specified<br />
on the plans. Use the forward-CG<br />
location for your first flights since it provides<br />
the most stability. As you gain flight<br />
experience with the model, you can move<br />
the CG aft for more maneuverability. The<br />
CG location can be easily changed by moving<br />
the battery forward or aft in the nose.<br />
Launching the model is easy. Grip the<br />
airplane near the CG, set 10 degrees flaps<br />
(optional) and 50-percent throttle, and<br />
throw it moderately hard straight ahead<br />
and parallel to the ground. Be careful to<br />
keep your hand away from the prop as<br />
you throw it! Slowly add throttle soon<br />
after launch, and after the model has<br />
gained some speed and altitude retract<br />
the flaps if desired.<br />
You’ll find this model handles very well<br />
and is capable of big graceful aerobatics<br />
just like the Blue Angels.<br />
While landings can be made without<br />
flaps, adding up to 30-degrees flaps before<br />
landing really helps slow the airplane<br />
down and allows it to float in much easier.<br />
Note that it’s very important to return the<br />
elevator to neutral just before touchdown<br />
to prevent the stabilator tips from digging<br />
into the grass! Also, be sure to pull the<br />
throttle back completely before touchdown<br />
to prevent damage to the prop. It’s a very<br />
good idea to use a “soft-mount” prop protector<br />
adapter such as the Wobbly Adapter<br />
from All E R/C to help prevent prop damage<br />
during landings.<br />
The functional wing strakes add an<br />
interesting dimension to the flying characteristics<br />
of this model. Just like on the fullsize<br />
F/A-<strong>18</strong>, they allow the airplane to fly<br />
at very high angles of attack (AoA),<br />
enabling beautiful, nose-high, flared landings<br />
and extremely tight turns and loops.<br />
Because they allow a strong lift to develop<br />
forward of the CG, the strakes create a<br />
moderate pitch-up tendency at very high<br />
AoA (30 degrees or higher) that pilots<br />
need to be aware of. This usually occurs<br />
only when flying straight and level at very<br />
low speeds and is easy to control if the<br />
pilot knows about it ahead of time. But if<br />
you’d prefer not to experience this, just<br />
don’t fly the airplane to very high AoA.<br />
This model is easy to build from<br />
scratch, but for those that have difficulty<br />
finding Depron or BlueCore foam or want<br />
to save time cutting out templates and<br />
parts, laser-cut kits are available from 3D<br />
Foamy (3dfoamy.com).<br />
Good luck; I hope you have as much<br />
fun with this model as I have. A<br />
See the Source Guide on page XX for<br />
manufacturers’ contact information.<br />
BACKYARDFLYER.COM<br />
FOR MORE<br />
CONSTRUCTION<br />
PHOTOS<br />
7 BACKYARD FLYER
