
You also want an ePaper? Increase the reach of your titles
YUMPU automatically turns print PDFs into web optimized ePapers that Google loves.
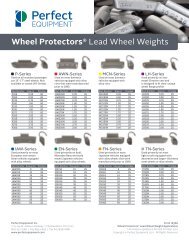
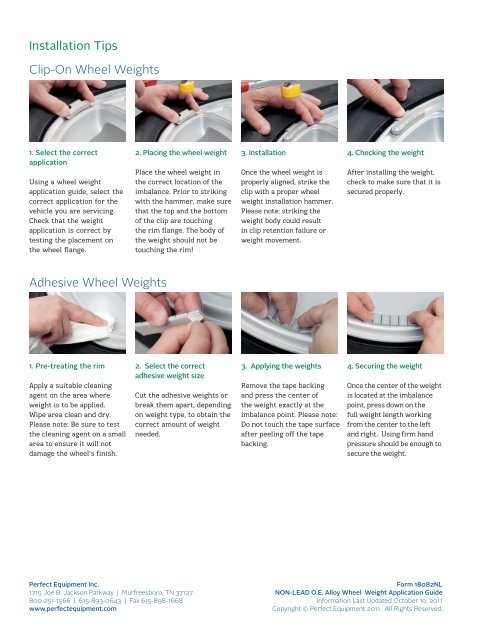
Installation Tips<br />
Clip-On <strong>Wheel</strong> <strong>Weight</strong>s<br />
1. Select the correct<br />
application<br />
Using a wheel weight<br />
application guide, select the<br />
correct application for the<br />
vehicle you are servicing.<br />
Check that the weight<br />
application is correct by<br />
testing the placement on<br />
the wheel flange.<br />
2. Placing the wheel weight<br />
Place the wheel weight in<br />
the correct location of the<br />
imbalance. Prior to striking<br />
with the hammer, make sure<br />
that the top and the bottom<br />
of the clip are touching<br />
the rim flange. The body of<br />
the weight should not be<br />
touching the rim!<br />
3. Installation<br />
Once the wheel weight is<br />
properly aligned, strike the<br />
clip with a proper wheel<br />
weight installation hammer.<br />
Please note: striking the<br />
weight body could result<br />
in clip retention failure or<br />
weight movement.<br />
4. Checking the weight<br />
After installing the weight,<br />
check to make sure that it is<br />
secured properly.<br />
Adhesive <strong>Wheel</strong> <strong>Weight</strong>s<br />
1. Pre-treating the rim<br />
Apply a suitable cleaning<br />
agent on the area where<br />
weight is to be applied.<br />
Wipe area clean and dry.<br />
Please note: Be sure to test<br />
the cleaning agent on a small<br />
area to ensure it will not<br />
damage the wheel‘s finish.<br />
2. Select the correct<br />
adhesive weight size<br />
Cut the adhesive weights or<br />
break them apart, depending<br />
on weight type, to obtain the<br />
correct amount of weight<br />
needed.<br />
3. Applying the weights<br />
Remove the tape backing<br />
and press the center of<br />
the weight exactly at the<br />
imbalance point. Please note:<br />
Do not touch the tape surface<br />
after peeling off the tape<br />
backing.<br />
4. Securing the weight<br />
Once the center of the weight<br />
is located at the imbalance<br />
point, press down on the<br />
full weight length working<br />
from the center to the left<br />
and right. Using firm hand<br />
pressure should be enough to<br />
secure the weight.<br />
Perfect Equipment Inc.<br />
1715 Joe B. Jackson Parkway | Murfreesboro, TN 37127<br />
800-251-1566 | 615-893-0643 | Fax 615-898-1668<br />
www.perfectequipment.com<br />
Form 18082NL<br />
NON-LEAD O.E. Alloy <strong>Wheel</strong> <strong>Weight</strong> <strong>Application</strong> Guide<br />
Information Last Updated October 10, 2011<br />
Copyright © Perfect Equipment 2011. All Rights Reserved.