Saline-Filled and Spectrum⢠Breast Implants - Mentor
Saline-Filled and Spectrum⢠Breast Implants - Mentor
Saline-Filled and Spectrum⢠Breast Implants - Mentor

You also want an ePaper? Increase the reach of your titles
YUMPU automatically turns print PDFs into web optimized ePapers that Google loves.
<strong>Mentor</strong> Corporation<br />
P990075/S21/A03<br />
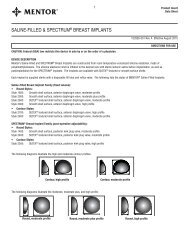
<strong>Saline</strong> <strong>Filled</strong> <strong>Breast</strong> <strong>Implants</strong><br />
INSTRUCTIONS FOR USE<br />
NOTE: It is advisable to have more than one size breast implant in the operating room at the time of surgery to allow for flexibility in determining the<br />
appropriate size implant to be used. A backup implant should also be available.<br />
Do Not stack more than one implant per breast pocket.<br />
Recording Procedure<br />
Each prosthesis is supplied with two Patient Record Labels showing the catalog number <strong>and</strong> lot number for that unit. One of these pressure sensitive<br />
labels should be attached directly to the Patient ID Card, <strong>and</strong> one to the patient’s chart. The implanted position (left or right side) <strong>and</strong> the fill volume of<br />
each prosthesis should be indicated on the label.<br />
Sterilization<br />
Siltex <strong>and</strong> smooth-surface saline-filled breast implants are provided sterile. They are sterilized by either gamma radiation or dry heat. The exact method<br />
can be determined by the sterilization symbol on the outer packaging. This product is for single use only.<br />
Do not resterilize.<br />
Implant Selection<br />
Some of the important surgical <strong>and</strong> implant sizing variables that have been identified include the following:<br />
• The implant should not be too small or too large in comparison to the patient’s chest wall dimensions.<br />
• Available tissue must provide adequate coverage of the implant.<br />
• Submuscular placement of the implant may be preferable in patients with thin or poor quality tissue.<br />
• A well-defined, dry pocket of adequate size <strong>and</strong> symmetry must be created to allow the implant to be placed flat on a smooth surface.<br />
• Avoid too small of an incision.<br />
• The higher profile of the Siltex shell should be considered in surgical approach.<br />
Testing Procedure For <strong>Saline</strong>-<strong>Filled</strong> <strong>Implants</strong><br />
The device should be tested for patency <strong>and</strong> shell integrity immediately prior to use. This can be accomplished by the following steps:<br />
1. Partially inflate the prosthesis with air through the fill tube, taking care not to damage the valve (see Attaching Fill Tube instructions for the<br />
Diaphragm Valve under FILLING PROCEDURE).<br />
2. Submerge the air-filled prosthesis in sterile, pyrogen-free testing fluid (water or saline).<br />
3. Apply mild pressure <strong>and</strong> check for possible punctures or leaks.<br />
Maintaining hemostasis/Avoiding fluid accumulation<br />
Careful hemostasis is important to prevent postoperative hematoma formation. Should excessive bleeding persist, the implantation with the device should<br />
be delayed until bleeding is controlled. Postoperative evacuation of hematoma or seroma must be conducted with care to avoid breast implant<br />
contamination, or damage from sharp instruments.<br />
FILLING PROCEDURE–IMPLANTS WITH DIAPHRAGM VALVES<br />
The normal position of the diaphragm valve, which is located anteriorly, is closed. A fill tube stylet, enclosed with the product, is inserted into the<br />
implant’s valve system at the time of surgery <strong>and</strong> removed intraoperatively when the desired volume is reached. Air or fluid flow into or out of the<br />
prosthesis is established by inserting the fill tube stylet, which holds the diaphragm valve open.<br />
Attaching Fill Tube<br />
1. Remove <strong>and</strong> discard the protective strip between the strap closure <strong>and</strong> valve. Push the strap closure to one side of the valve opening. To insert the fill<br />
tube into the valve opening, wet the stylet tip of the fill tube in sterile, isotonic saline, <strong>and</strong>, using the thumb <strong>and</strong> forefinger to stabilize/support the<br />
valve seat while moving the strap aside, gently push the stylet tip into the valve opening as far as the fill-tube stylet flange permits. (Figure 1a)<br />
Support of the diaphragm valve together with a gentle rotation of the fill tube during insertion facilitates ease of entry. Continue to press the stylet<br />
against the prosthesis shell until air freely escapes from the prosthesis (Figures 1b & 1c).<br />
14<br />
Attachment 2