(CVC) Management Guidance - the Royal Cornwall Hospitals Trust ...
(CVC) Management Guidance - the Royal Cornwall Hospitals Trust ...
(CVC) Management Guidance - the Royal Cornwall Hospitals Trust ...

Create successful ePaper yourself
Turn your PDF publications into a flip-book with our unique Google optimized e-Paper software.
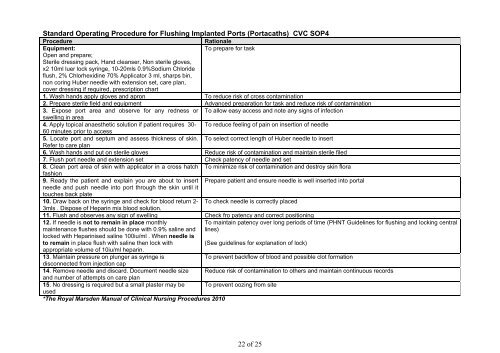
Standard Operating Procedure for Flushing Implanted Ports (Portacaths) <strong>CVC</strong> SOP4<br />
Procedure<br />
Rationale<br />
Equipment:<br />
To prepare for task<br />
Open and prepare;<br />
Sterile dressing pack, Hand cleanser, Non sterile gloves,<br />
x2 10ml luer lock syringe, 10-20mls 0.9%Sodium Chloride<br />
flush, 2% Chlorhexidine 70% Applicator 3 ml, sharps bin,<br />
non coring Huber needle with extension set, care plan,<br />
cover dressing if required, prescription chart<br />
1. Wash hands apply gloves and apron To reduce risk of cross contamination<br />
2. Prepare sterile field and equipment Advanced preparation for task and reduce risk of contamination<br />
3. Expose port area and observe for any redness or To allow easy access and note any signs of infection<br />
swelling in area<br />
4. Apply topical anaes<strong>the</strong>tic solution if patient requires 30- To reduce feeling of pain on insertion of needle<br />
60 minutes prior to access<br />
5. Locate port and septum and assess thickness of skin. To select correct length of Huber needle to insert<br />
Refer to care plan<br />
6. Wash hands and put on sterile gloves Reduce risk of contamination and maintain sterile filed<br />
7. Flush port needle and extension set Check patency of needle and set<br />
8. Clean port area of skin with applicator in a cross hatch To minimize risk of contamination and destroy skin flora<br />
fashion<br />
9. Ready <strong>the</strong> patient and explain you are about to insert Prepare patient and ensure needle is well inserted into portal<br />
needle and push needle into port through <strong>the</strong> skin until it<br />
touches back plate<br />
10. Draw back on <strong>the</strong> syringe and check for blood return 2- To check needle is correctly placed<br />
3mls . Dispose of Heparin mix blood solution.<br />
11. Flush and observes any sign of swelling Check fro patency and correct positioning<br />
12. If needle is not to remain in place monthly<br />
To maintain patency over long periods of time (PHNT Guidelines for flushing and locking central<br />
maintenance flushes should be done with 0.9% saline and lines)<br />
locked with Heparinised saline 100iu/ml . When needle is<br />
to remain in place flush with saline <strong>the</strong>n lock with<br />
(See guidelines for explanation of lock)<br />
appropriate volume of 10iu/ml heparin.<br />
13. Maintain pressure on plunger as syringe is<br />
To prevent backflow of blood and possible clot formation<br />
disconnected from injection cap<br />
14. Remove needle and discard. Document needle size Reduce risk of contamination to o<strong>the</strong>rs and maintain continuous records<br />
and number of attempts on care plan<br />
15. No dressing is required but a small plaster may be To prevent oozing from site<br />
used<br />
*The <strong>Royal</strong> Marsden Manual of Clinical Nursing Procedures 2010<br />
22 of 25