bed assembly instructions for standard bunking lofting beds
bed assembly instructions for standard bunking lofting beds
bed assembly instructions for standard bunking lofting beds

You also want an ePaper? Increase the reach of your titles
YUMPU automatically turns print PDFs into web optimized ePapers that Google loves.
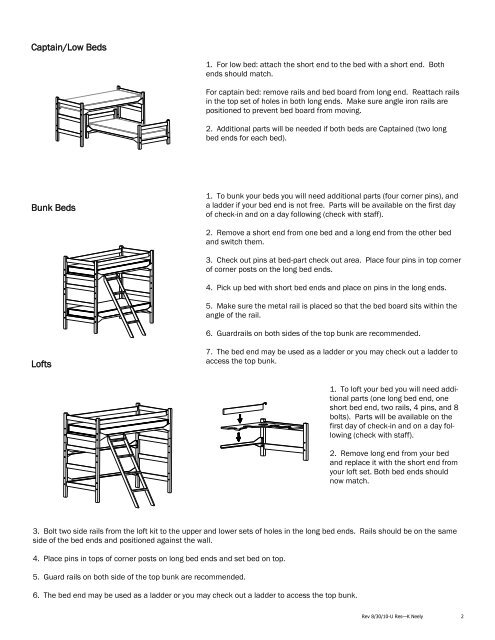
Captain/Low Beds<br />
1. For low <strong>bed</strong>: attach the short end to the <strong>bed</strong> with a short end. Both<br />
ends should match.<br />
For captain <strong>bed</strong>: remove rails and <strong>bed</strong> board from long end. Reattach rails<br />
in the top set of holes in both long ends. Make sure angle iron rails are<br />
positioned to prevent <strong>bed</strong> board from moving.<br />
2. Additional parts will be needed if both <strong>bed</strong>s are Captained (two long<br />
<strong>bed</strong> ends <strong>for</strong> each <strong>bed</strong>).<br />
Bunk Beds<br />
1. To bunk your <strong>bed</strong>s you will need additional parts (four corner pins), and<br />
a ladder if your <strong>bed</strong> end is not free. Parts will be available on the first day<br />
of check-in and on a day following (check with staff).<br />
2. Remove a short end from one <strong>bed</strong> and a long end from the other <strong>bed</strong><br />
and switch them.<br />
3. Check out pins at <strong>bed</strong>-part check out area. Place four pins in top corner<br />
of corner posts on the long <strong>bed</strong> ends.<br />
4. Pick up <strong>bed</strong> with short <strong>bed</strong> ends and place on pins in the long ends.<br />
5. Make sure the metal rail is placed so that the <strong>bed</strong> board sits within the<br />
angle of the rail.<br />
6. Guardrails on both sides of the top bunk are recommended.<br />
Lofts<br />
7. The <strong>bed</strong> end may be used as a ladder or you may check out a ladder to<br />
access the top bunk.<br />
1. To loft your <strong>bed</strong> you will need additional<br />
parts (one long <strong>bed</strong> end, one<br />
short <strong>bed</strong> end, two rails, 4 pins, and 8<br />
bolts). Parts will be available on the<br />
first day of check-in and on a day following<br />
(check with staff).<br />
2. Remove long end from your <strong>bed</strong><br />
and replace it with the short end from<br />
your loft set. Both <strong>bed</strong> ends should<br />
now match.<br />
3. Bolt two side rails from the loft kit to the upper and lower sets of holes in the long <strong>bed</strong> ends. Rails should be on the same<br />
side of the <strong>bed</strong> ends and positioned against the wall.<br />
4. Place pins in tops of corner posts on long <strong>bed</strong> ends and set <strong>bed</strong> on top.<br />
5. Guard rails on both side of the top bunk are recommended.<br />
6. The <strong>bed</strong> end may be used as a ladder or you may check out a ladder to access the top bunk.<br />
Rev 8/30/10-U Res—K Neely 2