Pole-Safe - Transpo Industries, Inc.
Pole-Safe - Transpo Industries, Inc.
Pole-Safe - Transpo Industries, Inc.

You also want an ePaper? Increase the reach of your titles
YUMPU automatically turns print PDFs into web optimized ePapers that Google loves.
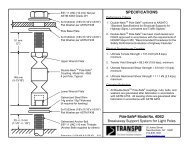
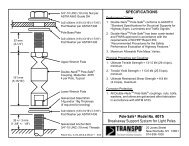
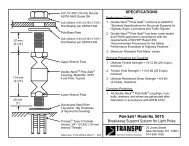
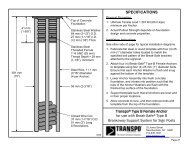
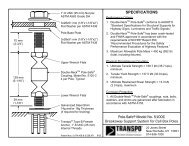
<strong>Pole</strong>-<strong>Safe</strong> ® Model No. 5062, 5075, 5100 and 5125<br />
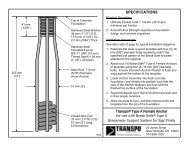
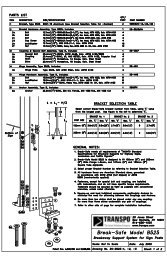
Breakaway Support System for Light <strong>Pole</strong>s<br />
INSTALLATION INSTRUCTIONS<br />
NOTE: Proper Installation is essential for the <strong>Pole</strong>-<strong>Safe</strong> Breakaway Support System to<br />
function correctly as designed.<br />
Anchor Assembly:<br />
1. Fasten <strong>Transpo</strong> ® Type A Female Anchors to a rigid template pre-fabricated to match<br />
the specified bolt circle.<br />
2. Lower entire anchor assembly into the fresh concrete foundation, and vibrate<br />
assembly into place, such that the anchors are in the proper location to match the<br />
holes in the pole base plate. Ensure that all anchors are level and that the tops of<br />
the individual anchors and the bottom of the template are flush with the finished top<br />
surface of the foundation.<br />
3. Allow foundation to fully cure, and remove template from the anchors.<br />
Coupling Assembly:<br />
1. Surface of foundation around anchors must be smooth, flat and free of debris.<br />
2. Thread <strong>Pole</strong>-<strong>Safe</strong> couplings into <strong>Transpo</strong> ® Type A Female Anchors.<br />
3. If needed, shims are provided for leveling of the pole base plate, and may be<br />
installed on the top and/or bottom of the couplings. No more than 2 shims shall be<br />
installed on any one coupling. For larger adjustments that may be required, install<br />
no more than one additional flat washer per <strong>Pole</strong> -<strong>Safe</strong> coupling.<br />
4. Use lower wrench flats to tighten <strong>Pole</strong>-<strong>Safe</strong> couplings into the anchors. Secure<br />
couplings as tight as possible using conventional wrenches. Do not use a pipe<br />
wrench. Couplings must be seated squarely on top of the anchors.<br />
5. Install a flat washer on top of each <strong>Pole</strong>-<strong>Safe</strong> coupling, and set the pole with base<br />
plate on top of the couplings.<br />
6. Install a flat washer and nut on to each coupling extended through the pole base<br />
plate. If pole is not plumb, install shims and/or washers for proper leveling as<br />
described in Step 3 above.<br />
7. Tighten each nut on to pole base plate. <strong>Pole</strong>-<strong>Safe</strong> couplings must be held with an<br />
additional wrench on the upper wrench flats to prevent an induced torque stress<br />
across the necked portion of the couplings. Nuts shall be tightened using the turnof-nut<br />
method in accordance with American Institute of Steel Construction (AISC)<br />
procedures (1/3 rotation past “snug tight”).<br />
12/00<br />
<strong>Transpo</strong> <strong>Industries</strong>, <strong>Inc</strong>., 20 Jones Street, New Rochelle, NY 10801-6098<br />
Phone: 914-636-1000 Fax: 914-636-1282<br />
www.transpo.com