Ultra Sonic Speed Transducer - Nexus Marine
Ultra Sonic Speed Transducer - Nexus Marine
Ultra Sonic Speed Transducer - Nexus Marine

Create successful ePaper yourself
Turn your PDF publications into a flip-book with our unique Google optimized e-Paper software.
Installing<br />
Caution: Never pull, carry, or hold the ultrasonic insert by<br />
the cable as this may sever internal connections.<br />
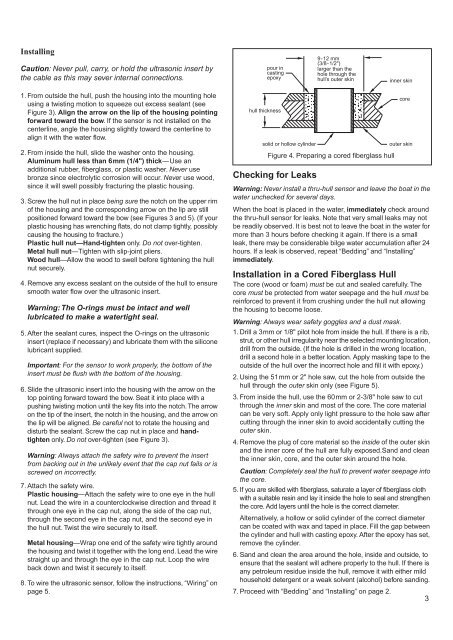
pour in<br />
casting<br />
epoxy<br />
9-12 mm<br />
(3/8-1/2")<br />
larger than the<br />
hole through the<br />
hull’s outer skin<br />
inner skin<br />
1. From outside the hull, push the housing into the mounting hole<br />
using a twisting motion to squeeze out excess sealant (see<br />
Figure 3). Align the arrow on the lip of the housing pointing<br />
forward toward the bow. If the sensor is not installed on the<br />
centerline, angle the housing slightly toward the centerline to<br />
align it with the water flow.<br />
2. From inside the hull, slide the washer onto the housing.<br />
Aluminum hull less than 6mm (1/4") thick—Use an<br />
additional rubber, fiberglass, or plastic washer. Never use<br />
bronze since electrolytic corrosion will occur. Never use wood,<br />
since it will swell possibly fracturing the plastic housing.<br />
3. Screw the hull nut in place being sure the notch on the upper rim<br />
of the housing and the corresponding arrow on the lip are still<br />
positioned forward toward the bow (see Figures 3 and 5). (If your<br />
plastic housing has wrenching flats, do not clamp tightly, possibly<br />
causing the housing to fracture.)<br />
Plastic hull nut—Hand-tighten only. Do not over-tighten.<br />
Metal hull nut—Tighten with slip-joint pliers.<br />
Wood hull—Allow the wood to swell before tightening the hull<br />
nut securely.<br />
4. Remove any excess sealant on the outside of the hull to ensure<br />
smooth water flow over the ultrasonic insert.<br />
Warning: The O-rings must be intact and well<br />
lubricated to make a watertight seal.<br />
5. After the sealant cures, inspect the O-rings on the ultrasonic<br />
insert (replace if necessary) and lubricate them with the silicone<br />
lubricant supplied.<br />
Important: For the sensor to work properly, the bottom of the<br />
insert must be flush with the bottom of the housing.<br />
6. Slide the ultrasonic insert into the housing with the arrow on the<br />
top pointing forward toward the bow. Seat it into place with a<br />
pushing twisting motion until the key fits into the notch. The arrow<br />
on the tip of the insert, the notch in the housing, and the arrow on<br />
the lip will be aligned. Be careful not to rotate the housing and<br />
disturb the sealant. Screw the cap nut in place and handtighten<br />
only. Do not over-tighten (see Figure 3).<br />
Warning: Always attach the safety wire to prevent the insert<br />
from backing out in the unlikely event that the cap nut fails or is<br />
screwed on incorrectly.<br />
7. Attach the safety wire.<br />
Plastic housing—Attach the safety wire to one eye in the hull<br />
nut. Lead the wire in a counterclockwise direction and thread it<br />
through one eye in the cap nut, along the side of the cap nut,<br />
through the second eye in the cap nut, and the second eye in<br />
the hull nut. Twist the wire securely to itself.<br />
Metal housing—Wrap one end of the safety wire tightly around<br />
the housing and twist it together with the long end. Lead the wire<br />
straight up and through the eye in the cap nut. Loop the wire<br />
back down and twist it securely to itself.<br />
8. To wire the ultrasonic sensor, follow the instructions, “Wiring” on<br />
page 5.<br />
hull thickness<br />
solid or hollow cylinder<br />
Figure 4. Preparing a cored fiberglass hull<br />
Checking for Leaks<br />
core<br />
outer skin<br />
Warning: Never install a thru-hull sensor and leave the boat in the<br />
water unchecked for several days.<br />
When the boat is placed in the water, immediately check around<br />
the thru-hull sensor for leaks. Note that very small leaks may not<br />
be readily observed. It is best not to leave the boat in the water for<br />
more than 3 hours before checking it again. If there is a small<br />
leak, there may be considerable bilge water accumulation after 24<br />
hours. If a leak is observed, repeat “Bedding” and “Installing”<br />
immediately.<br />
Installation in a Cored Fiberglass Hull<br />
The core (wood or foam) must be cut and sealed carefully. The<br />
core must be protected from water seepage and the hull must be<br />
reinforced to prevent it from crushing under the hull nut allowing<br />
the housing to become loose.<br />
Warning: Always wear safety goggles and a dust mask.<br />
1. Drill a 3mm or 1/8" pilot hole from inside the hull. If there is a rib,<br />
strut, or other hull irregularity near the selected mounting location,<br />
drill from the outside. (If the hole is drilled in the wrong location,<br />
drill a second hole in a better location. Apply masking tape to the<br />
outside of the hull over the incorrect hole and fill it with epoxy.)<br />
2. Using the 51mm or 2" hole saw, cut the hole from outside the<br />
hull through the outer skin only (see Figure 5).<br />
3. From inside the hull, use the 60mm or 2-3/8" hole saw to cut<br />
through the inner skin and most of the core. The core material<br />
can be very soft. Apply only light pressure to the hole saw after<br />
cutting through the inner skin to avoid accidentally cutting the<br />
outer skin.<br />
4. Remove the plug of core material so the inside of the outer skin<br />
and the inner core of the hull are fully exposed.Sand and clean<br />
the inner skin, core, and the outer skin around the hole.<br />
Caution: Completely seal the hull to prevent water seepage into<br />
the core.<br />
5. If you are skilled with fiberglass, saturate a layer of fiberglass cloth<br />
with a suitable resin and lay it inside the hole to seal and strengthen<br />
the core. Add layers until the hole is the correct diameter.<br />
Alternatively, a hollow or solid cylinder of the correct diameter<br />
can be coated with wax and taped in place. Fill the gap between<br />
the cylinder and hull with casting epoxy. After the epoxy has set,<br />
remove the cylinder.<br />
6. Sand and clean the area around the hole, inside and outside, to<br />
ensure that the sealant will adhere properly to the hull. If there is<br />
any petroleum residue inside the hull, remove it with either mild<br />
household detergent or a weak solvent (alcohol) before sanding.<br />
7. Proceed with “Bedding” and “Installing” on page 2.<br />
3