Download Hoist user manual - Access Lifts Limited
Download Hoist user manual - Access Lifts Limited
Download Hoist user manual - Access Lifts Limited

Create successful ePaper yourself
Turn your PDF publications into a flip-book with our unique Google optimized e-Paper software.
• • Description 2<br />
2.2.1 Charging and life span of the batteries<br />
In order to maximize the life span of the batteries, it is advised to put the cassette into the<br />
charging station when the cassette is not being used.<br />
Always charge the battery when the orange battery indicator is blinking.<br />
Charge the batteries according to the following procedure:<br />
- Make sure the charger is connected to the grid.<br />
- The green indicator on the charger will light up.<br />
- Place the cassette below the charging strips.<br />
- After several seconds charging will start automatically.<br />
- The red indicator on the charger will light up while the battery is being charged.<br />
(The orange indicator on the cassette will light up.)<br />
- The red indicator light will dim when the battery is fully charged.<br />
(The orange indicator on the cassette will also dim.)<br />
- Allow for a charging time of 8 hours.<br />
Capacity<br />
The number of lifting cycles that can be done with a fully charged battery depends on the time per lifting<br />
cycle, the lifted weight and the age and condition of the battery.<br />
Discharging<br />
A battery which is not used for a longer time will automatically discharge. Too much discharging of the<br />
battery reduces the battery’s capacity. This will result in the fact that less lifting cycles can be done with a<br />
battery.<br />
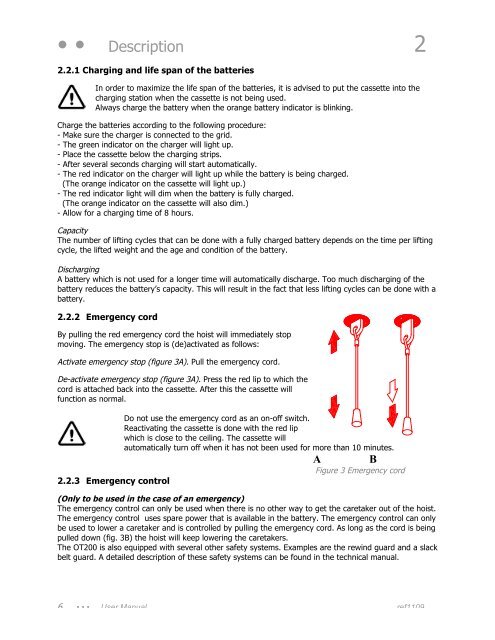
2.2.2 Emergency cord<br />
By pulling the red emergency cord the hoist will immediately stop<br />
moving. The emergency stop is (de)activated as follows:<br />
Activate emergency stop (figure 3A). Pull the emergency cord.<br />
De-activate emergency stop (figure 3A). Press the red lip to which the<br />
cord is attached back into the cassette. After this the cassette will<br />
function as normal.<br />
2.2.3 Emergency control<br />
Do not use the emergency cord as an on-off switch.<br />
Reactivating the cassette is done with the red lip<br />
which is close to the ceiling. The cassette will<br />
automatically turn off when it has not been used for more than 10 minutes.<br />
A<br />
B<br />
Figure 3 Emergency cord<br />
(Only to be used in the case of an emergency)<br />
The emergency control can only be used when there is no other way to get the caretaker out of the hoist.<br />
The emergency control uses spare power that is available in the battery. The emergency control can only<br />
be used to lower a caretaker and is controlled by pulling the emergency cord. As long as the cord is being<br />
pulled down (fig. 3B) the hoist will keep lowering the caretakers.<br />
The OT200 is also equipped with several other safety systems. Examples are the rewind guard and a slack<br />
belt guard. A detailed description of these safety systems can be found in the technical <strong>manual</strong>.<br />
6 • • • User Manual ref1109