
Create successful ePaper yourself
Turn your PDF publications into a flip-book with our unique Google optimized e-Paper software.
104 > Review the Knowledge You Need to Score High<br />
Step I: <strong>Free</strong>-body diagram.<br />
We'll use point A as die fulcrum to start with. Why? In a static equilbrium situation, since die<br />
bridge isn't actually rotating, any point on die bridge could serve as a fulcrum. But we have two<br />
unknown forces here, die forces of die supports A <strong>and</strong> B. We choose die location of one of these<br />
supports as die fulcrum, because now that support provides zero torque—die distance from die<br />
fulcrum becomes zero! Now all we have to do is solve for die force of support B.<br />
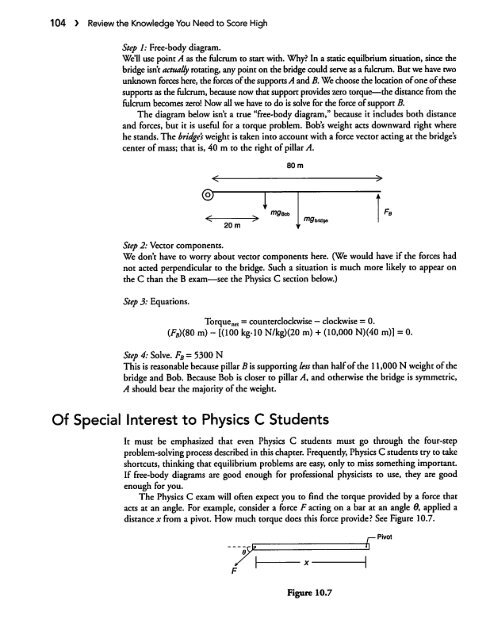
The diagram below isn't a true "free-body diagram," because it includes both distance<br />
<strong>and</strong> forces, but it is useful for a torque problem. Bob's weight acts downward right where<br />
he st<strong>and</strong>s. The bridges weight is taken into account with a force vector acting at the bridge's<br />
center of mass; that is, 40 m to the right of pillar A.<br />
80 m<br />
20 m<br />
Step 2: Vector components.<br />
We don't have to worry about vector components here. (We would have if the forces had<br />
not acted perpendicular to the bridge. Such a situation is much more likely to appear on<br />
the C than the B exam—see the Physics C section below.)<br />
Step 3: Equations.<br />
Torquenel = counterclockwise - clockwise = 0.<br />
(FB)(80 m) - [(100 kg-10 N/kg)(20 m) + (10,000 N)(40 m)] = 0.<br />
Step 4: Solve. ^=5300 N<br />
This is reasonable because pillar B is supporting less than half of the 11,000 N weight of the<br />
bridge <strong>and</strong> Bob. Because Bob is closer to pillar A, <strong>and</strong> orherwise the bridge is symmetric,<br />
A should bear the majority of the weight.<br />
Of Special Interest to Physics C Students<br />
It must be emphasized that even Physics C students must go through the four-step<br />
problem-solving process described in this chapter. Frequently, Physics C students try to take<br />
shortcuts, thinking that equilibrium problems are easy, only to miss something important.<br />
If free-body diagrams are good enough for professional physicists to use, they are good<br />
enough for you.<br />
The Physics C exam will often expect you to find the torque provided by a force that<br />
acts at an angle. For example, consider a force F acting on a bar at an angle 6, applied a<br />
distance x from a pivot. How much torque does this force provide? See Figure 10.7.<br />
,— Pivot<br />
/<br />
F<br />
Figure 10.7