lux elements lavado®-float - Lux Elements GmbH & Co. KG
lux elements lavado®-float - Lux Elements GmbH & Co. KG
lux elements lavado®-float - Lux Elements GmbH & Co. KG

Create successful ePaper yourself
Turn your PDF publications into a flip-book with our unique Google optimized e-Paper software.
www.<strong>lux</strong><strong>elements</strong>.com<br />
17<br />
18<br />
19<br />
20<br />
8<br />
90°<br />
LUX ELEMENTS LAVADO ® -FLOAT …<br />
-G -Z -E -R<br />
10 | 2012<br />
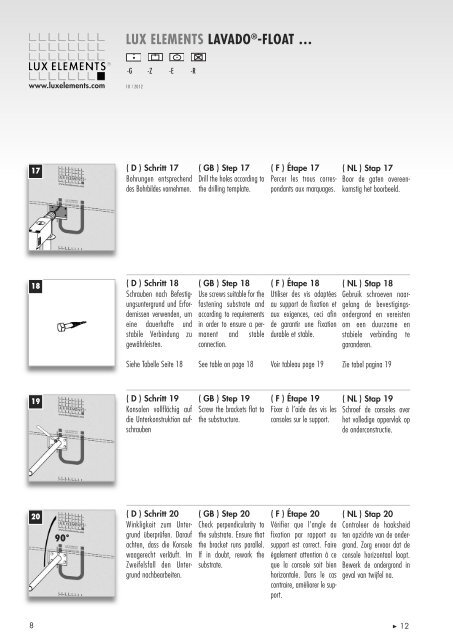
( D ) Schritt 17<br />
Bohrungen entsprechend<br />
des Bohrbildes vornehmen.<br />
( D ) Schritt 18<br />
Schrauben nach Befestig -<br />
ungs untergrund und Erfor -<br />
dernissen verwenden, um<br />
eine dauerhafte und<br />
stabile Verbindung zu<br />
gewährleisten.<br />
Siehe Tabelle Seite 18<br />
( D ) Schritt 19<br />
Konsolen vollflächig auf<br />
die Unterkonstruktion aufschrauben<br />
( D ) Schritt 20<br />
Winkligkeit zum Unter -<br />
grund überprüfen. Darauf<br />
achten, dass die Konsole<br />
waagerecht verläuft. Im<br />
Zweifelsfall den Unter -<br />
grund nachbearbeiten.<br />
( GB ) Step 17<br />
Drill the holes according to<br />
the drilling template.<br />
( GB ) Step 18<br />
Use screws suitable for the<br />
fastening substrate and<br />
according to requirements<br />
in order to ensure a permanent<br />
and stable<br />
connection.<br />
See table on page 18<br />
( GB ) Step 19<br />
Screw the brackets flat to<br />
the substructure.<br />
( GB ) Step 20<br />
Check perpendicularity to<br />
the substrate. Ensure that<br />
the bracket runs parallel.<br />
If in doubt, rework the<br />
substrate.<br />
( F ) Étape 17<br />
Percer les trous correspondants<br />
aux marquages.<br />
( F ) Étape 18<br />
Utiliser des vis adaptées<br />
au support de fixation et<br />
aux exigences, ceci afin<br />
de garantir une fixation<br />
durable et stable.<br />
Voir tableau page 19<br />
( F ) Étape 19<br />
Fixer à l’aide des vis les<br />
consoles sur le support.<br />
( F ) Étape 20<br />
Vérifier que l’angle de<br />
fixation par rapport au<br />
support est correct. Faire<br />
également attention à ce<br />
que la console soit bien<br />
horizontale. Dans le cas<br />
contraire, améliorer le support.<br />
( NL ) Stap 17<br />
Boor de gaten overeenkomstig<br />
het boorbeeld.<br />
( NL ) Stap 18<br />
Gebruik schroeven naargelang<br />
de bevestigings -<br />
ondergrond en vereisten<br />
om een duurzame en<br />
stabiele verbinding te<br />
garanderen.<br />
Zie tabel pagina 19<br />
( NL ) Stap 19<br />
Schroef de consoles over<br />
het volledige oppervlak op<br />
de onderconstructie.<br />
( NL ) Stap 20<br />
<strong>Co</strong>ntroleer de haaksheid<br />
ten opzichte van de ondergrond.<br />
Zorg ervoor dat de<br />
console horizontaal loopt.<br />
Bewerk de ondergrond in<br />
geval van twijfel na.<br />
12