
You also want an ePaper? Increase the reach of your titles
YUMPU automatically turns print PDFs into web optimized ePapers that Google loves.
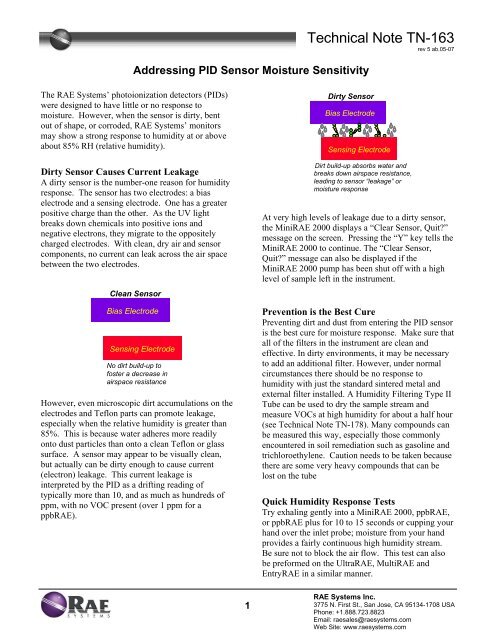
Addressing PID Sensor Moisture Sensitivity<br />
Technical Note TN-163<br />
rev 5 ab.05-07<br />
The RAE Systems’ photoionization detectors (<strong>PIDs</strong>)<br />
were designed to have little or no response to<br />
moisture. However, when the sensor is dirty, bent<br />
out of shape, or corroded, RAE Systems’ monitors<br />
may show a strong response to humidity at or above<br />
about 85% RH (relative humidity).<br />
Dirty Sensor Causes Current Leakage<br />
A dirty sensor is the number-one reason for humidity<br />
response. The sensor has two electrodes: a bias<br />
electrode and a sensing electrode. One has a greater<br />
positive charge than the other. <strong>As</strong> the UV light<br />
breaks down chemicals into positive ions and<br />
negative electrons, they migrate to the oppositely<br />
charged electrodes. With clean, dry air and sensor<br />
components, no current can leak across the air space<br />
between the two electrodes.<br />
Clean Sensor<br />
Bias Electrode<br />
Sensing Electrode<br />
No dirt build-up to<br />
foster a decrease in<br />
airspace resistance<br />
However, even microscopic dirt accumulations<br />
on the<br />
electrodes and Teflon parts can promote leakage,<br />
especially when the relative humidity is greater than<br />
85%. This is because water adheres more readily<br />
onto dust particles than onto a clean Teflon or glass<br />
surface. A sensor may appear to be visually clean,<br />
but actually can be dirty enough to cause current<br />
(electron) leakage. This current leakage is<br />
interpreted by the PID as a drifting reading of<br />
typically more than 10, and as much as hundreds of<br />
ppm, with no VOC present (over 1 ppm for a<br />
ppbRAE).<br />
Dirty Sensor<br />
Bias Electrode<br />
Sensing Electrode<br />
Dirt build-up absorbs water and<br />
breaks down airspace resistance,<br />
leading to sensor “ leakage” or<br />
moisture response<br />
At very high levels of leakage due to a dirty sensor,<br />
the MiniRAE 2000 displays a “Clear Sensor, Quit?”<br />
message on the screen. Pressing the “Y” key tells the<br />
MiniRAE 2000 to continue. The “Clear Sensor,<br />
Quit?” message can also be displayed if the<br />
MiniRAE 2000 pump has been shut off with a high<br />
level of sample left in the instrument.<br />
Prevention is the Best Cure<br />
Preventing dirt and dust from entering the PID sensor<br />
is the best cure for moisture response. Make sure that<br />
all of the filters in the instrument are clean and<br />
effective. In dirty environments, it may be necessary<br />
to add an additional filter. However, under normal<br />
circumstances there should be no response to<br />
humidity with just the standard sintered metal and<br />
external filter installed. A Humidity Filtering Type II<br />
Tube can be used to dry the sample stream and<br />
measure VOCs at high humidity for about a half hour<br />
(see Technical Note TN-178). Many compounds can<br />
be measured this way, especially those commonly<br />
encountered in soil remediation such as gasoline and<br />
trichloroethylene. Caution needs to be taken because<br />
there are some<br />
very heavy compounds that can be<br />
lost on the tube<br />
Quick Humidity <strong>Response</strong> Tests<br />
Try exhaling gently into a MiniRAE 2000, ppbRAE,<br />
or ppbRAE plus for 10 to 15 seconds or cupping your<br />
hand over the inlet probe; moisture from your hand<br />
provides a fairly continuous high humidity stream.<br />
Be sure not to block the air flow. This test can also<br />
be preformed on the UltraRAE, MultiRAE and<br />
EntryRAE in a similar manner.<br />
1<br />
RAE Systems Inc.<br />
3775 N. First St., San Jose, CA 95134-1708 USA<br />
Phone: +1.888.723.8823<br />
Email: raesales@raesystems.com<br />
Web Site: www.raesystems.com
Technical Note TN-163<br />
rev 5 ab.05-07<br />
inside the probe, including a green dust filter and a<br />
white<br />
“C” filter. Both of these should be removed.<br />
The instrument should show little or no response<br />
from these tests. If the MiniRAE 2000 shows more<br />
than 5 ppm isobutylene units or the ppbRAE shows<br />
more than 500 ppb increase in reading, then<br />
something is wrong. The design of the instruments<br />
makes it quick and easy to remove and clean the<br />
probe, lamp, and sensor to address this problem.<br />
Focus on the following areas:<br />
1. Replace filters<br />
2. Clean the probe, PID lamp, and sensor<br />
3. Inspect the sensor for damage or corrosio n.<br />
4. Clean the sensor housing.<br />
5. Clean the sensor using an ultrasonic bath.<br />
MiniRAE 2000, ppbRAE Plus, and UltraRAE<br />
When testing the UltraRAE monitor, make sure that the<br />
tube of interest is installed before proceeding with the<br />
test. If you plan to test for Benzene, install the Benzene<br />
tube and use the same moisture test discussed for the<br />
MiniRAE 2000. If the readings increase more than 2<br />
ppm Benzene units, then there is a problem with dirt in<br />
the monitor.<br />
Replace Filter<br />
The MiniRAE 2000, ppbRAE, ppbRAE plus, and<br />
UltraRAE all use two filters, an external filter and a<br />
sintered metal filter. The external filter (PN 002-<br />
3022-005 for a pack of 5, 002-3022-010 for a pack of<br />
10, and PN 002-3022-100 for a pack of 100) is<br />
attached to the end of the probe and is white. If it<br />
appears to have any discoloration, then it is time to<br />
replace the filter. If the instrument goes into pump<br />
alarm with the filter attached and is able to run<br />
without any problems when not attached, it is time to<br />
replace the filter. When the instrument is responding<br />
to moisture, it is time to replace the filter. The metal<br />
sintered filter (PN 490-0047-005 for a pack of 5)<br />
should be replaced when it is dirty and when the<br />
instrument responds to moisture. The MiniRAE<br />
2000 and ppbRAE instruments have other filters<br />
Clean the Probe<br />
Unscrew the lamp housing cap; inspect the sintered<br />
metal filter at the bottom of the probe. If it appears to<br />
be dirty, it needs to be replaced. A dirty internal filter<br />
indicates that the probe has dirt inside and requires<br />
cleaning. Cleaning the probe depends on the kind of<br />
exposure or dirt that has contaminated the probe. If it is<br />
a chemical that might affect the reading of the PID, use<br />
methanol to clean the probe. If it is just dirt or dust that<br />
has been sucked into the instrument, blow clean, dry air<br />
through the probe to clear the internal tubing.<br />
Clean the PID Lamp<br />
Access to both the lamp and the sensor of a MiniRAE<br />
2000 and ppbRAE plus requires no tools. To remove<br />
the PID sensor, grasp the top lip of the sensor and pull<br />
straight out, to avoid bending the electrical pins on the<br />
sensor. If the sensor does not pull out immediately, a<br />
gentle rocking motion should help loosen the sensor.<br />
Also try rotating your grip as you pull the sensor. Once<br />
the PID sensor is removed, set it aside to clean or to<br />
inspect for damage or corrosion.<br />
The PID lamp has a white O-ring that keeps it from<br />
sitting too low in the lamp housing. Before reaching for<br />
the lamp, get out the lamp cleaning kit (PN 081-0002-<br />
000), which includes methanol, finger cots, cotton<br />
swabs, and lens tissue. Use finger cots on the fingers<br />
that will handle the lamp.<br />
CAUTION: Never touch the window surface with<br />
anything that might scratch, including your fingers, or<br />
any liquid that might leave a film.<br />
Carefully remove the lamp by grabbing onto the white<br />
O-ring, and set the instrument aside. Dip a cotton swab<br />
into the methanol and wipe the window surface of the<br />
lamp. The sides of the lamp can be cleaned if it is<br />
obviously dirty, but the flat-surface window of the lamp<br />
is the only part of the PID lamp that requires cleaning.<br />
Once the lamp is cleaned, use a piece of the lens tissue<br />
to dry and polish the lamp before dropping it back into<br />
the instrument. If there is visible dirt, clean the lamp<br />
housing prior to placing the lamp back into the<br />
instrument. Do not force the lamp all the way down to<br />
the bottom of the lamp housing. Allow the PID sensor<br />
to push the lamp the rest of the way into place.<br />
2<br />
RAE Systems Inc.<br />
3775 N. First St., San Jose, CA 95134-1708 USA<br />
Phone: +1.888.723.8823<br />
Email: raesales@raesystems.com<br />
Web Site: www.raesystems.com
Technical Note TN-163<br />
rev 5 ab.05-07<br />
To access the UltraRAE lamp for cleaning, you will<br />
need to first remove any RAE-SEP tube from the probe.<br />
Then unscrew the four screws holding the bar code<br />
reader cap to the instrument base. Lift the Bar Code<br />
Reader cap straight off of the instrument base until the<br />
PCB (printed circuit board) clears. Set it aside and<br />
make sure that the screws do not fall out and disappear.<br />
Take the silver sensor adapter off of the PID senso r.<br />
Underneath is a rubber tube connector and a silver<br />
sintered filter. Remove the rubber tube connector with<br />
filter. If it appears to be dirty, it needs to be replaced. A<br />
dirty internal filter indicates that the probe has dirt<br />
inside and requires cleaning. Cleaning the probe<br />
depends on the kind of exposure or dirt that has<br />
contaminated the probe. If it is a chemical that might<br />
affect the reading of the PID, use methanol to clean the<br />
probe. If it is just dirt or dust that has been sucked into<br />
the instrument, blow clean, dry air through the probe to<br />
clear the internal tubing.<br />
bent or the Teflon mask is warped, the sensor needs<br />
replacement. Note: A warped Teflon mask can be a<br />
sign that the sensor has been exposed to too much heat.<br />
Straight Electrodes<br />
with mask removed<br />
for clarity<br />
Good Sensor<br />
(partly disassembled)<br />
Warped<br />
Teflon<br />
Mask<br />
Damaged Sensor<br />
Bent<br />
Electrode<br />
If the sensing electrode is exposed to UV light from the<br />
lamp, it gives an undesired positive response to the<br />
light. If the fingers look aligned but are not in the same<br />
plane (some fingers are bent towards or away from the<br />
lamp), then the sensor should be replaced. The fingers<br />
should be close to, but not touching, the Teflon mask.<br />
In some cases it is possible to carefully bend the<br />
electrodes back into the correct position if the damage is<br />
very minor.<br />
Clean the Sensor Housing<br />
If the PID sensor is not damaged, thoroughly wipe clean<br />
the sensor housing area using a cotton swab dipped in<br />
lamp-cleaning methanol. Let the sensor housing area<br />
dry completely. Reassemble the PID, and perform a<br />
humidity response test. If it shows no response,<br />
calibrate the instrument and return it to service.<br />
Follow the directions for the MiniRAE 2000 and<br />
ppbRAE plus for PID sensor and lamp removal. The<br />
UltraRAE PID sensor and lamp are the same as those in<br />
the MiniRAE 2000.<br />
Sensor<br />
Housing<br />
Inspect the Sensor for Damage or Corrosion<br />
If the sensor appears corroded, it should be replaced. If<br />
the sensor is damaged or even slightly bent, it can show<br />
increased response to moisture. The bias and sensing<br />
electrodes are two sets of “fingers” in the MiniRAE<br />
2000 sensor. These fingers should be straight and<br />
parallel. The bias electrode is easy to see when the<br />
bottom of the sensor is inspected. However, the sensing<br />
electrode should be blocked from sight (and the UV<br />
light from the PID lamp) by a Teflon mask. If the<br />
sensing electrode can be seen because the fingers are<br />
Cleaning the PID Sensor<br />
Cleaning the lamp and sensor surfaces using the lamp<br />
cleaning kit with cotton swabs is not good enough to<br />
remove humidity response. In fact, cotton swabs can<br />
leave behind fibers that continue to cause moisture<br />
issues after cleaning. An ultrasonic cleaning bath<br />
MUST be used. Ultrasonic cleaners are available<br />
from laboratory suppliers. Alternatively, a jewelry<br />
3<br />
RAE Systems Inc.<br />
3775 N. First St., San Jose, CA 95134-1708 USA<br />
Phone: +1.888.723.8823<br />
Email: raesales@raesystems.com<br />
Web Site: www.raesystems.com
Technical Note TN-163<br />
rev 5 ab.05-07<br />
cleaner from a department store can be used. To<br />
clean the sensor, remove it from the instrument<br />
and<br />
immerse it in lamp-cleaning solution (anhydrous<br />
methanol) in a small beaker or baby food jar. Fill the<br />
ultrasonic cleaning bath with water. Place the beaker<br />
containing the sensor into the water bath of the<br />
ultrasonic cleaner. The ultrasonic waves pass through<br />
the water and container and assist in cleaning the<br />
sensor. The lamp-cleaning solution in the jar can be<br />
reused a few times until it becomes dirty. Remove the<br />
through the tube easily. Some heavy vapors such as<br />
diesel fuel or polar compounds such as acetone and<br />
alcohols require extended sampling times. See<br />
Technical Note TN-178 for more details and cautions<br />
on use. (Note that Type I Humidity Filtering tubes<br />
cannot be used during measurements.)<br />
Flex-I-Probe<br />
Tube Tip Breaker<br />
(p/n 021-2400-100)<br />
Tube Adapter<br />
(p/n 025-3002-000)<br />
Humidity Filtering II Tube<br />
(10-pack, p/n 025-2002-010)<br />
Water Bath<br />
Methanol<br />
in Jar<br />
Ultrasonic Cleaner<br />
sensor and allow it to dry for at least a few hours, and<br />
preferably overnight (warm but not hot air will speed<br />
the drying process).<br />
Caution! Do not overheat the sensor, and never<br />
disassemble the sensor!<br />
It is very important to blow or shake out any residual<br />
lamp-cleaning solution from the sensor before letting it<br />
air dry. Otherwise, some of the dirt that was just<br />
extracted into the cleaning solvent could be deposited<br />
back onto the sensor components as they dry.<br />
Reinstall the clean, dry sensor into the MiniRAE 2000.<br />
Exhale into the instrument and check the response. If it<br />
shows no response to the moisture in your breath,<br />
calibrate the instrument and return it to service.<br />
Using Humidity Filtering II tubes<br />
Humidity Filtering Tubes (Type II) can be used to dry<br />
the sample gas and measure many VOCs for about 15<br />
minutes to 1 hour. Their use prevents moisture effects,<br />
even on a dirty sensor. The tubes (p/n 025-2002-010)<br />
are inserted into an adapter (PN 025-3002-000) attached<br />
to a Flex-I-Probe (PN 021-2400-000). Many<br />
compounds such as trichloroethylene and gasoline pass<br />
MultiRAE Plus and EntryRAE<br />
While the MultiRAE and EntryRAE do not normally<br />
have as many issues with dirt in PID sensor,<br />
contamination is possible. The moisture test is done<br />
by cupping your hand over the end or breathing<br />
gently into the end, being careful not to block the air<br />
flow. If the VOC reading increases over 5 ppm<br />
isobutylene, there is a problem with dirt.<br />
Filters<br />
The MultiRAE uses a smaller external filter (PN 008-<br />
3022-001 for a pack of 3, PN 008-3022-010 for a<br />
pack of 10, PN 008-3022-100 for a pack of 100, and<br />
PN 008-3014-000 for a single external filter with<br />
adapter for the silver MultiRAE). This white filter<br />
should be replaced when it is dirty and when the<br />
instrument responds to moisture. If the instrument<br />
goes into pump alarm with the filter attached and is<br />
able to run without any problems when it is not<br />
attached, it is time to replace the filter.<br />
The EntryRAE uses a small external filter (PN 490-<br />
0122-000), which should be replaced when it appears<br />
dirty or when the instrument goes into pump alarm<br />
with the filter attached and clears the pump alarm<br />
when the filter is removed.<br />
MultiRAE PLUS<br />
There are two versions of the MultiRAE Plus, silver<br />
housing and black housing. There are small differences<br />
when cleaning them. If there is a response to moisture,<br />
dirt has gotten to the lamp. Due to the gas flow within<br />
the instrument, if dirt has gotten to the lamp, it has<br />
probably gotten into the filter, pump, tubing (silver<br />
MultiRAE only) and the gas plate.<br />
4<br />
RAE Systems Inc.<br />
3775 N. First St., San Jose, CA 95134-1708 USA<br />
Phone: +1.888.723.8823<br />
Email: raesales@raesystems.com<br />
Web Site: www.raesystems.com
Technical Note TN-163<br />
rev 5 ab.05-07<br />
Pump<br />
Start by replacing the filter, and then work on cleaning<br />
the internal parts of the instrument. Loosen the two<br />
screws on the back of the instrument and remove the<br />
top housing cover. Unplug the battery. If you have a<br />
black-box MultiRAE, you have access to the gas plate,<br />
pump and sensors now. If you have a silver-box<br />
MultiRAE, you still need to unscrew the four screws<br />
holding the gas plate to the instrument. After loosening<br />
the four screws, pull the gas plate off of the silver stand-<br />
plugged into the<br />
offs. Unplug the tubing from the pump and the wiring<br />
PCB.<br />
To clean the tubing, remove both pieces of tubing<br />
from<br />
the instrument and the gas plate and immerse it in<br />
methanol. Agitate it by hand or in an ultrasonic bath.<br />
Remove it and let it dry overnight. The black<br />
MultiRAE does not have tubing, but there are O-rings<br />
in the adapter attached to the tubing. Make sure there is<br />
no dirt in the adapter or O-rings by removing the pump<br />
from the top housing, and unplug the pump from the<br />
adapter. Remove all eight O-rings and inspect the<br />
adapter and O-rings. Clean the adapter and O-rings<br />
with methanol. Dry the O-rings with a piece of the lens<br />
tissue that comes with lamp-cleaning kit. Clean the<br />
pump by removing the four screws that hold the head to<br />
the diaphragm. Use a cotton swab dipped in methanol<br />
to clean all surfaces, including the diaphragm.<br />
Reassemble the pump and set it aside to dry for 5<br />
minutes. Now that everything is removed from the gas<br />
plate, clean the gas plate by pushing air or methanol<br />
through the airflow path. Allow it to dry overnight.<br />
The PID sensor<br />
The PID sensor is covered by a shielding cover that<br />
needs to be removed. This silver cover can be dipped in<br />
methanol to be cleaned. To clean the sensor, remove it<br />
from the instrument and immerse it in lamp-cleaning<br />
solution (anhydrous methanol) in a small beaker or<br />
baby food jar.<br />
Agitate it by hand or in an ultrasonic cleaner. Fill the<br />
ultrasonic cleaning bath with water. Place the beaker<br />
containing the sensor into the water bath of the<br />
ultrasonic cleaner. The ultrasonic waves pass through<br />
the water and container and assist in cleaning the<br />
sensor. The lamp-cleaning solution in the jar can be<br />
reused a few times until it becomes dirty. Remove<br />
the PID sensor and let it dry for at least a few hours,<br />
and preferably overnight (warm but not hot air will<br />
speed the drying process).<br />
Caution! Do not overheat the sensor!<br />
It is very important to blow or shake out any residual<br />
lamp-cleaning solution from the sensor before letting it<br />
air dry. Otherwise, some of the dirt that was just<br />
extracted into the cleaning solvent could be deposited<br />
back onto the sensor components as they dry. Reinstall<br />
the clean, dry sensor into the MultiRAE. Exhale into<br />
the instrument and check the response. If it shows no<br />
response to the moisture in your breath, calibrate the<br />
instrument and return it to service.<br />
EntryRAE<br />
If moisture problems still persist, contact the RAE<br />
Systems Service Department at 888-723-4800.<br />
5<br />
RAE Systems Inc.<br />
3775 N. First St., San Jose, CA 95134-1708 USA<br />
Phone: +1.888.723.8823<br />
Email: raesales@raesystems.com<br />
Web Site: www.raesystems.com