OPERATING INSTRUCTIONS for the heat press Secabo TPD7
OPERATING INSTRUCTIONS for the heat press Secabo TPD7
OPERATING INSTRUCTIONS for the heat press Secabo TPD7

Create successful ePaper yourself
Turn your PDF publications into a flip-book with our unique Google optimized e-Paper software.
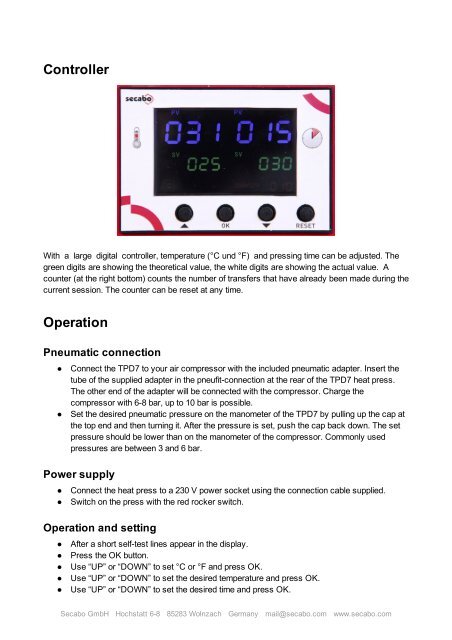
Controller<br />
With a large digital controller, temperature (°C und °F) and <strong>press</strong>ing time can be adjusted. The<br />
green digits are showing <strong>the</strong> <strong>the</strong>oretical value, <strong>the</strong> white digits are showing <strong>the</strong> actual value. A<br />
counter (at <strong>the</strong> right bottom) counts <strong>the</strong> number of transfers that have already been made during <strong>the</strong><br />
current session. The counter can be reset at any time.<br />
Operation<br />
Pneumatic connection<br />
●<br />
●<br />
Connect <strong>the</strong> <strong>TPD7</strong> to your air com<strong>press</strong>or with <strong>the</strong> included pneumatic adapter. Insert <strong>the</strong><br />
tube of <strong>the</strong> supplied adapter in <strong>the</strong> pneufit-connection at <strong>the</strong> rear of <strong>the</strong> <strong>TPD7</strong> <strong>heat</strong> <strong>press</strong>.<br />
The o<strong>the</strong>r end of <strong>the</strong> adapter will be connected with <strong>the</strong> com<strong>press</strong>or. Charge <strong>the</strong><br />
com<strong>press</strong>or with 6-8 bar, up to 10 bar is possible.<br />
Set <strong>the</strong> desired pneumatic <strong>press</strong>ure on <strong>the</strong> manometer of <strong>the</strong> <strong>TPD7</strong> by pulling up <strong>the</strong> cap at<br />
<strong>the</strong> top end and <strong>the</strong>n turning it. After <strong>the</strong> <strong>press</strong>ure is set, push <strong>the</strong> cap back down. The set<br />
<strong>press</strong>ure should be lower than on <strong>the</strong> manometer of <strong>the</strong> com<strong>press</strong>or. Commonly used<br />
<strong>press</strong>ures are between 3 and 6 bar.<br />
Power supply<br />
●<br />
●<br />
Connect <strong>the</strong> <strong>heat</strong> <strong>press</strong> to a 230 V power socket using <strong>the</strong> connection cable supplied.<br />
Switch on <strong>the</strong> <strong>press</strong> with <strong>the</strong> red rocker switch.<br />
Operation and setting<br />
●<br />
●<br />
●<br />
●<br />
●<br />
After a short self-test lines appear in <strong>the</strong> display.<br />
Press <strong>the</strong> OK button.<br />
Use “UP” or “DOWN” to set °C or °F and <strong>press</strong> OK.<br />
Use “UP” or “DOWN” to set <strong>the</strong> desired temperature and <strong>press</strong> OK.<br />
Use “UP” or “DOWN” to set <strong>the</strong> desired time and <strong>press</strong> OK.<br />
<strong>Secabo</strong> GmbH Hochstatt 6-8 85283 Wolnzach Germany mail@secabo.com www.secabo.com