GRC Production - OCV Reinforcements
GRC Production - OCV Reinforcements
GRC Production - OCV Reinforcements

You also want an ePaper? Increase the reach of your titles
YUMPU automatically turns print PDFs into web optimized ePapers that Google loves.
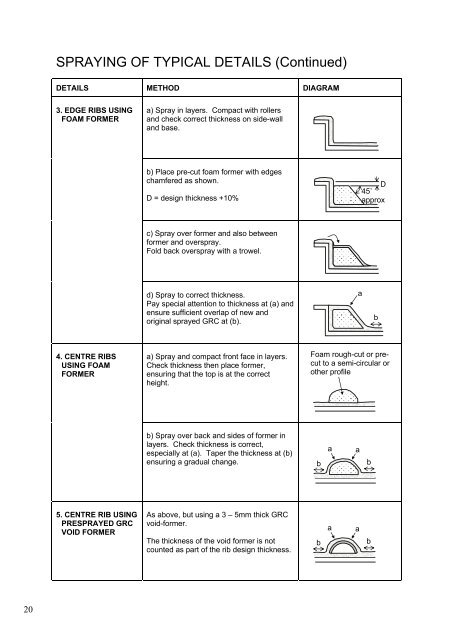
SPRAYING OF TYPICAL DETAILS (Continued)<br />
DETAILS METHOD DIAGRAM<br />
3. EDGE RIBS USING<br />
FOAM FORMER<br />
a) Spray in layers. Compact with rollers<br />
and check correct thickness on side-wall<br />
and base.<br />
b) Place pre-cut foam former with edges<br />
chamfered as shown.<br />
D = design thickness +10%<br />
D<br />
45<br />
approx<br />
c) Spray over former and also between<br />
former and overspray.<br />
Fold back overspray with a trowel.<br />
d) Spray to correct thickness.<br />
Pay special attention to thickness at (a) and<br />
ensure sufficient overlap of new and<br />
original sprayed <strong>GRC</strong> at (b).<br />
a<br />
b<br />
4. CENTRE RIBS<br />
USING FOAM<br />
FORMER<br />
a) Spray and compact front face in layers.<br />
Check thickness then place former,<br />
ensuring that the top is at the correct<br />
height.<br />
Foam rough-cut or precut<br />
to a semi-circular or<br />
other profile<br />
b) Spray over back and sides of former in<br />
layers. Check thickness is correct,<br />
especially at (a). Taper the thickness at (b)<br />
ensuring a gradual change.<br />
b<br />
a<br />
a<br />
b<br />
5. CENTRE RIB USING<br />
PRESPRAYED <strong>GRC</strong><br />
VOID FORMER<br />
As above, but using a 3 – 5mm thick <strong>GRC</strong><br />
void-former.<br />
The thickness of the void former is not<br />
counted as part of the rib design thickness.<br />
b<br />
a<br />
a<br />
b<br />
20<br />
18