
Create successful ePaper yourself
Turn your PDF publications into a flip-book with our unique Google optimized e-Paper software.
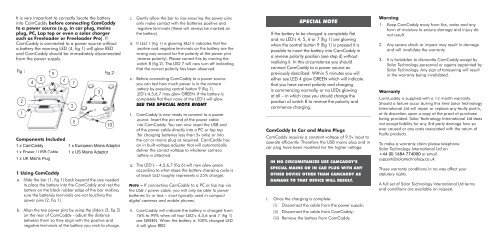
It is very important to correctly locate the battery<br />
into <strong>CamCaddy</strong> before connecting <strong>CamCaddy</strong><br />
to a power source (e.g. in car plug, mains<br />
plug, PC, Lap top or even a solar charger<br />
such as Freeloader or Freeloader Pro). If<br />
<strong>CamCaddy</strong> is connected to a power source without<br />
a battery the warning LED (4, fig 1) will glow RED<br />
and <strong>CamCaddy</strong> should be immediately disconnected<br />
from the power supply.<br />
Fig 1<br />
9<br />
Fig 2<br />
5<br />
4<br />
6<br />
7<br />
2<br />
1<br />
1 Using <strong>CamCaddy</strong><br />
a. Slide the bar (1, fig 1) back beyond the size needed<br />
to place the battery into the <strong>CamCaddy</strong> and rest the<br />
battery on the black rubber edge of the bar making<br />
sure the batteries terminals are not touching the<br />
power pins (2, fig 1).<br />
b. Align the two power pins by using the sliders (3, fig 2)<br />
on the rear of <strong>CamCaddy</strong> - adjust the distance<br />
between them so they align with the positive and<br />
negative terminals of the battery you wish to charge.<br />
2<br />
8<br />
3<br />
10<br />
Components Included<br />
1 x <strong>CamCaddy</strong><br />
1 x European Mains Adaptor<br />
1 x Power / USB Cable 1 x US Mains Adaptor<br />
1 x UK Mains Plug<br />
c. Gently allow the bar to rise ensuring the power pins<br />
only make contact with the batteries positive and<br />
negative terminals (these will always be marked on<br />
the battery).<br />
d. If LED 7 (fig 1) is glowing RED it indicates that the<br />
positive and negative terminals on the battery are the<br />
wrong way around for the polarity of the power pins<br />
(reverse polarity). Please correct this by moving the<br />
switch 8 (fig 2). The LED 7 will now turn off indicating<br />
that the correct polarity has been observed.<br />
e. Before connecting <strong>CamCaddy</strong> to a power source<br />
you can test how much power is in the camera<br />
battery by pressing central button 9 (fig 1).<br />
LED’s 4,5,6,7 may glow GREEN. If the battery is<br />
completely flat then none of the LED’s will glow.<br />
SEE THE SPECIAL NOTE RIGHT<br />
f. <strong>CamCaddy</strong> is now ready to connect to a power<br />
source. Insert the pin end of the power cable<br />
into <strong>CamCaddy</strong>. You can now insert the USB end<br />
of the power cable directly into a PC or lap top<br />
(for charging batteries less than 5v only) or into<br />
the car or mains plug as required. <strong>CamCaddy</strong> has<br />
an in built voltage adjuster that will automatically<br />
deliver the correct voltage to whatever camera<br />
battery is attached.<br />
g. The LED’s – 4,5,6,7 (fig 6) will now glow green<br />
according to what stage the battery charging cycle is<br />
at (each LED roughly represents a 25% charge).<br />
Note – If connecting <strong>CamCaddy</strong> to a PC or lap top via<br />
the USB / power cable, you will only be able to power<br />
batteries 5v or less – most typically used in compact<br />
digital cameras and mobile phones.<br />
h. <strong>CamCaddy</strong> will indicate the battery is charged from<br />
76% to 99% when all four LED’s 4,5,6 and 7 (fig 1)<br />
are GREEN. When the battery is 100% charged LED<br />
4 will glow RED.<br />
<strong>CamCaddy</strong> In Car and Mains Plugs<br />
<strong>CamCaddy</strong> requires a constant voltage of 9.5v input to<br />
operate efficiently. Therefore the USB mains plug and in<br />
car plug have been modified for the higher voltage.<br />
IN NO CIRCUMSTANCES USE CAMCADDY’S<br />
SPECIAL MAINS OR IN CAR PLUG WITH ANY<br />
OTHER DEVICE OTHER THAN CAMCADDY AS<br />
DAMAGE TO THAT DEVICE WILL RESULT.<br />
i. Once the charging is complete:<br />
(i)<br />
SPECIAL NOTE<br />
If the battery to be charged is completely flat<br />
and no LED’s 4, 5, 6 or 7 (fig 1) are glowing<br />
when the central button 9 (fig 1) is pressed it is<br />
possible to insert the battery into <strong>CamCaddy</strong> in<br />
a reverse polarity position (see step d) without<br />
realising it. In this circumstance you should<br />
connect <strong>CamCaddy</strong> to a power source as<br />
previously described. Within 5 minutes you will<br />
either see LED 4 glow GREEN which will indicate<br />
that you have correct polarity and charging<br />
is commencing normally, or no LEDs glowing<br />
at all – in which case you should change the<br />
position of switch 8 to reverse the polarity and<br />
commence charging.<br />
Disconnect the cable from the power supply;<br />
(ii) Disconnect the cable from <strong>CamCaddy</strong>;<br />
(iii) Remove the battery from <strong>CamCaddy</strong>.<br />
Warning<br />
1. Keep <strong>CamCaddy</strong> away from fire, water and any<br />
form of moisture to ensure damage and injury do<br />
not result.<br />
2. Any severe shock or impact may result in damage<br />
and will invalidate the warranty.<br />
3. It is forbidden to dismantle <strong>CamCaddy</strong> except by<br />
Solar Technology personnel or agents appointed by<br />
Solar Technology. Any sign of tampering will result<br />
in the warranty being invalidated.<br />
Warranty<br />
<strong>CamCaddy</strong> is supplied with a 12 month warranty.<br />
Should a failure occur during this time Solar Technology<br />
International Ltd will repair or replace any faulty part/s,<br />
at its discretion upon a copy of the proof of purchase<br />
being provided. Solar Technology International Ltd does<br />
not accept liability for any 3rd party damage how so<br />
ever caused or any costs associated with the return of<br />
faulty products.<br />
To make a warranty claim please telephone<br />
Solar Technology International Ltd on<br />
+44 (0) 1684 774000 or email<br />
support@solartechnology.co.uk<br />
These warranty conditions in no way affect your<br />
statutory rights.<br />
A full set of Solar Technology International Ltd terms<br />
and conditions are available on request.