Create successful ePaper yourself
Turn your PDF publications into a flip-book with our unique Google optimized e-Paper software.
Shrink Wrapping a <strong>Gemini</strong><br />
1– Choose whether you want to remove sails or leave them in place.<br />
2– If you choose to leave the sails in place, run foam padding over sail<br />
cover and around genoa . This helps protect them from the heat.<br />
3– To start running your strapping, take it from your high point at the<br />
mast and run forward to the base of the furling. Then you want to<br />
spread it around on the foredeck under the railings and first set of stanchions.<br />
For the sides you want to tie the strapping off on one side at<br />
the bottom of the stanchion and then run it over the boom to the same<br />
stanchion base on the opposing side. Continue until you get to the<br />
stern. Once you reach the stern you will tie your strapping to the end of<br />
the boom and run the strapping across to the bottom of the railings.<br />
Determine where you are going to install the door so you don't run<br />
strapping across that area. We usually recommend putting the door at the<br />
starboard stern steps. This is so with the boat on land you can access the<br />
boat with the swim ladder. You then have the steps to stand on while unzipping<br />
the doorway. You may have your boat on a lift, in the water or on<br />
the hard so placement of the door could vary with each <strong>Gemini</strong>.<br />
Materials:<br />
By: Steve Pitman<br />
Shrink Wrap— 40ft wide X 45 ft long<br />
Strapping—at least 100 ft<br />
Tape—4 rolls<br />
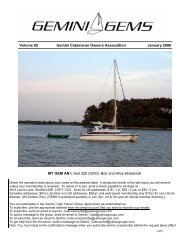
Step 3: Run your strapping<br />
Notice the cuts that allow the wrap to wrap around the stanchions.<br />
Wrapping around the stanchions builds the risk of<br />
bending them.<br />
4– You now want to start pulling the shrink wrap over the<br />
boat. You will need to cut a slot to pull it over the boom and<br />
around the mast. Once you get it pulled from bow to stern you will<br />
use your shrink wrap tape to seal that cut. You then need to take<br />
your time and cut slots for the standing rigging and genoa. As you<br />
get these cut and tapped back up, you will be cutting the width and<br />
tapping it off to the bottom side of the rubrail. Make sure to cut<br />
and install venting fittings, ideally 2 vents per side.<br />
4