What I Tell My Students Part II - Paul J Stankard
What I Tell My Students Part II - Paul J Stankard
What I Tell My Students Part II - Paul J Stankard

Create successful ePaper yourself
Turn your PDF publications into a flip-book with our unique Google optimized e-Paper software.
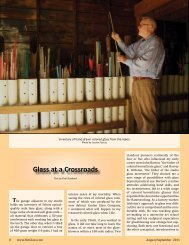
<strong>Stankard</strong> sealing the botanical components<br />
into a design on the gas-fired hot<br />
plate. Photo: Courtesy of Joseph <strong>Stankard</strong><br />
to keep it heated evenly and reasonably<br />
true.<br />
<strong>My</strong> first few paperweights were formed<br />
by gravity and a carbon paddle, and<br />
it didn’t take long to make a cherrywood<br />
mold or cup to shape the glass in.<br />
This idea came from watching furnace<br />
glassblowing demonstrations at Wheaton<br />
Village, now renamed Wheaton Arts. I<br />
remember how excited I was to bring this<br />
furnace working technique into the utility<br />
room to solve my shaping problems at the<br />
flameworking bench.<br />
After the set-up was made, I balled<br />
up the top half of what would become a<br />
paperweight and rested it on the stand.<br />
I then balled up the bottom section and,<br />
with tweezers, picked up the colored glass<br />
inclusion and dropped it on the superheated<br />
surface. With a combination of<br />
dropping and tapping the colored glass<br />
design with tweezers onto the hot surface,<br />
I learned how to get a good seal.<br />
Reheating the top half in my right hand<br />
while splashing the bottom half with my<br />
left hand to keep the glass hot was a good<br />
trick. When the glass was hot enough,<br />
“Whack”—I pushed the two sections<br />
together and hoped for the best. The hotter<br />
the top half-section was, the softer and<br />
better the seal would be, meaning fewer<br />
trapped air bubbles. I used the one-inch<br />
glass rod as a pontil while shaping the bottom.<br />
Next, I stuck up the bottom section<br />
with a Pyrex rod and rounded the top to<br />
finish the piece.<br />
By the time the paperweight was<br />
knocked off the Pyrex pontil into the oven<br />
to anneal, I was on a creative high unlike<br />
anything I experienced in industry and<br />
generally felt drained. <strong>What</strong> was magi-<br />
Middle:<br />
Removing the clear glass gob from the<br />
kiln by sticking up the glass with a pontil<br />
to be reheated.<br />
Bottom:<br />
Pickup. Dropping preheated clear glass<br />
onto preheated colored glass design for<br />
encapsulation. Photos: Courtesy of Joseph <strong>Stankard</strong><br />
April/May 2008