Directions For Use - Dentsply
Directions For Use - Dentsply
Directions For Use - Dentsply
You also want an ePaper? Increase the reach of your titles
YUMPU automatically turns print PDFs into web optimized ePapers that Google loves.
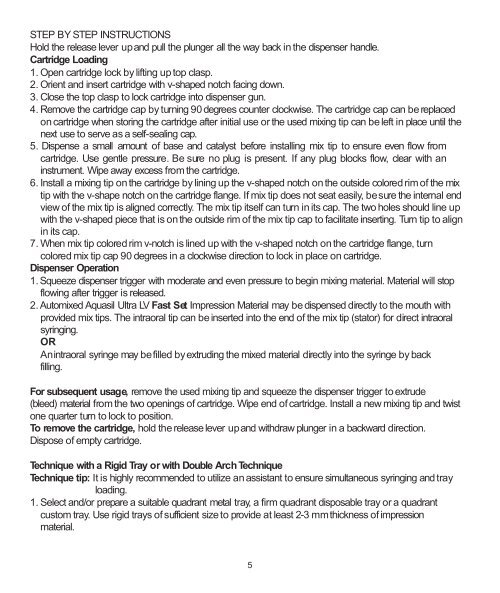
STEP BY STEP INSTRUCTIONS<br />
Hold the release lever upand pull the plunger all the way back in the dispenser handle.<br />
Cartridge Loading<br />
1. Open cartridge lock by lifting up top clasp.<br />
2. Orient and insert cartridge with v-shaped notch facing down.<br />
3. Close the top clasp to lock cartridge into dispenser gun.<br />
4. Remove the cartridge cap by turning 90 degrees counter clockwise. The cartridge cap can be replaced<br />
on cartridge when storing the cartridge after initial use or the used mixing tip can be left in place until the<br />
next use to serve as a self-sealing cap.<br />
5. Dispense a small amount of base and catalyst before installing mix tip to ensure even flow from<br />
cartridge. <strong>Use</strong> gentle pressure. Be sure no plug is present. If any plug blocks flow, clear with an<br />
instrument. Wipe away excess from the cartridge.<br />
6. Install a mixing tip on the cartridge by lining up the v-shaped notch on the outside colored rim of the mix<br />
tip with the v-shape notch on the cartridge flange. If mix tip does not seat easily, besure the internal end<br />
view of the mix tip is aligned correctly. The mix tip itself can turn in its cap. The two holes should line up<br />
with the v-shaped piece that is on the outside rim of the mix tip cap to facilitate inserting. Turn tip to align<br />
in its cap.<br />
7. When mix tip colored rim v-notch is lined up with the v-shaped notch on the cartridge flange, turn<br />
colored mix tip cap 90 degrees in a clockwise direction to lock in place on cartridge.<br />
Dispenser Operation<br />
1. Squeeze dispenser trigger with moderate and even pressure to begin mixing material. Material will stop<br />
flowing after trigger is released.<br />
2. Automixed Aquasil Ultra LV Fast Set Impression Material may be dispensed directly to the mouth with<br />
provided mix tips. The intraoral tip can be inserted into the end of the mix tip (stator) for direct intraoral<br />
syringing.<br />
OR<br />
Anintraoral syringe may befilled byextruding the mixed material directly into the syringe by back<br />
filling.<br />
<strong>For</strong> subsequent usage, remove the used mixing tip and squeeze the dispenser trigger to extrude<br />
(bleed) material from the two openings of cartridge. Wipe end of cartridge. Install a new mixing tip and twist<br />
one quarter turn to lock to position.<br />
To remove the cartridge, hold the release lever upand withdraw plunger in a backward direction.<br />
Dispose of empty cartridge.<br />
Technique with a Rigid Tray or with Double ArchTechnique<br />
Technique tip: It is highly recommended to utilize an assistant to ensure simultaneous syringing and tray<br />
loading.<br />
1. Select and/or prepare a suitable quadrant metal tray, a firm quadrant disposable tray or a quadrant<br />
custom tray. <strong>Use</strong> rigid trays of sufficient size to provide at least 2-3 mmthickness of impression<br />
material.<br />
5


