
You also want an ePaper? Increase the reach of your titles
YUMPU automatically turns print PDFs into web optimized ePapers that Google loves.
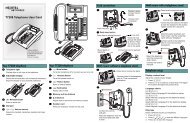
Button inquiry<br />
Memory buttons<br />
More on programming memory buttons<br />
More on making and answering calls<br />
Check what is programmed on your buttons.<br />
1. Press ≤•‚.<br />
2. Press the button(s) that you want to check.<br />
3. Read the display. Button assignment examples are<br />
shown below.<br />
Line<br />
Intercom<br />
XXX (LINENAME)<br />
Internal autodial<br />
Feature<br />
SHOW<br />
4. Press ≤ when finished.<br />
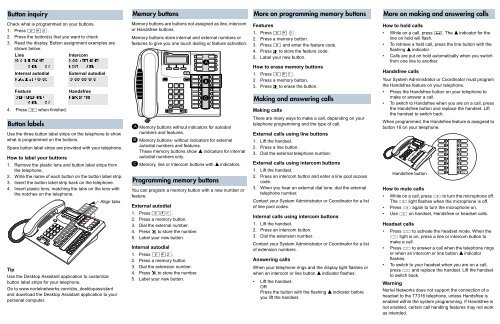
Button labels<br />
OK<br />
Autodial (XXXX)<br />
(FEATURENAME)<br />
SHOW<br />
OK<br />
XXXX (SETNAME)<br />
NEXT<br />
VIEW<br />
External autodial<br />
(XXXXXXXXXX)<br />
Handsfree<br />
Handsfree<br />
Use the three button label strips on the telephone to show<br />
what is programmed on the buttons.<br />
Spare button label strips are provided with your telephone.<br />
How to label your buttons<br />
1. Remove the plastic lens and button label strips from<br />
the telephone.<br />
2. Write the name of each button on the button label strip.<br />
3. Insert the button label strip back on the telephone.<br />
4. Insert plastic lens, matching the tabs on the lens with<br />
the notches on the telephone.<br />
Align tabs<br />
Tip<br />
Use the Desktop Assistant application to customize<br />
button label strips for your telephone.<br />
Go to www.nortelnetworks.com/sbs_desktopassistant<br />
and download the Desktop Assistant application to your<br />
personal computer.<br />
Memory buttons are buttons not assigned as line, intercom<br />
or Handsfree buttons.<br />
Memory buttons store internal and external numbers or<br />
features to give you one touch dialing or feature activation.<br />
A<br />
B<br />
C<br />
Memory buttons without indicators for autodial<br />
numbers and features.<br />
Memory buttons- without indicators for external<br />
autodial numbers and features.<br />
These memory buttons show Ω indicators for internal<br />
autodial numbers only.<br />
Memory, line or intercom buttons with Ω indicators.<br />
Programming memory buttons<br />
You can program a memory button with a new number or<br />
feature.<br />
External autodial<br />
1. Press ≤•⁄.<br />
2. Press a memory button.<br />
3. Dial the external number.<br />
4. Press OK to store the number.<br />
5. Label your new button.<br />
Internal autodial<br />
1. Press ≤•¤.<br />
2. Press a memory button.<br />
3. Dial the extension number.<br />
4. Press OK to store the number.<br />
5. Label your new button.<br />
A<br />
B<br />
C<br />
Features<br />
1. Press ≤• ‹.<br />
2. Press a memory button.<br />
3. Press ≤ and enter the feature code.<br />
4. Press OK to store the feature code.<br />
5. Label your new button.<br />
How to erase memory buttons<br />
1. Press ≤•⁄.<br />
2. Press a memory button.<br />
3. Press OK to erase the button.<br />
Making and answering calls<br />
Making calls<br />
There are many ways to make a call, depending on your<br />
telephone programming and the type of call.<br />
External calls using line buttons<br />
1. Lift the handset.<br />
2. Press a line button.<br />
3. Dial the external telephone number.<br />
External calls using intercom buttons<br />
1. Lift the handset.<br />
2. Press an intercom button and enter a line pool access<br />
code.<br />
3. When you hear an external dial tone, dial the external<br />
telephone number.<br />
Contact your System Administrator or Coordinator for a list<br />
of line pool codes.<br />
Internal calls using intercom buttons<br />
1. Lift the handset.<br />
2. Press an intercom button.<br />
3. Dial the extension number.<br />
Contact your System Administrator or Coordinator for a list<br />
of extension numbers.<br />
Answering calls<br />
When your telephone rings and the display light flashes or<br />
when an intercom or line button Ω indicator flashes:<br />
• Lift the handset.<br />
OR<br />
Press the button with the flashing Ω indicator before<br />
you lift the handset.<br />
How to hold calls<br />
• While on a call, press ≥. The Ω indicator for the<br />
line on hold will flash.<br />
• To retrieve a held call, press the line button with the<br />
flashing Ω indicator.<br />
• Calls are put on hold automatically when you switch<br />
from one line to another.<br />
Handsfree calls<br />
Your System Administrator or Coordinator must program<br />
the Handsfree feature on your telephone.<br />
• Press the Handsfree button on your telephone to<br />
make or answer a call.<br />
• To switch to Handsfree when you are on a call, press<br />
the Handsfree button and replace the handset. Lift<br />
the handset to switch back.<br />
When programmed, the Handsfree feature is assigned to<br />
button 16 on your telephone.<br />
Handsfree button<br />
How to mute calls<br />
• While on a call, press © to turn the microphone off.<br />
The © light flashes when the microphone is off.<br />
• Press © again to turn the microphone on.<br />
• Use © on handset, Handsfree or headset calls.<br />
Headset calls<br />
• Press ¬ to activate the headset mode. When the<br />
¬ light is on, press a line or intercom button to<br />
make a call.<br />
• Press ¬ to answer a call when the telephone rings<br />
or when an intercom or line button Ω indicator<br />
flashes.<br />
• To switch to your headset when you are on a call,<br />
press ¬ and replace the handset. Lift the handset<br />
to switch back.<br />
Warning<br />
<strong>Nortel</strong> Networks does not support the connection of a<br />
headset to the <strong>T7316</strong> telephone, unless Handsfree is<br />
enabled within the system programming. If Handsfree is<br />
not enabled, certain call handling features may not work<br />
as intended.<br />
16