Installation instructions - Sunova
Installation instructions - Sunova
Installation instructions - Sunova

You also want an ePaper? Increase the reach of your titles
YUMPU automatically turns print PDFs into web optimized ePapers that Google loves.
INSTALLATION MANUAL<br />
IEC version<br />
• Do not install SPV modules in a location where it would be immersed in water or continually exposed to water<br />
from a sprinkler or fountain, etc.<br />
• For roof installations, modules should be mounted over a fire resistant covering, with adequate ventilation<br />
between the module backsheet and the mounting surface.<br />
5.3 MODULE TILT ANGLE<br />
Trina Solar SPV modules connected in series should be installed at the same orientation and angle. Differing<br />
orientations or angles may cause a loss of power output due to differing amounts of sunlight exposure for each<br />
module.<br />
Typically, the optimal tilt for a SPV module is roughly the same as the latitude of installation location.<br />
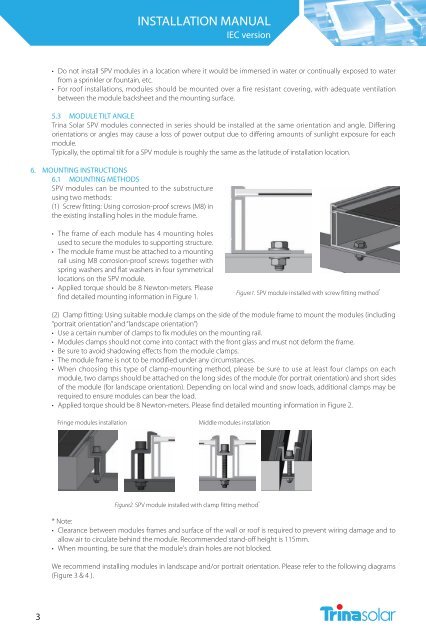
6. MOUNTING INSTRUCTIONS<br />
6.1 MOUNTING METHODS<br />
SPV modules can be mounted to the substructure<br />
using two methods:<br />
(1) Screw fitting: Using corrosion-proof screws (M8) in<br />
the existing installing holes in the module frame.<br />
• The frame of each module has 4 mounting holes<br />
used to secure the modules to supporting structure.<br />
• The module frame must be attached to a mounting<br />
rail using M8 corrosion-proof screws together with<br />
spring washers and flat washers in four symmetrical<br />
locations on the SPV module.<br />
• Applied torque should be 8 Newton-meters. Please<br />
find detailed mounting information in Figure 1.<br />
Figure1. SPV module installed with screw fitting method *<br />
(2) Clamp fitting: Using suitable module clamps on the side of the module frame to mount the modules (including<br />
“portrait orientation” and “landscape orientation”)<br />
• Use a certain number of clamps to fix modules on the mounting rail.<br />
• Modules clamps should not come into contact with the front glass and must not deform the frame.<br />
• Be sure to avoid shadowing effects from the module clamps.<br />
• The module frame is not to be modified under any circumstances.<br />
• When choosing this type of clamp-mounting method, please be sure to use at least four clamps on each<br />
module, two clamps should be attached on the long sides of the module (for portrait orientation) and short sides<br />
of the module (for landscape orientation). Depending on local wind and snow loads, additional clamps may be<br />
required to ensure modules can bear the load.<br />
• Applied torque should be 8 Newton-meters. Please find detailed mounting information in Figure 2.<br />
Fringe modules installation<br />
Middle modules installation<br />
Figure2. SPV module installed with clamp fitting method *<br />
* Note:<br />
• Clearance between modules frames and surface of the wall or roof is required to prevent wiring damage and to<br />
allow air to circulate behind the module. Recommended stand-off height is 115mm.<br />
• When mounting, be sure that the module's drain holes are not blocked.<br />
We recommend installing modules in landscape and/or portrait orientation. Please refer to the following diagrams<br />
(Figure 3 & 4 ).<br />
3