Matthaeus Waissel's Lute Tutorial - Sarge Gerbode's Lute Page
Matthaeus Waissel's Lute Tutorial - Sarge Gerbode's Lute Page
Matthaeus Waissel's Lute Tutorial - Sarge Gerbode's Lute Page

Create successful ePaper yourself
Turn your PDF publications into a flip-book with our unique Google optimized e-Paper software.
On left hand fingering<br />
How to correctly finger each note 4<br />
on the neck, and how to hold the notes until they<br />
have finished sounding for their proper time.<br />
First of all, you must realize and remember that in common chords, the forefinger of the left hand<br />
actually belongs on the first fret, the middle finger on the second, the ring finger on the third, and the<br />
little finger on the fourth. But this rule has very many exceptions; thus the fingers are often<br />
interchanged and are not used always on their own frets but also on other frets, as when the<br />
forefinger is used on the second fret, the middle finger on the first, the ring finger also on the second,<br />
the little finger on the third, etc. The same should be understood of the other frets, if your hand is<br />
moved up and you must play a chord in a higher position. One cannot provide any hard and fast rules<br />
bout this, but must clarify such with examples. Also, from time to time you have to cover two notes<br />
next to each other at one fret with the forefinger, and sometimes you must place the forefinger over<br />
the fingerboard and stop not just one but two or three notes at the same time at one fret with the<br />
forefinger alone. The examples below will illustrate this.<br />
Secondly, when you have stopped a chord, you must not lift any finger from the notes in the chord,<br />
but remain on the notes for the duration of the beat, so that the note finishes ringing at the right time,<br />
unless it is necessary to lift a finger for coloraturas [ornamental passages] or some such. This is so<br />
that the voices are not interrupted but keep their complete sound. But this is especially important to<br />
pay attention to in the bass, for if the bass notes don’t sound for their full length, the piece is bare and<br />
has neither art nor beauty.<br />
But so that you may fully understand all of this, I will illustrate fingerings on all frets with some<br />
examples, from the bottom right to the top, and place these before your eyes, so that the rest [of the<br />
fingerings] will come easily of themselves, and so that you will not lack anything if you will pay<br />
close attention. And I will begin with the easiest and most common chords. 5<br />
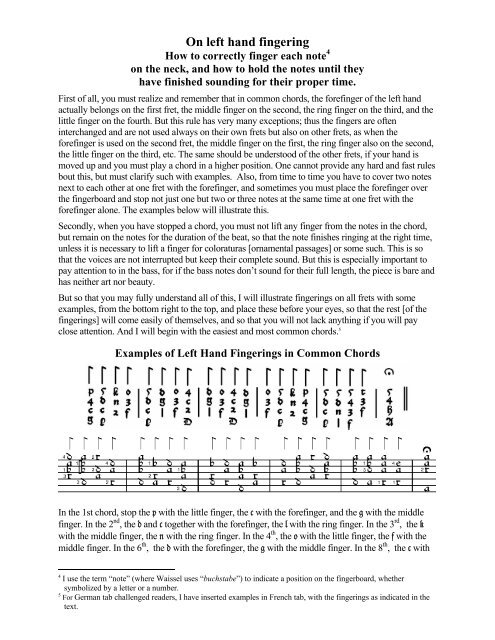
Examples of Left Hand Fingerings in Common Chords<br />
In the 1st chord, stop the p with the little finger, the c with the forefinger, and the g with the middle<br />
finger. In the 2 nd , the d and c together with the forefinger, the l with the ring finger. In the 3 rd , the k<br />
with the middle finger, the n with the ring finger. In the 4 th , the o with the little finger, the f with the<br />
middle finger. In the 6 th , the d with the forefinger, the g with the middle finger. In the 8 th , the c with<br />
4<br />
I use the term “note” (where Waissel uses “buchstabe”) to indicate a position on the fingerboard, whether<br />
symbolized by a letter or a number.<br />
5 For German tab challenged readers, I have inserted examples in French tab, with the fingerings as indicated in the<br />
text.

![Finale 2005b - [BWV846-Prelude in C.MUS]](https://img.yumpu.com/43978887/1/190x245/finale-2005b-bwv846-prelude-in-cmus.jpg?quality=85)
![Finale 2005b - [AirG-TAB.MUS] - Richard Yates Classical Guitar ...](https://img.yumpu.com/37104901/1/190x245/finale-2005b-airg-tabmus-richard-yates-classical-guitar-.jpg?quality=85)