Clinical Techniques in Dentistry - Flax Dental
Clinical Techniques in Dentistry - Flax Dental
Clinical Techniques in Dentistry - Flax Dental

Create successful ePaper yourself
Turn your PDF publications into a flip-book with our unique Google optimized e-Paper software.
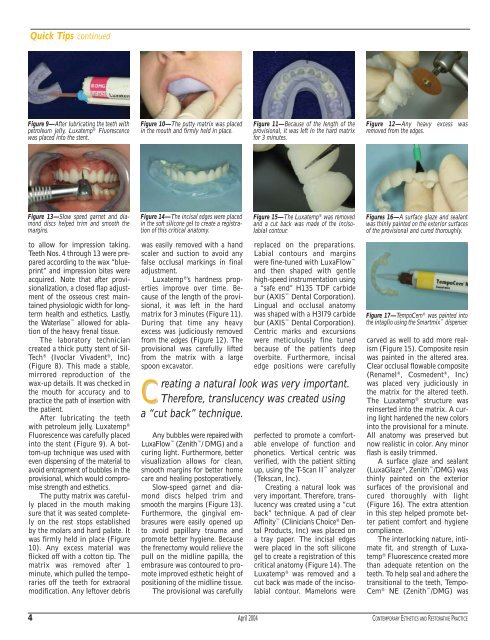
Quick Tips cont<strong>in</strong>ued<br />
Figure 9—After lubricat<strong>in</strong>g the teeth with<br />
petroleum jelly, Luxatemp ® Fluorescence<br />
was placed <strong>in</strong>to the stent.<br />
Figure 10—The putty matrix was placed<br />
<strong>in</strong> the mouth and firmly held <strong>in</strong> place.<br />
Figure 11—Because of the length of the<br />
provisional, it was left <strong>in</strong> the hard matrix<br />
for 3 m<strong>in</strong>utes.<br />
Figure 12—Any heavy excess was<br />
removed from the edges.<br />
Figure 13—Slow speed garnet and diamond<br />
discs helped trim and smooth the<br />
marg<strong>in</strong>s.<br />
Figure 14—The <strong>in</strong>cisal edges were placed<br />
<strong>in</strong> the soft silicone gel to create a registration<br />
of this critical anatomy.<br />
Figure 15—The Luxatemp ® was removed<br />
and a cut back was made of the <strong>in</strong>cisolabial<br />
contour.<br />
Figures 16—A surface glaze and sealant<br />
was th<strong>in</strong>ly pa<strong>in</strong>ted on the exterior surfaces<br />
of the provisional and cured thoroughly.<br />
to allow for impression tak<strong>in</strong>g.<br />
Teeth Nos. 4 through 13 were prepared<br />
accord<strong>in</strong>g to the wax “bluepr<strong>in</strong>t”<br />
and impression bites were<br />
acquired. Note that after provisionalization,<br />
a closed flap adjustment<br />
of the osseous crest ma<strong>in</strong>ta<strong>in</strong>ed<br />
physiologic width for longterm<br />
health and esthetics. Lastly,<br />
the Waterlase allowed for ablation<br />
of the heavy frenal tissue.<br />
The laboratory technician<br />
created a thick putty stent of Sil-<br />
Tech ® (Ivoclar Vivadent ® , Inc)<br />
(Figure 8). This made a stable,<br />
mirrored reproduction of the<br />
wax-up details. It was checked <strong>in</strong><br />
the mouth for accuracy and to<br />
practice the path of <strong>in</strong>sertion with<br />
the patient.<br />
After lubricat<strong>in</strong>g the teeth<br />
with petroleum jelly, Luxatemp ®<br />
Fluorescence was carefully placed<br />
<strong>in</strong>to the stent (Figure 9). A bottom-up<br />
technique was used with<br />
even dispens<strong>in</strong>g of the material to<br />
avoid entrapment of bubbles <strong>in</strong> the<br />
provisional, which would compromise<br />
strength and esthetics.<br />
The putty matrix was carefully<br />
placed <strong>in</strong> the mouth mak<strong>in</strong>g<br />
sure that it was seated completely<br />
on the rest stops established<br />
by the molars and hard palate. It<br />
was firmly held <strong>in</strong> place (Figure<br />
10). Any excess material was<br />
flicked off with a cotton tip. The<br />
matrix was removed after 1<br />
m<strong>in</strong>ute, which pulled the temporaries<br />
off the teeth for extraoral<br />
modification. Any leftover debris<br />
was easily removed with a hand<br />
scaler and suction to avoid any<br />
false occlusal mark<strong>in</strong>gs <strong>in</strong> f<strong>in</strong>al<br />
adjustment.<br />
Luxatemp ® ’s hardness properties<br />
improve over time. Because<br />
of the length of the provisional,<br />
it was left <strong>in</strong> the hard<br />
matrix for 3 m<strong>in</strong>utes (Figure 11).<br />
Dur<strong>in</strong>g that time any heavy<br />
excess was judiciously removed<br />
from the edges (Figure 12). The<br />
provisional was carefully lifted<br />
from the matrix with a large<br />
spoon excavator.<br />
Any bubbles were repaired with<br />
LuxaFlow (Zenith /DMG) and a<br />
cur<strong>in</strong>g light. Furthermore, better<br />
visualization allows for clean,<br />
smooth marg<strong>in</strong>s for better home<br />
care and heal<strong>in</strong>g postoperatively.<br />
Slow-speed garnet and diamond<br />
discs helped trim and<br />
smooth the marg<strong>in</strong>s (Figure 13).<br />
Furthermore, the g<strong>in</strong>gival embrasures<br />
were easily opened up<br />
to avoid papillary trauma and<br />
promote better hygiene. Because<br />
the frenectomy would relieve the<br />
pull on the midl<strong>in</strong>e papilla, the<br />
embrasure was contoured to promote<br />
improved esthetic height of<br />
position<strong>in</strong>g of the midl<strong>in</strong>e tissue.<br />
The provisional was carefully<br />
replaced on the preparations.<br />
Labial contours and marg<strong>in</strong>s<br />
were f<strong>in</strong>e-tuned with LuxaFlow <br />
and then shaped with gentle<br />
high-speed <strong>in</strong>strumentation us<strong>in</strong>g<br />
a “safe end” H135 TDF carbide<br />
bur (AXIS <strong>Dental</strong> Corporation).<br />
L<strong>in</strong>gual and occlusal anatomy<br />
was shaped with a H3l79 carbide<br />
bur (AXIS <strong>Dental</strong> Corporation).<br />
Centric marks and excursions<br />
were meticulously f<strong>in</strong>e tuned<br />
because of the patient’s deep<br />
overbite. Furthermore, <strong>in</strong>cisal<br />
edge positions were carefully<br />
Creat<strong>in</strong>g a natural look was very important.<br />
Therefore, translucency was created us<strong>in</strong>g<br />
a “cut back” technique.<br />
perfected to promote a comfortable<br />
envelope of function and<br />
phonetics. Vertical centric was<br />
verified, with the patient sitt<strong>in</strong>g<br />
up, us<strong>in</strong>g the T-Scan II analyzer<br />
(Tekscan, Inc).<br />
Creat<strong>in</strong>g a natural look was<br />
very important. Therefore, translucency<br />
was created us<strong>in</strong>g a “cut<br />
back” technique. A pad of clear<br />
Aff<strong>in</strong>ity (Cl<strong>in</strong>ician’s Choice ® <strong>Dental</strong><br />
Products, Inc) was placed on<br />
a tray paper. The <strong>in</strong>cisal edges<br />
were placed <strong>in</strong> the soft silicone<br />
gel to create a registration of this<br />
critical anatomy (Figure 14). The<br />
Luxatemp ® was removed and a<br />
cut back was made of the <strong>in</strong>cisolabial<br />
contour. Mamelons were<br />
Figure 17—TempoCem ® was pa<strong>in</strong>ted <strong>in</strong>to<br />
the <strong>in</strong>taglio us<strong>in</strong>g the Smartmix dispenser.<br />
carved as well to add more realism<br />
(Figure 15). Composite res<strong>in</strong><br />
was pa<strong>in</strong>ted <strong>in</strong> the altered area.<br />
Clear occlusal flowable composite<br />
(Renamel ® , Cosmedent ® , Inc)<br />
was placed very judiciously <strong>in</strong><br />
the matrix for the altered teeth.<br />
The Luxatemp ® structure was<br />
re<strong>in</strong>serted <strong>in</strong>to the matrix. A cur<strong>in</strong>g<br />
light hardened the new colors<br />
<strong>in</strong>to the provisional for a m<strong>in</strong>ute.<br />
All anatomy was preserved but<br />
now realistic <strong>in</strong> color. Any m<strong>in</strong>or<br />
flash is easily trimmed.<br />
A surface glaze and sealant<br />
(LuxaGlaze ® , Zenith /DMG) was<br />
th<strong>in</strong>ly pa<strong>in</strong>ted on the exterior<br />
surfaces of the provisional and<br />
cured thoroughly with light<br />
(Figure 16). The extra attention<br />
<strong>in</strong> this step helped promote better<br />
patient comfort and hygiene<br />
compliance.<br />
The <strong>in</strong>terlock<strong>in</strong>g nature, <strong>in</strong>timate<br />
fit, and strength of Luxatemp<br />
® Fluorescence created more<br />
than adequate retention on the<br />
teeth. To help seal and adhere the<br />
transitional to the teeth, Tempo-<br />
Cem ® NE (Zenith /DMG) was<br />
4 April 2004 CONTEMPORARY ESTHETICS AND RESTORATIVE PRACTICE