

AxIAl sCx-10 sCAlE Off ROAD tRuCk - CML Distribution
AxIAl sCx-10 sCAlE Off ROAD tRuCk - CML Distribution
AxIAl sCx-10 sCAlE Off ROAD tRuCk - CML Distribution

Create successful ePaper yourself
Turn your PDF publications into a flip-book with our unique Google optimized e-Paper software.
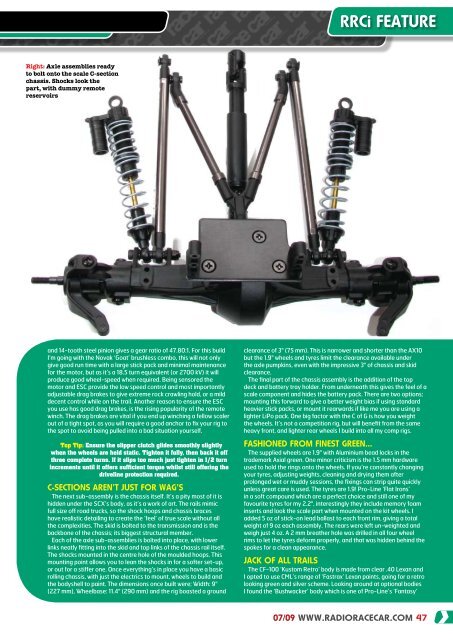
Right: Axle assemblies ready<br />
to bolt onto the scale C-section<br />
chassis. Shocks look the<br />
part, with dummy remote<br />
reservoirs<br />
and 14-tooth steel pinion gives a gear ratio of 47.80:1. For this build<br />
I’m going with the Novak ‘Goat’ brushless combo, this will not only<br />
give good run time with a large stick pack and minimal maintenance<br />
for the motor, but as it’s a 18.5 turn equivalent (or 2700 kV) it will<br />
produce good wheel-speed when required. Being sensored the<br />
motor and ESC provide the low speed control and most importantly<br />
adjustable drag brakes to give extreme rock crawling hold, or a mild<br />
decent control while on the trail. Another reason to ensure the ESC<br />
you use has good drag brakes, is the rising popularity of the remote<br />
winch. The drag brakes are vital if you end up winching a fellow scaler<br />
out of a tight spot, as you will require a good anchor to fix your rig to<br />
the spot to avoid being pulled into a bad situation yourself.<br />
Top Tip: Ensure the slipper clutch glides smoothly slightly<br />
when the wheels are held static. Tighten it fully, then back it off<br />
three complete turns. If it slips too much just tighten in 1/2 turn<br />
increments until it offers sufficient torque whilst still offering the<br />
driveline protection required.<br />
C-sECtIONs AREN’t Just fOR WAg’s<br />
The next sub-assembly is the chassis itself. It’s a pity most of it is<br />
hidden under the SCX’s body, as it’s a work of art. The rails mimic<br />
full size off road trucks, so the shock hoops and chassis braces<br />
have realistic detailing to create the ‘feel’ of true scale without all<br />
the complexities. The skid is bolted to the transmission and is the<br />
backbone of the chassis; its biggest structural member.<br />
Each of the axle sub-assemblies is bolted into place, with lower<br />
links neatly fitting into the skid and top links of the chassis rail itself.<br />
The shocks mounted in the centre hole of the moulded hoops. This<br />
mounting point allows you to lean the shocks in for a softer set-up,<br />
or out for a stiffer one. Once everything’s in place you have a basic<br />
rolling chassis, with just the electrics to mount, wheels to build and<br />
the bodyshell to paint. The dimensions once built were; Width: 9"<br />
(227 mm), Wheelbase: 11.4" (290 mm) and the rig boasted a ground<br />
RRCi fEAtuRE<br />
clearance of 3" (75 mm). This is narrower and shorter than the AX<strong>10</strong><br />
but the 1.9" wheels and tyres limit the clearance available under<br />
the axle pumpkins, even with the impressive 3" of chassis and skid<br />
clearance.<br />
The final part of the chassis assembly is the addition of the top<br />
deck and battery tray holder. From underneath this gives the feel of a<br />
scale component and hides the battery pack. There are two options;<br />
mounting this forward to give a better weight bias if using standard<br />
heavier stick packs, or mount it rearwards if like me you are using a<br />
lighter LiPo pack. One big factor with the C of G is how you weight<br />
the wheels. It’s not a competition rig, but will benefit from the same<br />
heavy front, and lighter rear wheels I build into all my comp rigs.<br />
fAsHIONED fROM fINEst gREEN…<br />
The supplied wheels are 1.9" with Aluminium bead locks in the<br />
trademark Axial green. One minor criticism is the 1.5 mm hardware<br />
used to hold the rings onto the wheels. If you’re constantly changing<br />
your tyres, adjusting weights, cleaning and drying them after<br />
prolonged wet or muddy sessions, the fixings can strip quite quickly<br />
unless great care is used. The tyres are 1.9! Pro-Line ‘Flat Irons’<br />
in a soft compound which are a perfect choice and still one of my<br />
favourite tyres for my 2.2", interestingly they include memory foam<br />
inserts and look the scale part when mounted on the kit wheels. I<br />
added 5 oz of stick-on lead ballast to each front rim, giving a total<br />
weight of 9 oz each assembly. The rears were left un-weighted and<br />
weigh just 4 oz. A 2 mm breather hole was drilled in all four wheel<br />
rims to let the tyres deform properly, and that was hidden behind the<br />
spokes for a clean appearance.<br />
JACk Of All tRAIls<br />
The CF-<strong>10</strong>0 ‘Kustom Retro’ body is made from clear .40 Lexan and<br />
I opted to use <strong>CML</strong>’s range of ‘Fastrax’ Lexan paints, going for a retro<br />
looking green and silver scheme. Looking around at optional bodies<br />
I found the ‘Bushwacker’ body which is one of Pro-Line’s ‘Fantasy’<br />
07/09 WWW.RADIORACECAR.COM 47


