
You also want an ePaper? Increase the reach of your titles
YUMPU automatically turns print PDFs into web optimized ePapers that Google loves.
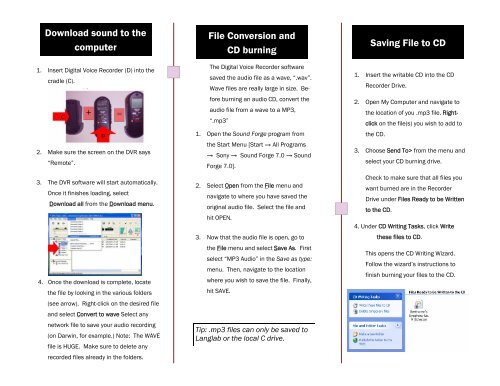
Download sound to the<br />
computer<br />
1. Insert Digital Voice Recorder (D) into the<br />
cradle (C).<br />
2. Make sure the screen on the DVR says<br />
“Remote”.<br />
3. The DVR software will start automatically.<br />
Once it finishes loading, select<br />
Download all from the Download menu.<br />
4. Once the download is complete, locate<br />
the file by looking in the various folders<br />
(see arrow). Right-click on the desired file<br />
<strong>and</strong> select Convert to wave Select any<br />
network file to save your audio recording<br />
(on Darwin, for example.) Note: The WAVE<br />
file is HUGE. Make sure to delete any<br />
recorded files already in the folders.<br />
File Conversion <strong>and</strong><br />
CD burning<br />
The Digital Voice Recorder software<br />
saved the audio file as a wave, “.wav”.<br />
Wave files are really large in size. Before<br />
burning an audio CD, convert the<br />
audio file from a wave to a MP3,<br />
“.mp3”<br />
1. Open the <strong>Sound</strong> Forge program from<br />
the Start Menu [Start → All Programs<br />
→ Sony → <strong>Sound</strong> Forge 7.0 → <strong>Sound</strong><br />
Forge 7.0].<br />
2. Select Open from the File menu <strong>and</strong><br />
navigate to where you have saved the<br />
original audio file. Select the file <strong>and</strong><br />
hit OPEN.<br />
3. Now that the audio file is open, go to<br />
the File menu <strong>and</strong> select Save As. First<br />
select “MP3 Audio” in the Save as type:<br />
menu. Then, navigate to the location<br />
where you wish to save the file. Finally,<br />
hit SAVE.<br />
Tip: .mp3 files can only be saved to<br />
Langlab or the local C drive.<br />
<strong>Saving</strong> File to CD<br />
1. Insert the writable CD into the CD<br />
Recorder Drive.<br />
2. Open My Computer <strong>and</strong> navigate to<br />
the location of you .mp3 file. Rightclick<br />
on the file(s) you wish to add to<br />
the CD.<br />
3. Choose Send To> from the menu <strong>and</strong><br />
select your CD burning drive.<br />
Check to make sure that all files you<br />
want burned are in the Recorder<br />
Drive under Files Ready to be Written<br />
to the CD.<br />
4. Under CD Writing Tasks, click Write<br />
these files to CD.<br />
This opens the CD Writing Wizard.<br />
Follow the wizard’s instructions to<br />
finish burning your files to the CD.