Chess Horizons - The Massachusetts Chess Association
Chess Horizons - The Massachusetts Chess Association
Chess Horizons - The Massachusetts Chess Association

You also want an ePaper? Increase the reach of your titles
YUMPU automatically turns print PDFs into web optimized ePapers that Google loves.
Having come back from a material<br />
disadvantage thanks to those darn<br />
tricky Knights and their forks, I decided<br />
to violate endgame principles and<br />
make an additional pawn exchange<br />
in hopes of getting Ed's Rook close<br />
enough for a magical series of surprising<br />
and deadly Knight moves. This is<br />
the "praying to Caissa" approach.<br />
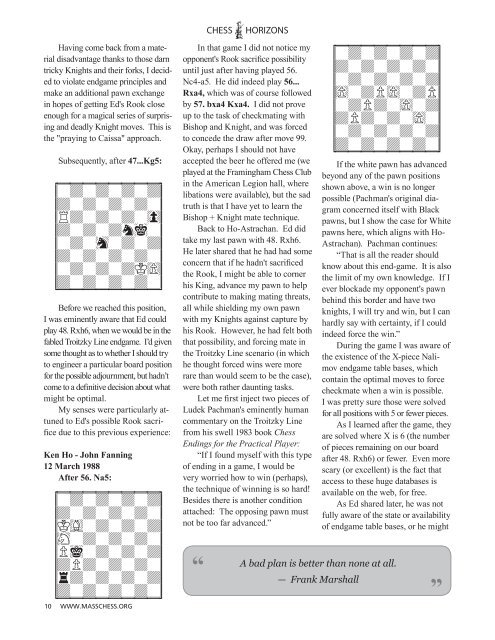
Subsequently, after 47...Kg5:<br />
cuuuuuuuuC<br />
{wdwdwdwd}<br />
{dwdwdwdw}<br />
{Rdwdwdw0}<br />
{dwdwdniw}<br />
{wdwhwdwd}<br />
{dwdwdwdw}<br />
{wdwdwdK)}<br />
{dwdwdwdw}<br />
vllllllllV<br />
Before we reached this position,<br />
I was eminently aware that Ed could<br />
play 48. Rxh6, when we would be in the<br />
fabled Troitzky Line endgame. I’d given<br />
some thought as to whether I should try<br />
to engineer a particular board position<br />
for the possible adjournment, but hadn’t<br />
come to a definitive decision about what<br />
might be optimal.<br />
My senses were particularly attuned<br />
to Ed's possible Rook sacrifice<br />
due to this previous experience:<br />
Ken Ho - John Fanning<br />
12 March 1988<br />
After 56. Na5:<br />
cuuuuuuuuC<br />
{wdwdwdwd}<br />
{dwdwdwdw}<br />
{KGwdwdwd}<br />
{Hwdwdwdw}<br />
{Piwdwdwd}<br />
{dPdwdwdw}<br />
{rdwdwdwd}<br />
{dwdwdwdw}<br />
vllllllllV<br />
10 WWW.MASSCHESS.ORG<br />
In that game I did not notice my<br />
opponent's Rook sacrifice possibility<br />
until just after having played 56.<br />
Nc4-a5. He did indeed play 56...<br />
Rxa4, which was of course followed<br />
by 57. bxa4 Kxa4. I did not prove<br />
up to the task of checkmating with<br />
Bishop and Knight, and was forced<br />
to concede the draw after move 99.<br />
Okay, perhaps I should not have<br />
accepted the beer he offered me (we<br />
played at the Framingham <strong>Chess</strong> Club<br />
in the American Legion hall, where<br />
libations were available), but the sad<br />
truth is that I have yet to learn the<br />
Bishop + Knight mate technique.<br />
Back to Ho-Astrachan. Ed did<br />
take my last pawn with 48. Rxh6.<br />
He later shared that he had had some<br />
concern that if he hadn't sacrificed<br />
the Rook, I might be able to corner<br />
his King, advance my pawn to help<br />
contribute to making mating threats,<br />
all while shielding my own pawn<br />
with my Knights against capture by<br />
his Rook. However, he had felt both<br />
that possibility, and forcing mate in<br />
the Troitzky Line scenario (in which<br />
he thought forced wins were more<br />
rare than would seem to be the case),<br />
were both rather daunting tasks.<br />
Let me first inject two pieces of<br />
Ludek Pachman's eminently human<br />
commentary on the Troitzky Line<br />
from his swell 1983 book <strong>Chess</strong><br />
Endings for the Practical Player:<br />
“If I found myself with this type<br />
of ending in a game, I would be<br />
very worried how to win (perhaps),<br />
the technique of winning is so hard!<br />
Besides there is another condition<br />
attached: <strong>The</strong> opposing pawn must<br />
not be too far advanced.”<br />
“<br />
cuuuuuuuuC<br />
{wdwdwdwd}<br />
{dwdwdwdw}<br />
{wdwdwdwd}<br />
{)wdP)wdP}<br />
{wdPdw)wd}<br />
{dPdwdw)w}<br />
{wdwdwdwd}<br />
{dwdwdwdw}<br />
vllllllllV<br />
If the white pawn has advanced<br />
beyond any of the pawn positions<br />
shown above, a win is no longer<br />
possible (Pachman's original diagram<br />
concerned itself with Black<br />
pawns, but I show the case for White<br />
pawns here, which aligns with Ho-<br />
Astrachan). Pachman continues:<br />
“That is all the reader should<br />
know about this end-game. It is also<br />
the limit of my own knowledge. If I<br />
ever blockade my opponent's pawn<br />
behind this border and have two<br />
knights, I will try and win, but I can<br />
hardly say with certainty, if I could<br />
indeed force the win.”<br />
During the game I was aware of<br />
the existence of the X-piece Nalimov<br />
endgame table bases, which<br />
contain the optimal moves to force<br />
checkmate when a win is possible.<br />
I was pretty sure those were solved<br />
for all positions with 5 or fewer pieces.<br />
As I learned after the game, they<br />
are solved where X is 6 (the number<br />
of pieces remaining on our board<br />
after 48. Rxh6) or fewer. Even more<br />
scary (or excellent) is the fact that<br />
access to these huge databases is<br />
available on the web, for free.<br />
As Ed shared later, he was not<br />
fully aware of the state or availability<br />
of endgame table bases, or he might<br />
A bad plan is better than none at all.<br />
— Frank Marshall<br />
”